Deleting Inventory Records in Alma
updated: 1/9/2025
Getting Started in Resource Management
These instructions are for deleting “local” records. Local records are in your library’s Institution Zone and may be linked to the Network Zone or Community Zone, as opposed to records in the Network Zone or Community Zone that are not linked to the Institution Zone.
Throughout these instructions we recommend deleting unused bibliographic and holdings records, however you may choose to keep them in the IZ.
Roles:
- Physical Inventory Operator with the Physical Inventory Operator Extended roles permit deleting item and holding records.
- Electronic Inventory Operator with the Electronic Inventory Operator Extended roles permit deleting portfolios and electronic collections.
- Cataloger Extended with either the Cataloger or the Catalog Manager role permits the deleting of bibliographic records in the Metadata Editor.
- Catalog Manager or the Repository Manager role permits the deleting of inventory using jobs.
Sections below:
- Deleting a Single Item
- Deleting Holdings and Bibliographic Records Without Items
- Deleting Bibliographic Records Without Holdings or Item Records
- Deleting a Single Portfolio
- Deleting a Single Portfolio that is Part of a Local or Community Zone Electronic Collection
- Deleting an Electronic Collection and its Associated Bibliographic Records and Portfolios
- Deleting Items in Batch with a Spreadsheet
- Deleting Records in Batch Using Sets
Deleting a Single Item
Deleting records starts at the item and then Alma will prompt with options on what to do with the holding and bibliographic records.
- Perform a search for the item record. A simple way to find the item is by doing a Physical Titles search by barcode.
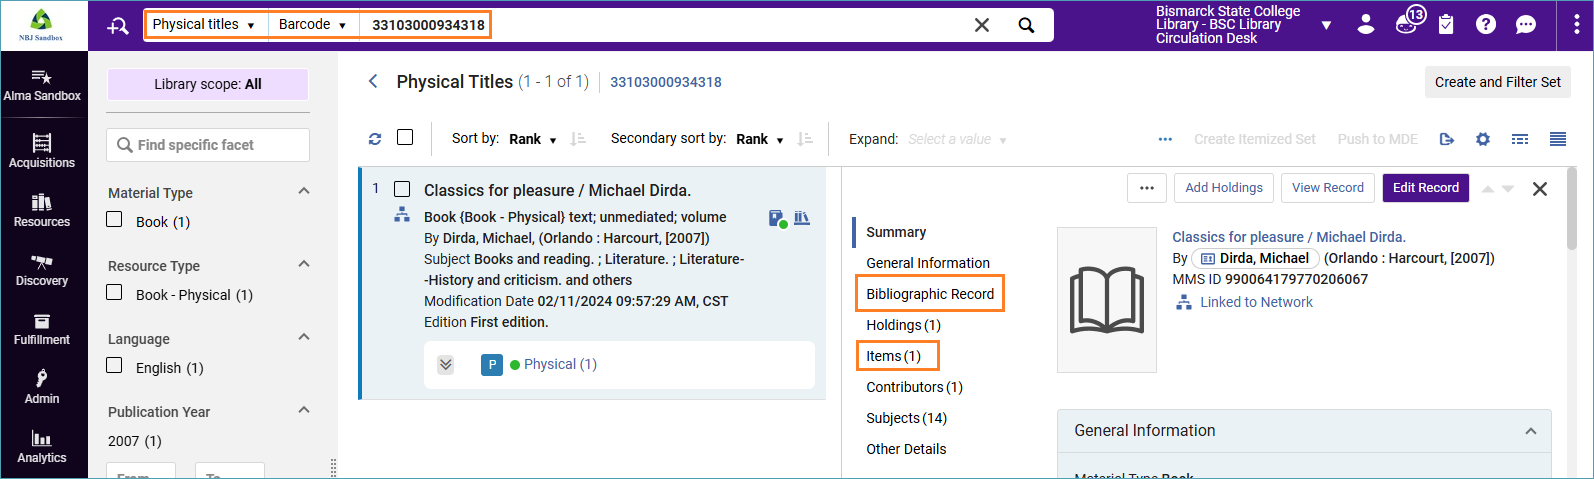
- Click on the Bibliographic Record link and note the OCLC number for updating holdings in OCLC if your library manages your holdings there.
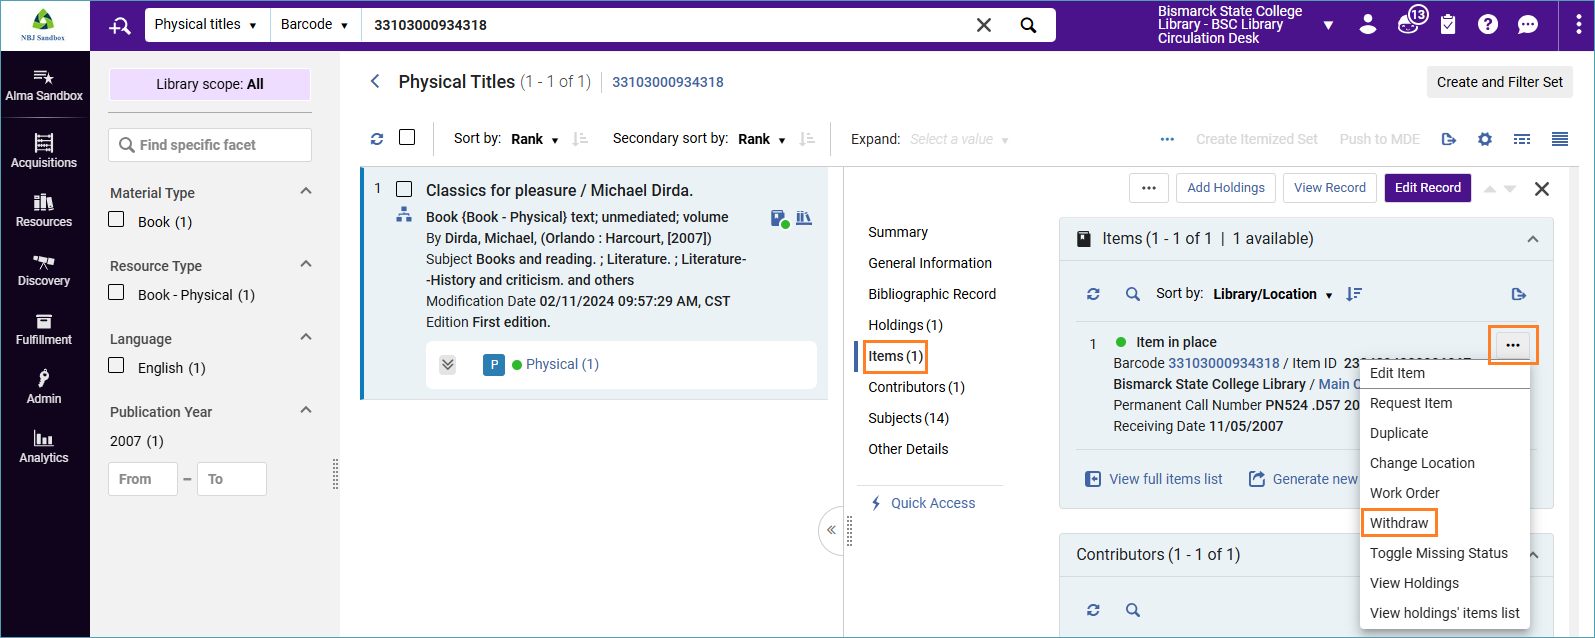
- Then, click the Items link, click the action menu, and select Withdraw.
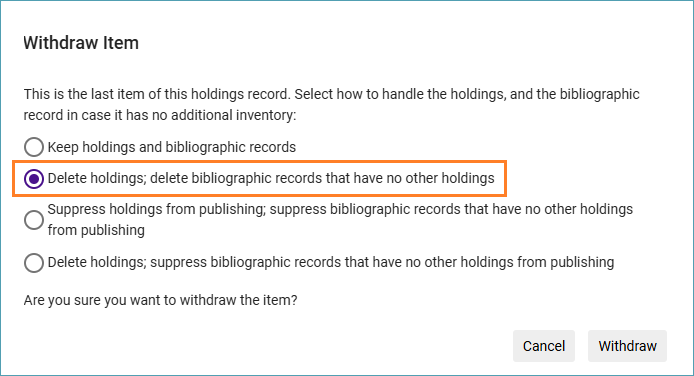
- This withdraw dialog box appears. When deleting the last/only item, it is recommended that you delete the bibliographic and holdings records.
- You can also delete multiple items on a title by clicking View full items list.
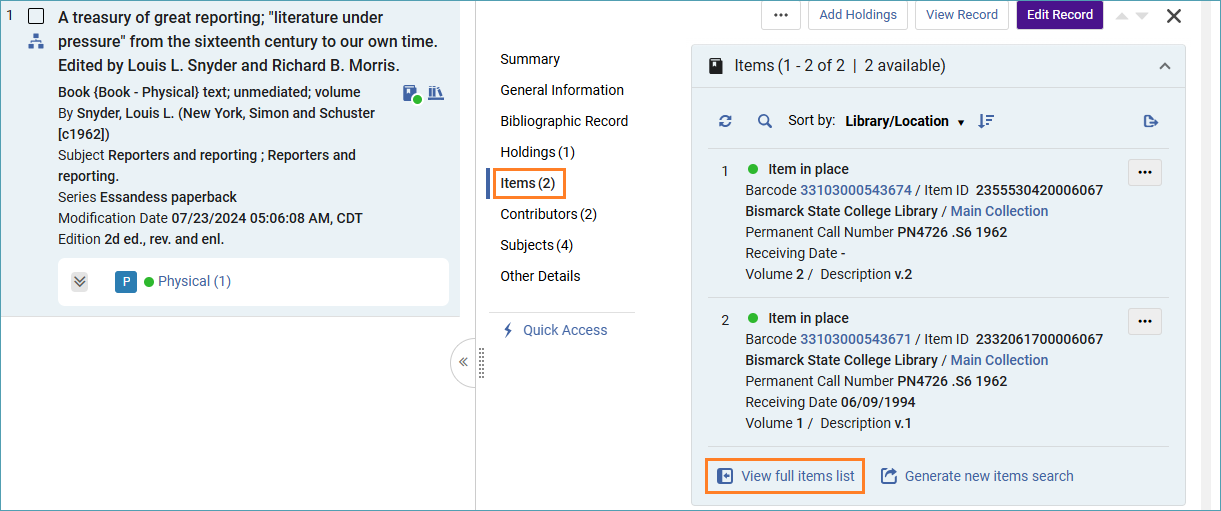
- Then click the check boxes next to the items to be deleted, click Manage Selected, and click Withdraw items.

Deleting Holdings and Bibliographic Records Without Items
- View the bibliographic record in the Metadata Editor. From the View Related Data menu, select View Inventory.

- Review the record to make sure there are no items then click Edit to open the holdings record in the Metadata Editor.
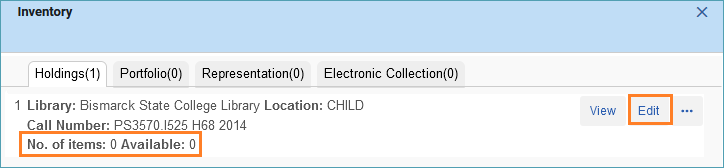
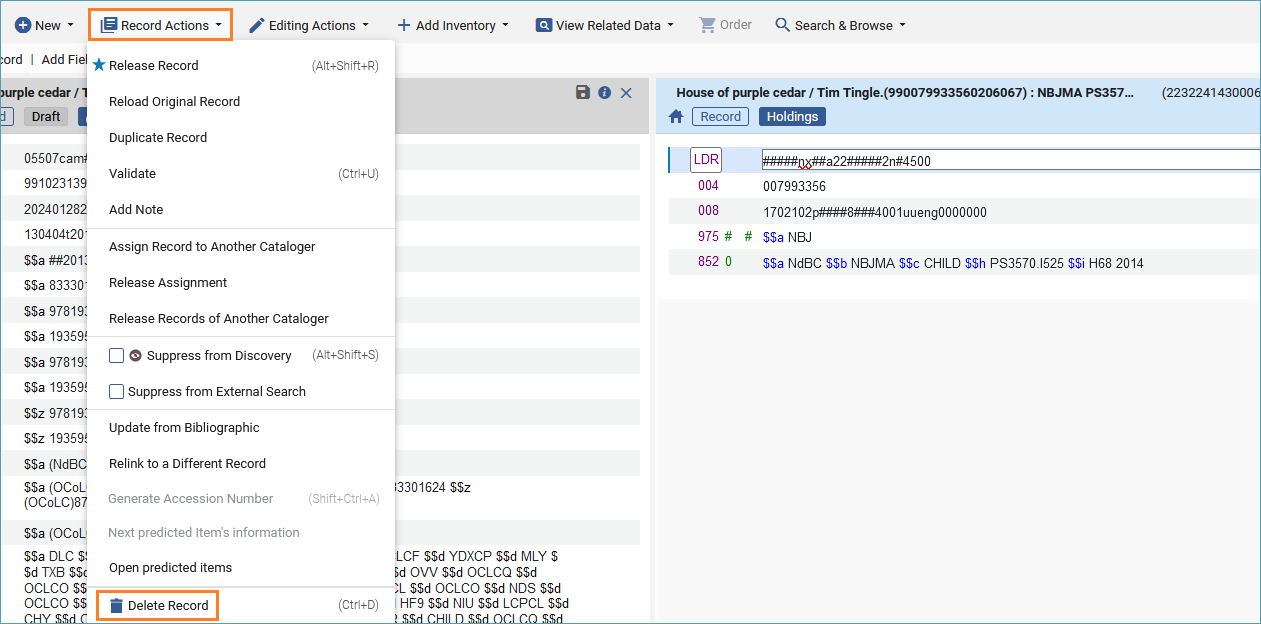
- Click the Record Actions menu and select Delete Record.
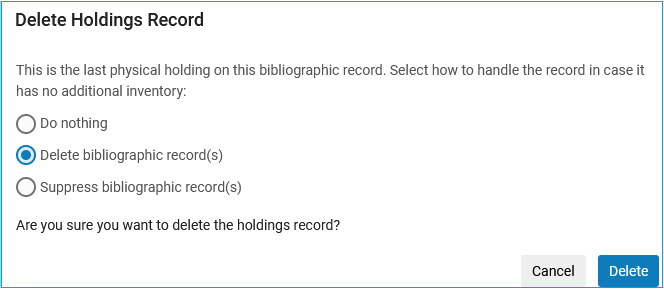
- The delete holdings record confirmation message appears, select Delete bibliographic record(s)(recommended) and click Delete.
Deleting Bibliographic Records Without Holdings or Item Records
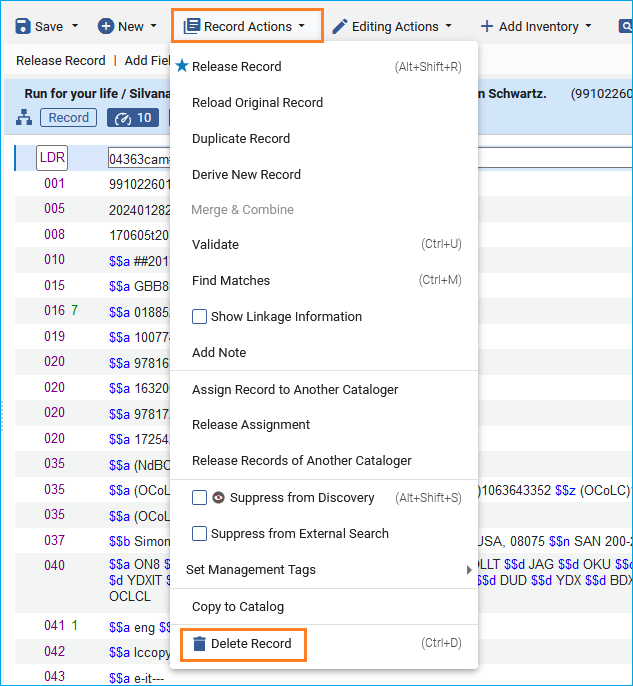
- Open the bibliographic record in the Metadata Editor.
- Under the Record Actions menu select Delete Record.
- A confirmation screen appears. Click Yes.
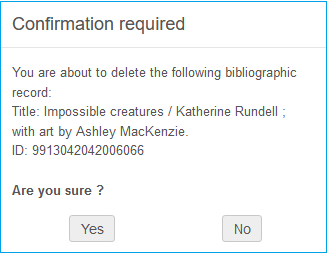
- When the record is linked to the Network Zone, and other institutions have holdings attached to it, you will receive an error message: “Bibliographic Title … cannot be deleted as it has: some members have a local version of this record that cannot be deleted.”

- In this case, select Copy to Catalog under the Record Action menu.
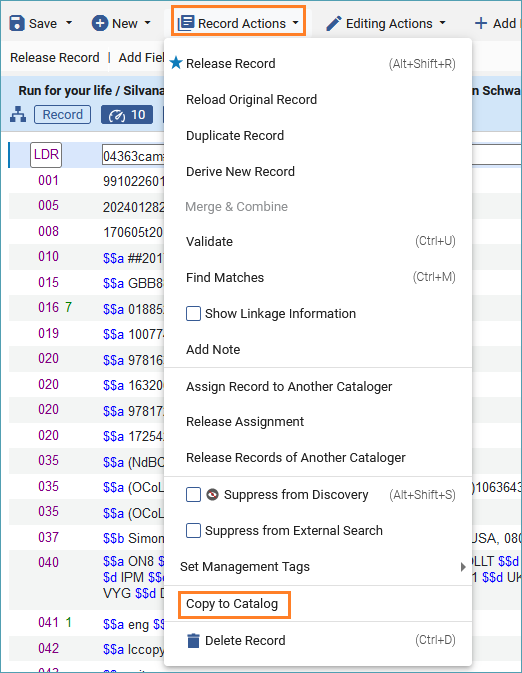
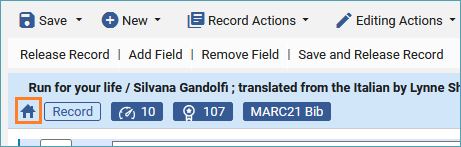
- You will note the icon on the record changes to the “House” icon indicating the record is not linked to the Network Zone.
- Now you can delete the record as outlined in step 2. Click the Record Actions menu and select Delete Record.
Deleting a Single Portfolio
Deleting records starts at the portfolio and then Alma will prompt with options on what to do with the bibliographic record. To delete a standalone portfolio:
- Locate the portfolio in Alma. Click the title to view the bibliographic record and note the OCLC number for updating holdings in OCLC if your library manages your holdings there.
- From the action menu, select Delete.
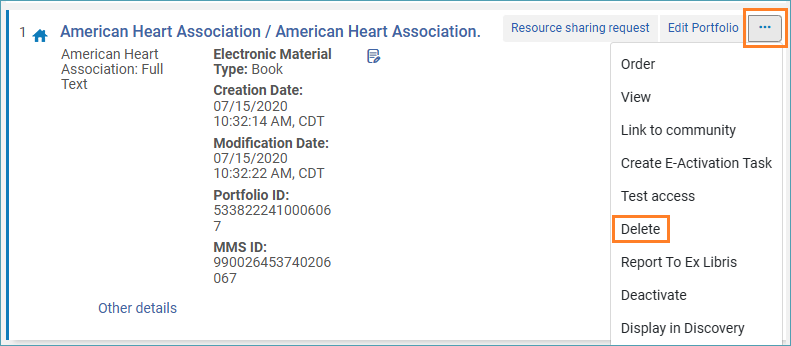
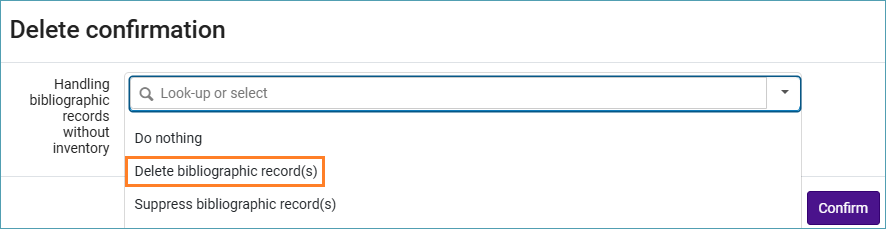
- A delete confirmation box appears, and here you select to delete the bibliographic record (recommended.)
Deleting a Single Portfolio that is Part of a Local or Community Zone Electronic Collection
Note: if you are deleting a large number of portfolios, it is better to put them in a set and delete them using the Delete Electronic Portfolios job. The documentation states that deleting a large number from Alma's search results can affect system performance.
- Locate the electronic collection in Alma and click the Edit Collection button.
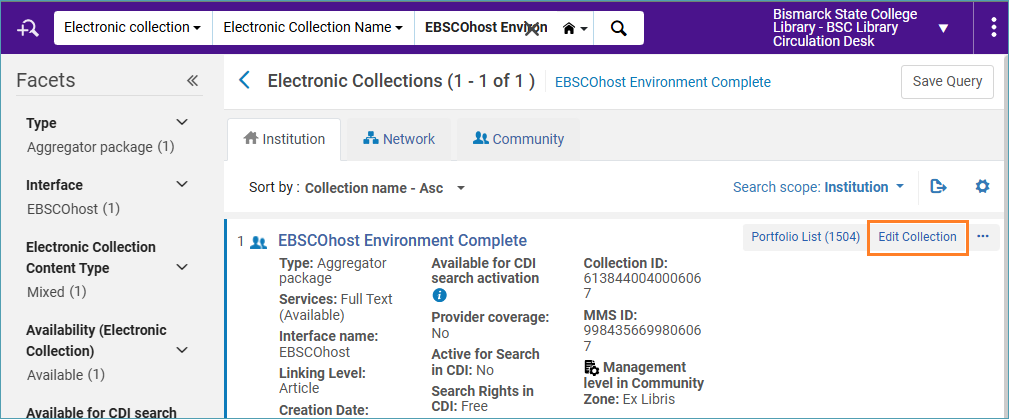
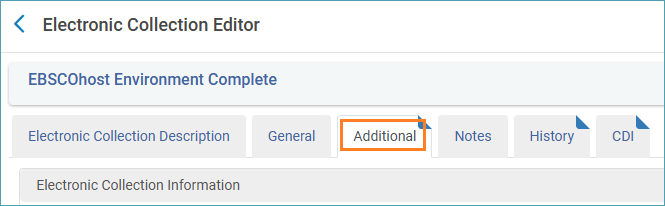
- From the Additional tab, scroll down the screen to the Services. Click the action menu and select Portfolio List.

- Select the portfolio you want to delete. You can search the list by ISBN, ISSN, and title. Check the box next to the portfolio and click Delete Selected.
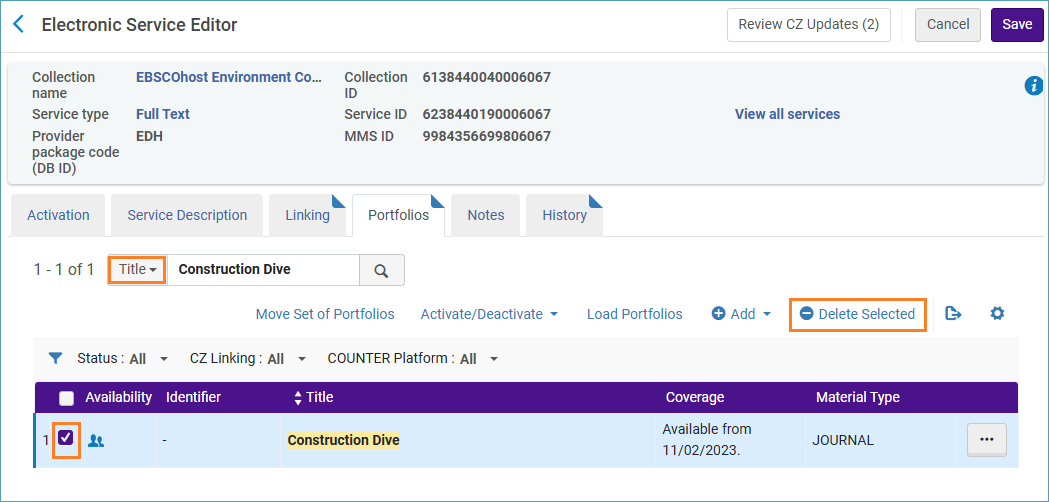
- A delete confirmation box appears. If this is the last portfolio on the bibliographic record you will have the option to delete the bibliographic record (recommended.)
Deleting an Electronic Collection and its Associated Bibliographic Records and Portfolios
- Find the Electronic Collection by performing a search on Electronic Collection by Electronic Collection Name.
- On the action menu select Delete.
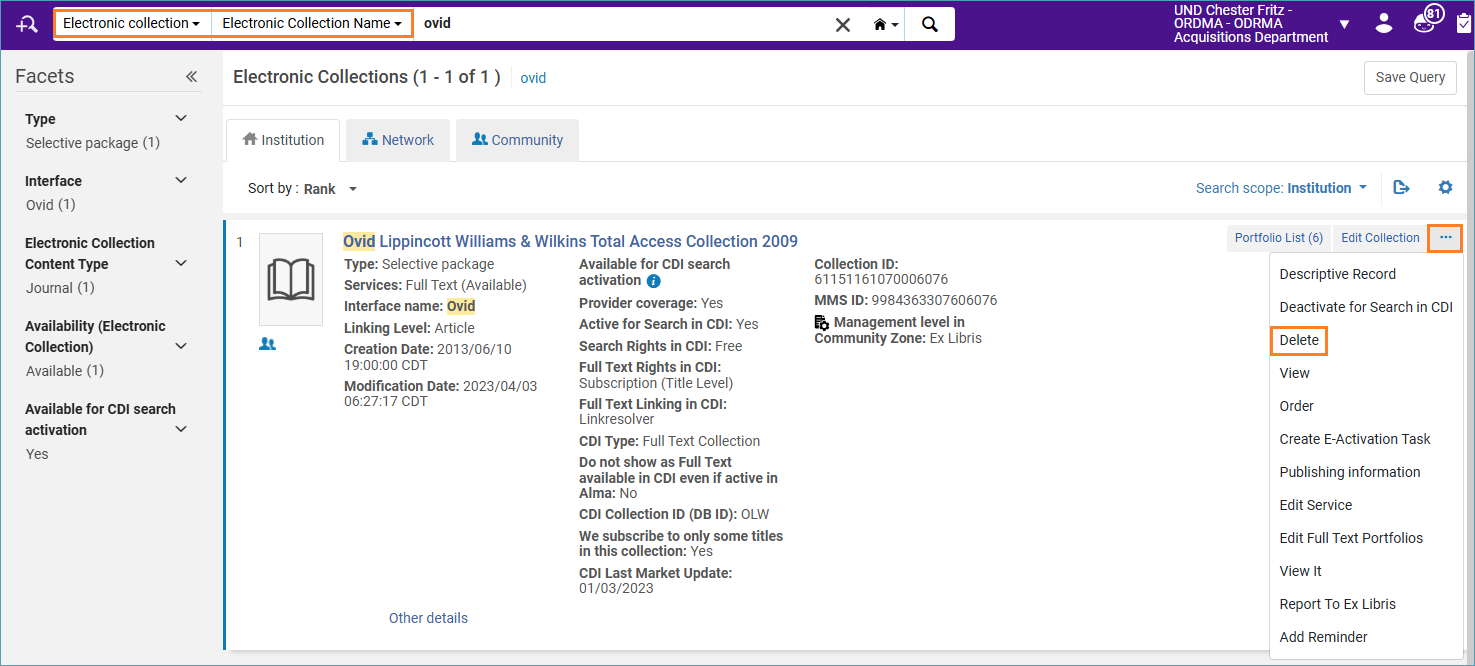
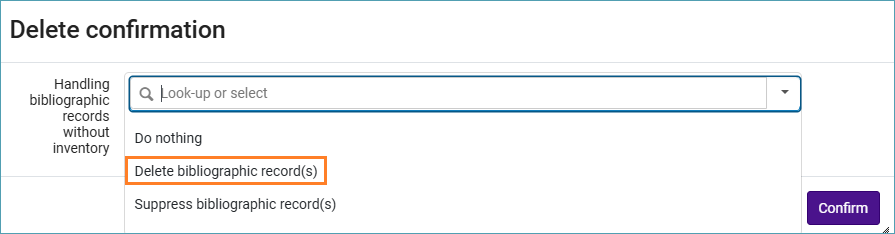
- A confirmation screen appears, select delete bibliographic records (recommended) and click Confirm.
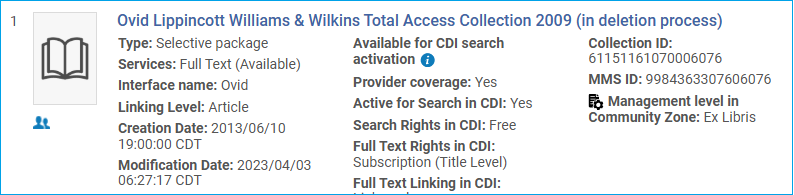
- Deleting an electronic collection sets off a job to deactivate and delete the electronic collection and its associated inventory. Note the electronic collection has the phrase (in deletion process). Wait until the deletion is complete before activating any new collections that may overlap with the one being deleted.
Deleting Items in Batch with a Spreadsheet
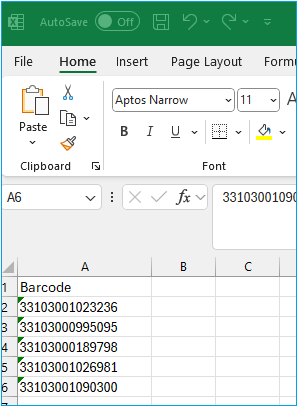
- Scan the barcodes of items into the first column of an Excel sheet. The column heading should be “Barcode.”
- To create a set from the Excel sheet, go to the Admin menu, under the heading Manage Jobs and Sets, click Manage Sets.
- Click the Create Itemized Set button.

- Give the set a name, make sure the set content type is Physical items, and the selection for Add items to set is “From file.”

- Upload or drop your file into the form and click Create.
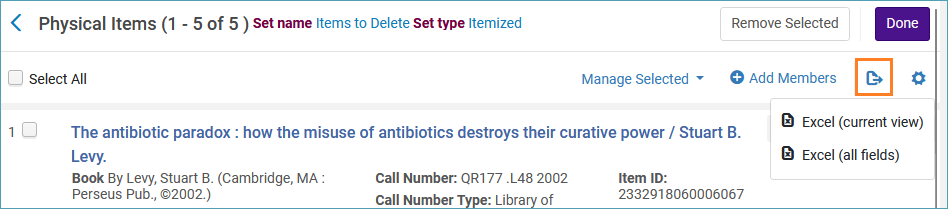
- (Optional) If you need to retrieve OCLC numbers for the items you are deleting to update holdings in OCLC, click the Content button to display a list of the items in Alma.

Then click the Export list icon to export the list of items as an Excel sheet.
The MMS ID numbers for each title appear on the spreadsheet. You can copy these into the analytics criteria to get the OCLC numbers. See instructions here.
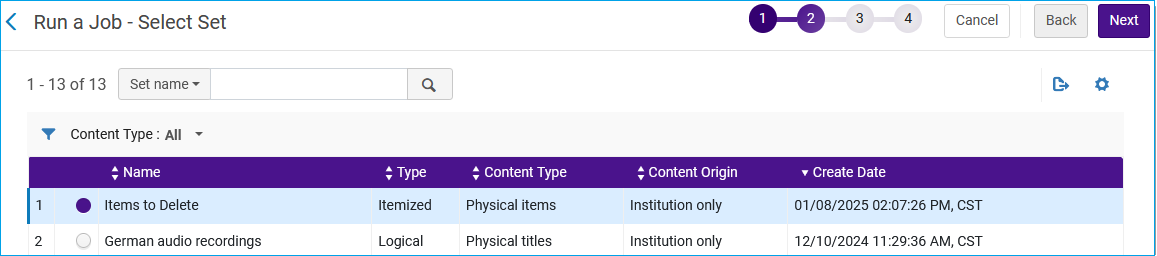
- When you are ready to delete the items, go to the Admin menu, and under the heading Manage Jobs and Sets, select Run a Job.
- Find the Withdraw Physical Items job, select it and click Next.
- Select the set and click Next.
- The task parameters screen appears. The recommended settings are below, but you may do what suits your library.
Recommended:
- Delete holdings; delete bibliographic records that have no other holdings.
- Check- Do not withdraw items with active requests.
- Check- Do not withdraw items with non-active requests in the queue.
- Check- Do not withdraw items with work orders.
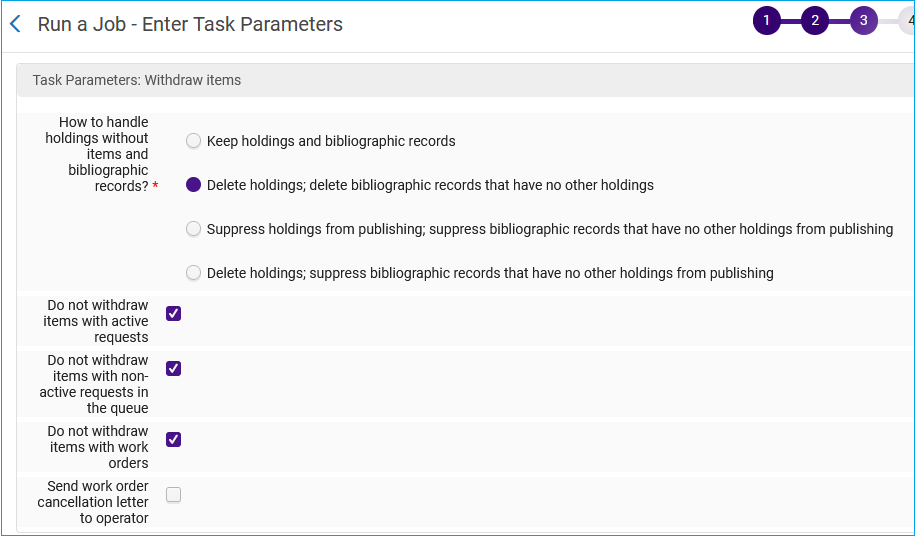
- Review the job settings, click Submit, then click Confirm when prompted.
Note: You can also create an itemized set using analytics. Here’s a link to that documentation (opens in new window).
Deleting Records in Batch Using Sets
You can create a set of records with a query and then run a job for that record type to delete the records.
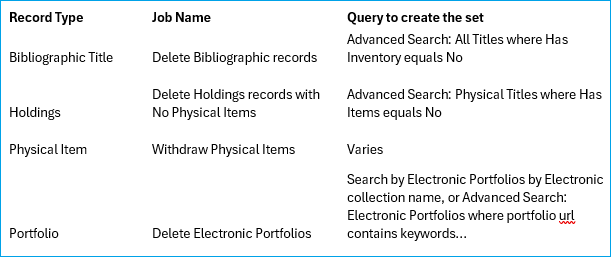
Example below: Holdings records with no items attached
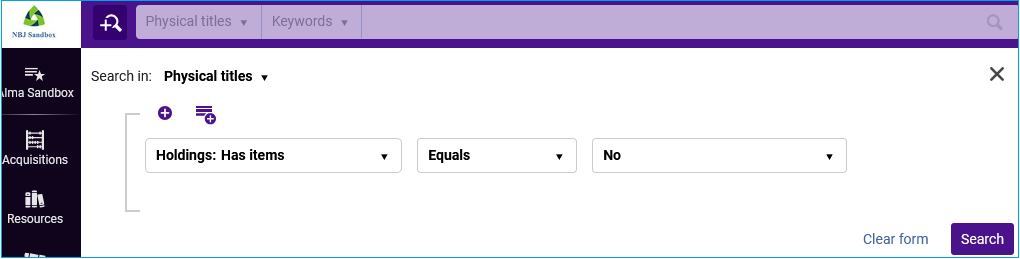
- To find holdings records without items, conduct an advanced Physical titles search where Has items equals No.
- When the search results appear, create a set by clicking on Create and Filter Set.

- Give the set a name, and description if desired, and click Save.
- When the set is created, click on Admin and under the heading Manage Jobs and Sets, select Run a Job.
- Find the job called Delete Holdings records with no Physical items. Select it and click Next.
- Select the set of records you created and click Next.
- On the task parameters page, you can choose to limit the deletions to a certain library and location, or to filter them by an indication rule. Select delete (recommended) or suppress bibliographic records.
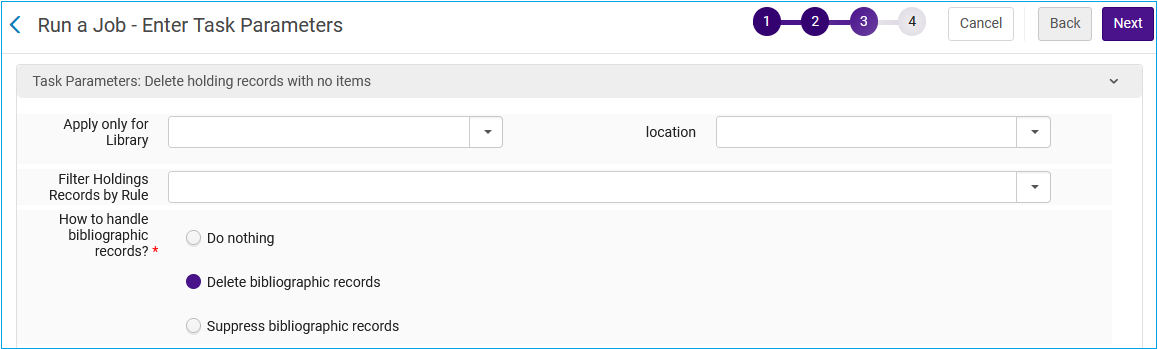
- The review page appears click Submit.
Related Trainings:
Copy Cataloging With Search Resources in the Metadata Editor
Add a Local Extension Field to a Bibliographic Record
Placement Options in the Metadata Editor
How to Add a Portfolio to a Bibliographic Record
Marking Items as Missing in Alma
How to Create Brief Bibliographic Records in the Metadata Editor