Basic Cataloging in Alma
(updated: 06/05/2025)
There Are Three Zones in Alma
- Institution Zone- the institutio's local records and inventory
- Network Zone- shared bibliographic records for ODIN libraries
- Community Zone- the electronic resources available for all Alma libraries
Examples of the kinds of records found in each zone:
Institution Zone (IZ)
- Bibliographic records for course reserves and other bibliographic records
- Vendor bibliographic records that the library is not allowed to share (proprietary vendor records)
- Inventory records: holdings records, item records, portfolio records, purchase order lines, purchase orders, invoices, vendor records
Network Zone (NZ)
- Bibliographic records, practically all bibliographic records should reside in the Network Zone to facilitate collaboration.
- Electronic collections and portfolios that are shared among ODIN libraries. Electronic collections purchased with a statewide contract are managed in the Network Zone.
Community Zone (CZ)
- Records for activating electronic collections, which are often vendor-supplied records. These are comprised of collection records and portfolios.
- Global authority records, including Library of Congress Subject Headings, Library of Congress Name Authorities, and MESH headings.
How Records in Each Zone Appear in Alma
Search Results From the IZ Search
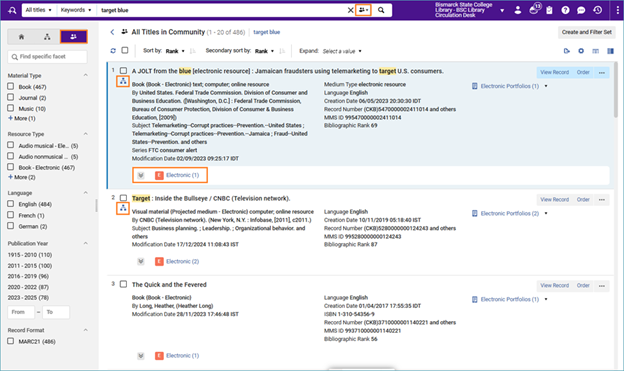
Here is an All Titles search in the Institution Zone (IZ) showing what records look like. In the search box, the house icon indicates it is an IZ search.
- The top result is a record that is linked to the Network Zone (NZ).
- The second record is a local record in the IZ and doesn't have an icon next to it.
- The gray pane on the left margin has the IZ house icon highlighted in purple. You can click the icon for another zone and the search results will update to that zone.
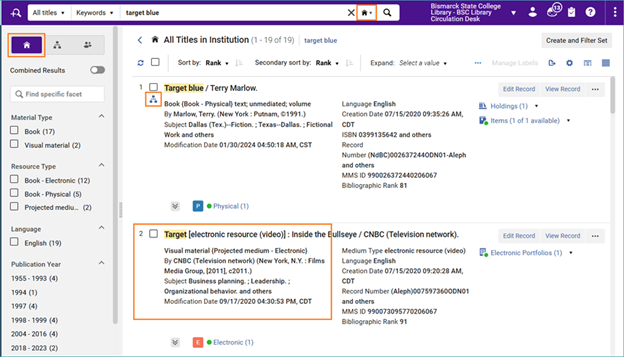
- The second screenshot show the Community Zone (CZ) icon next to the second result. Bibliographic records from the CZ appear when electronic resources are activated in the CZ.
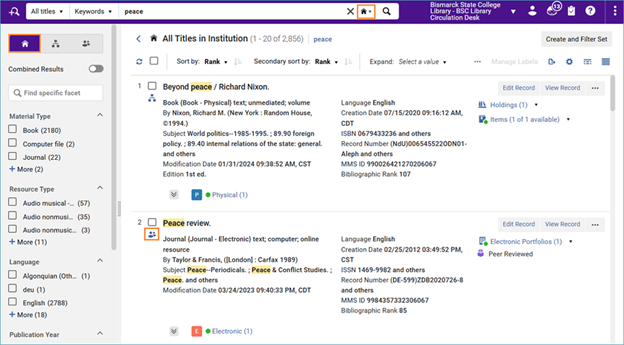
Search Results From the NZ Search
Here is an All Titles search conducted in the Network Zone (NZ). The search box has the NZ icon indicating the search is conducted there, and the gray pane on the left margin show the NZ icon in purple.
- The first search result has a house icon indicating that the library has inventory linked to the Network Zone record. Compare this title to the same title in the first screenshot. The icon changes in relation to the zone you are searching.
- The second search result is an NZ record, and the library is not linked to it. You can see which library is linking to it by clicking on the down arrow Held by (1).
- The third record is linked to the Community Zone as indicated by the icon. This record is from an electronic resource activated in the NZ.
Search Results From the CZ Search
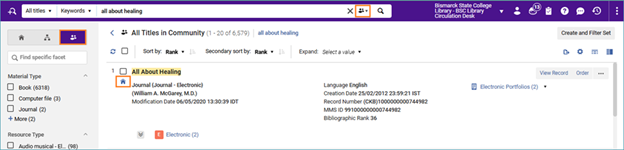
Here is an All Titles search in the Community Zone (CZ). The search box has the CZ icon indicating that the search is conducted there, and the gray pane on the left margin has the CZ icon highlighted in purple.
- The first two results have the NZ icon indicating that the electronic resource was activated in the NZ. The third result has no icon and is not activated anywhere. You can click the Electronic (1) indication to see how many portfolios there are for this title and which collections they are in.
- The second screenshot show an All titles search in the Community Zone, where the first search result has an IZ icon. This title was activated in the IZ.
Cataloging Steps
- Search the Network Zone to see if a record already exists there for the material you are cataloging. Do not add duplicate records to the Network Zone. If you find a matching record, add your holdings to the corresponding OCLC record and proceed to adding inventory.
- If no record exists in the Network Zone, catalog your record in OCLC. When you set holdings in OCLC, a process in Alma will add the record to the Network Zone 1-3 days later. If you want the record immediately, you can export the record to the Network Zone.
- Add inventory to the Network Zone record, including local extensions, holdings records, and item records.
Searching for Bibliographic Records
- Search the Network Zone for a record that matches the material you are cataloging.

- If there is no record in the Network Zone, you can catalog the record in OCLC, or if you are a copy cataloging library, bring in the record via the Metadata Editor > Search Resources.
Cataloging in OCLC
- If you need to make changes to the bibliographic record that would benefit all libraries, rather than editing the record in Alma, make the change in OCLC and replace the record.
- When you set your library's holdings in OCLC, a process imports the record into the Network Zone in 1-3 days. If you want the record immediately, you can export it from OCLC into the Network Zone immediately. See Setting up OCLC Connexion Client to Export to the ODIN Network Zone
- Once you locate the record that matches the material you are adding to the catalog, you can edit the record to add any needed local fields. Click Edit Record to open the bibliographic record in the Metadata Editor.
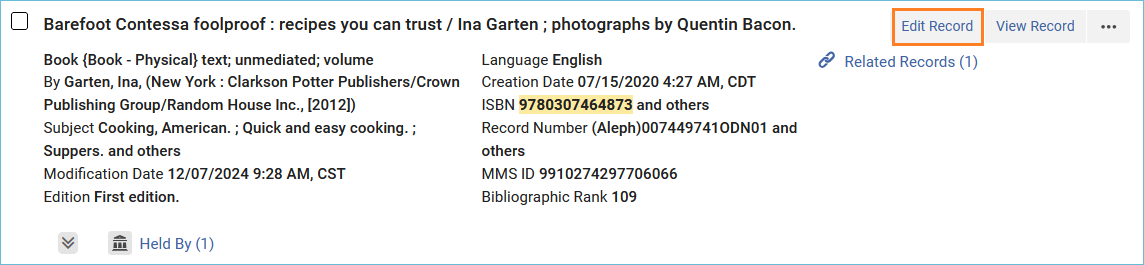
- The bibliographic record displays in the Metadata Editor. All ODIN Alma libraries share the bibliographic record in the Network Zone. The Network Zone is always being refreshed by the latest version of records from OCLC, so it is important to make changes to the OCLC mater record rather than the NZ record, otherwise, changes made to the NZ record will be lost. To add local information pertinent only to your library to the bibliographic record, use local extensions, which are not overwritten by the NZ refresh. See: Add a Local Extension Field to a Bibliographic Record.
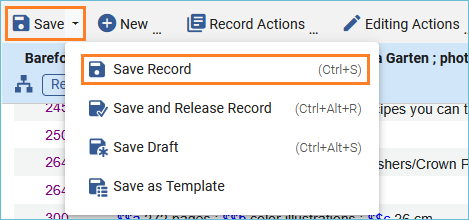
- When you’ve finished working with the record, save it. Click the Save menu and select Save Record, or the shortcut key Ctrl+S.
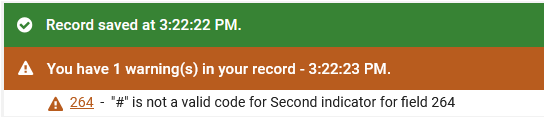
- Alerts display in the lower portion of the screen. Brown alerts are soft alerts and do not block the record from being saved. Red alerts are hard alerts and must be fixed before the record can be saved. When there are no errors in the record, there will only be the green alert that the record was saved. Additionally, Alma has an auto-saving feature and will save the record at intervals.
Adding Holdings and Item Records
Adding holdings
The holdings record contains information on the material's physical location and call number.
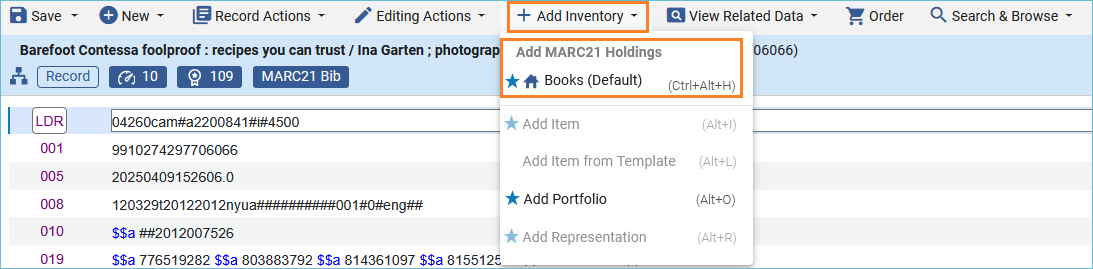
- With the bibliographic record open in the Metadata Editor, click the Add Inventory menu and select Books (Default) or use the shortcut key Ctrl+Alt+H.
- The metadata editor opens a split screen with the holdings record open on the right side of the screen.

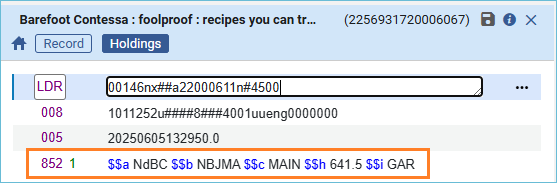
- Select the 852 field, click the row action menu and select Open form editor.
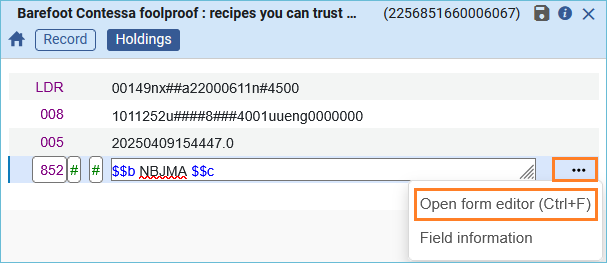
- A workform opens that can be used to add information to the field. It offers drop-down menus to make it easier to work with the library and location subfields.
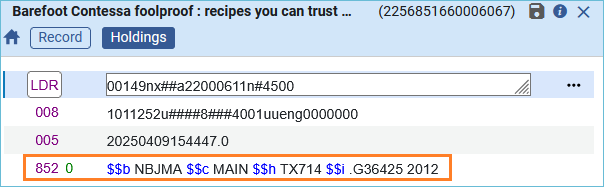
If the bibliographic record contains classification information for the call number type defined by your library (050/090 for LC Classification and 082/092 for Dewey), you may leave the call number fields blank. Make sure to update the first indicator in the 852 field for the appropriate classification type (0 for LC and 1 for Dewey). Upon saving the holdings record, the classification will be automatically inserted into the holdings record.
LC:
Dewey:
Adding Items
- Once the holding record has been saved, add an item record to the holdings record. To add an item, click the Add Inventory menu and select Add Item or use the shortcut key Alt+I.

- Alma opens the physical item editor, and you can fill in the fields to add an item record.
- The top section is the General Information box.
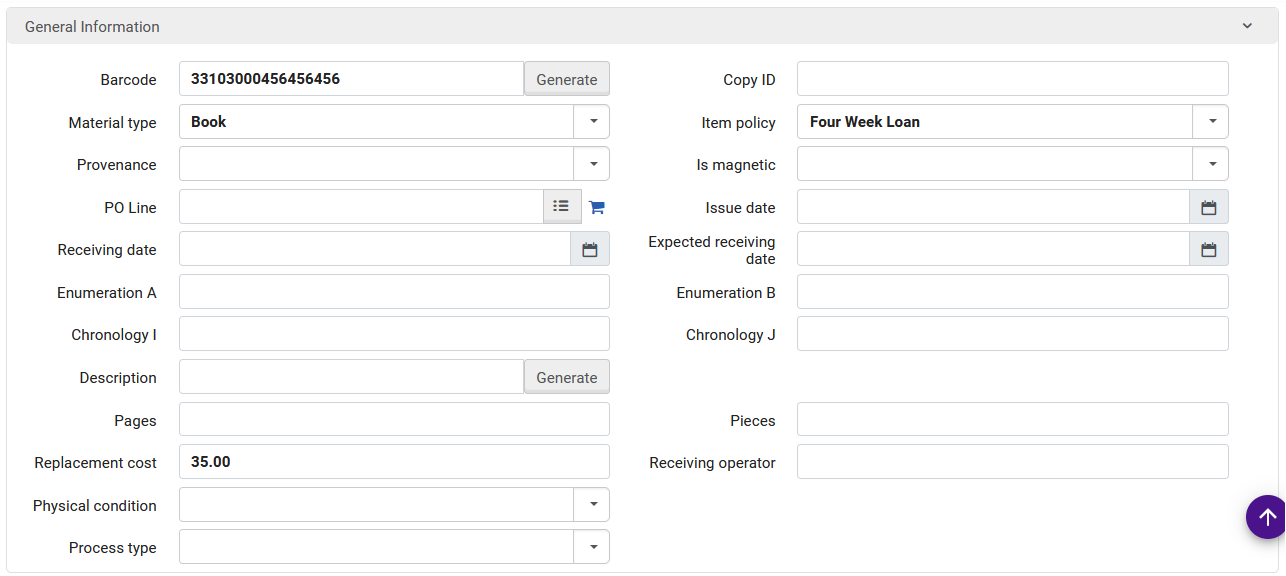
- Barcode – REQUIRED - enter the barcode of the item
- Copy ID – Enter the copy ID if desired
- Material Type – REQUIRED – enter the type of material, such as book, DVD, etc.
- Item policy – Enter the item policy that corresponds to the material. If this field is left blank, Alma will use the default line in your library’s TOU table to dictate circulation rules.
- Provenance – Enter the information if desired.
- Is Magnetic – Enter if the item is magnetic (default set to N)
- POL Line – Populated if using acquisitions
- Issue date – Populated if using acquisitions
- Enumeration A/B – Enter if there is any enumeration information
- Chronology I/J – Enter if there is any chronology information
- Description – Enter description field if necessary, or use Generate button to generate a description from the enum/chron fields.
- Pages/Pieces – Enter additional description information if necessary.
- Replacement Cost – Enter the replacement cost if desired. If entered, Alma will use this amount when sending lost material notices to patrons.
- Receiving operator – Populated if using acquisitions
- Physical Condition – Enter information if desired.
- Process type – Enter information if desired.
b. Inventory information. Some inventory information is populated automatically during the inventory process.

c. Location Information. Location information is pulled from the holdings record.

- Permanent location: This information is pulled directly from the holding record.
- Item call number type/Item call number – This information resides in the holding record and does not have to be included in the item record.
- Source – Enter information if desired
- Storage location ID – Enter information if desired
d. Temporary Location Information. This section should be used if moving an item to a location temporarily, such as to a display or to the reserve shelf.

- Item is in a temporary location – check the YES button if the material is going to be in a temporary location.
- Temporary location – use the drop-down menu to select the temporary location.
- Temporary Call number type/call number – Enter the temporary call number type and temporary call number.
- Temporary Source – Enter the temporary source
- Temporary Item policy – Enter the temporary item policy that should be used when circulating the material.
- Due back date - The date the item is due back from the temporary location.
**Note: once the material goes back to its permanent location, the Item is in temporary location button will be set to No, and all fields will default back to their previous values. For more about temporary locations see: Assigning an Item to a Temporary Location
e. Retention information. If the library is committed to retaining an item, this setting will prevent the accidental deletion of the item.

- Committed to Retain - select yes, no, or leave blank.
- Retention reason - enter information if desired.
- Retention note - enter information if desired.
- When the item work form is complete, click Save and Edit to save and stay on the record, or click Save to save and return to the Metadata Editor. Save and Edit is very useful if you have notes or enumeration/chronology that you need to enter on other tabs of the item record.

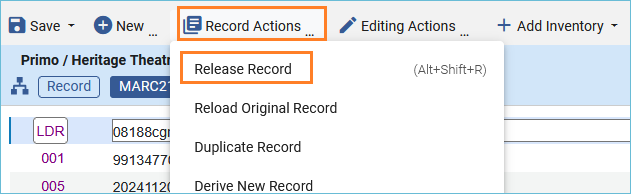
- Once you have saved the item record, the cataloging is complete. You can now release your records from the Metadata Editor by clicking the Record Actions menu and selecting Release Record.
Related Trainings:
Copy Cataloging Using Search Resources in the Metadata Editor
Add a Local Extension Field to a Bibliographic Record
Placement Options in the Metadata Editor
Deleting Inventory Records in Alma
How to Add a Portfolio to a Bibliographic Record
Marking Items as Missing in Alma
How to Create Brief Bibliographic Records in the Metadata Editor