Adding a Patron Record
The Polaris LEAP interface is used for all circulation activity, including registering new patrons. https://polaris.odinlibrary.org/leapwebapp

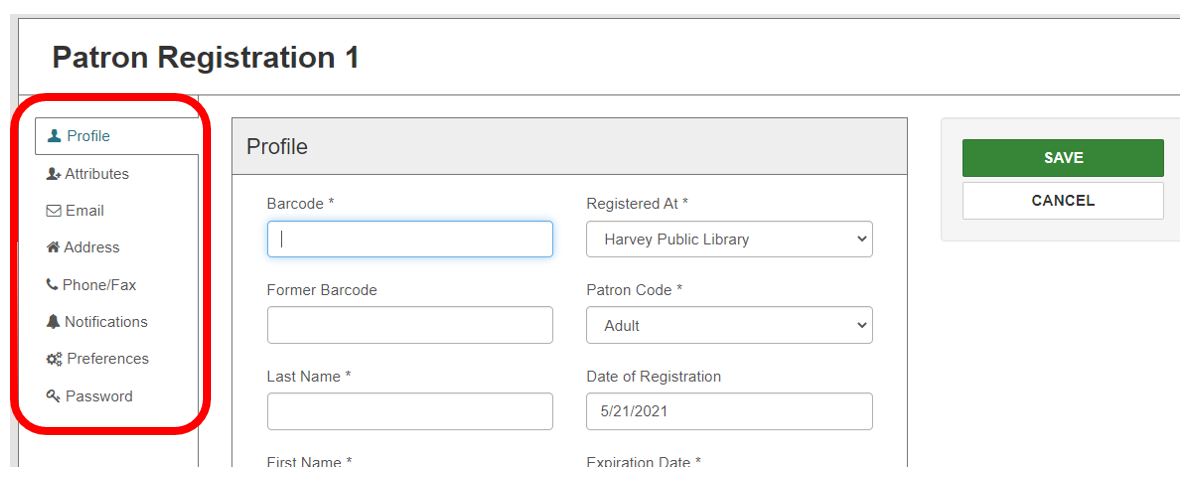
The Patron registration form is divided into eight sections – Profile, Attributes, Email, Address, Phone/Fax, Notifications, Preferences and Password. You can scroll down the form to see each section or click on the section titles on the left to jump to the area you wish to view.
**NOTES: fields designated with an asterisk are mandatory. If you wish to alter the fields that are considered mandatory, please contact the ODIN office. It is not necessary to use all fields – for example, you do not have to select a gender, enter a birthday or select a statistical class if it does not fit with your library procedures or workflows. Secondly, it is recommended that name and address fields be entered in all caps to conform with postal regulations.
I. Profile
The profile contains specific information about a patron such as barcode and name. Name fields should be entered in all caps to comply with US Postal Service regulations.
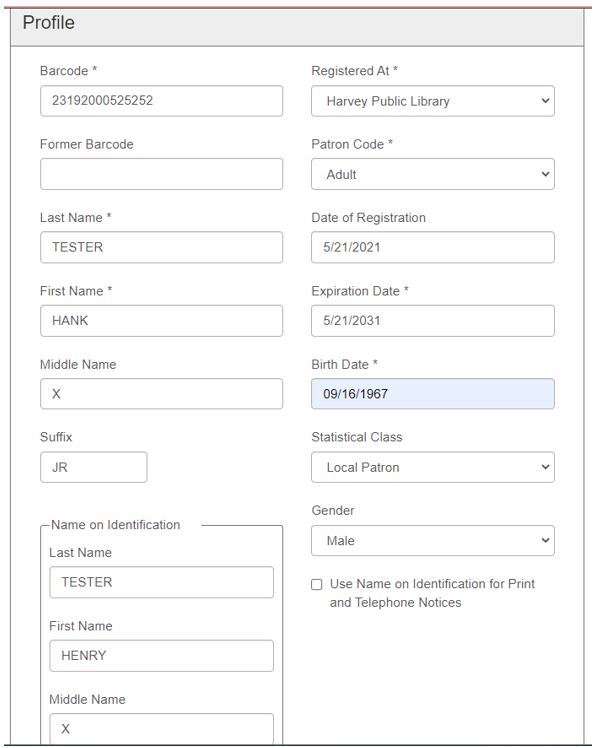
- Barcode – enter the barcode being assigned to the patron
- Former Barcode – this field is not needed during patron registration, but rather when updating a record when a patron has lost their card. The former barcode can be put in this field, and the barcode field can be updated with the new barcode.
- Last Name – enter the patron’s last name
- First Name – enter the patron’s first name
- Middle Name – enter the patron’s middle name or initial if desired
- Suffix – enter the patron’s suffix if applicable (Jr., Sr., etc).
- Registered At – this field defaults to the logged in user’s library
- Patron Code – select the patron’s code (Adult, Child, etc.) from the drop down.
- Date of Registration – the system will default to the current date.
- Expiration Date – the system will enter a default expiration date; update it as necessary.
- Birth Date – enter the patron’s birth date.
- Statistical Class – use the drop down to select the applicable statistical class.
- Gender – select the patron’s gender from the drop-down list
- Name on Identification – enter the patron’s name as it appears on their identification if desired. If you wish to use this as the preferred name, be sure to check the ‘Use Name on Identification for Print and Telephone Notices’ as well.
II. Attributes
Attributes are specific identifiers regarding a patron and can be optional. Individual libraries are able to determine which – if any - check-boxes appear.
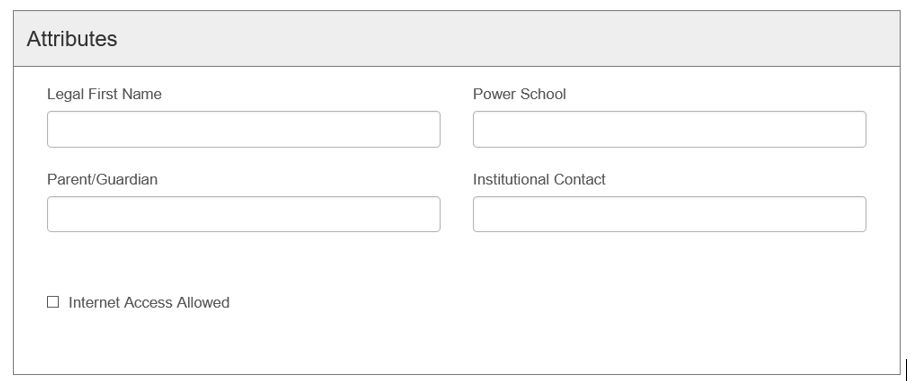
- Legal First Name – enter the patron’s legal first name if applicable/desired.
- Power School – enter the patron’s Power School number if applicable.
- Parent/Guardian – enter the patron’s parent or guardian if applicable.
- Institutional Contact – enter the institution’s contact if applicable.
- Check boxes – click any applicable check boxes. Options can be added by library, and can include such things as State Employee, Under Eighteen Years Old, or Internet Access Allowed.
III. Email
Information regarding patron’s email address
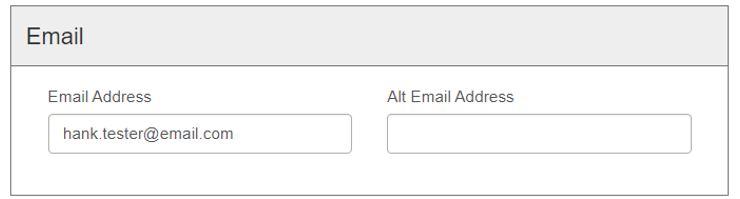
- Email Address – enter the patron’s email address.
- Alt Email Address – enter the patron’s alternate email address if applicable. If email notifications are used, they will be sent to both email addresses.
IV. Addresses
Information regarding patron’s address. Address information should be added in all caps to comply with US Postal Service regulations.
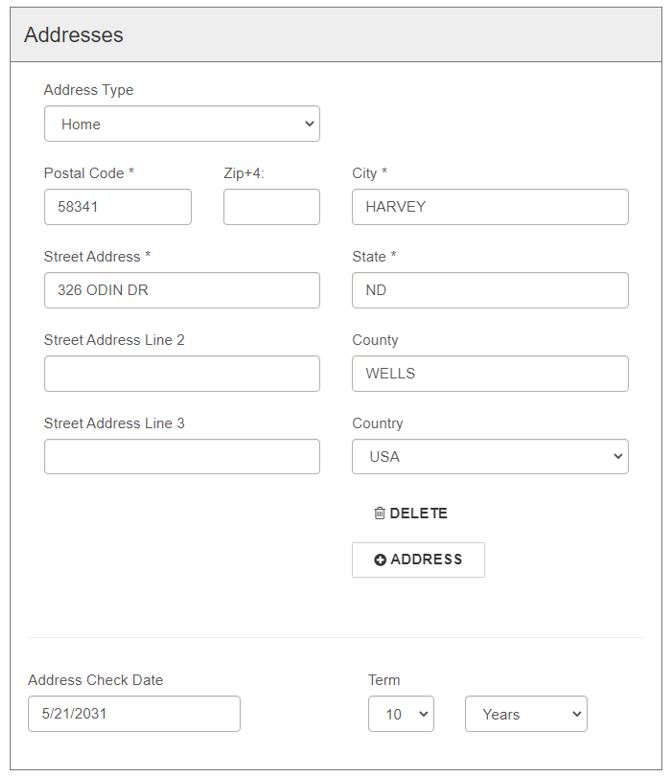
- Address Type – use the drop-down menu to select the type of address being added – for example: home, work, parent/guardian.
- Postal Code – enter the patron’s postal code. Once entered, this will then populate the city, state, county, and country. If a postal code serves more than one community, you’ll be presented with a choice of which community to use. This field can be defaulted to a postal code (which will prepopulate the city/state/county/country fields) or left empty to be added fresh each registration.
- Zip+4 – enter the patron’s Zip +4 if available.
- Street Address – enter the patron’s street address.
- Street Address Line 2 – enter the patron’s street address line 2 if applicable.
- City – the city field should default dependent on the zip code.
- State – the state field should default dependent on the zip code.
- County – the county field should default dependent on the zip code.
- Country – the country field should default dependent on the zip code.
- Delete – use this button to delete an erroneous address.
- + Address – user this button to add multiple addresses
- Address Check Date – enter the date upon which the patron’s address should be rechecked for accuracy. The system will automatically default a date.
V. Phone/Fax
Information regarding patron's phone number(s). Numbers should be added in XXX-XXX-XXXX format for consistency among records.

- Phone 1-3 – enter patron’s phone number information. There are fields that allow up to three numbers.
- Fax – enter patron’s fax number information if applicable.
VI. Notifications
Information about how a patron should be notified in the case of overdues, holds, etc.
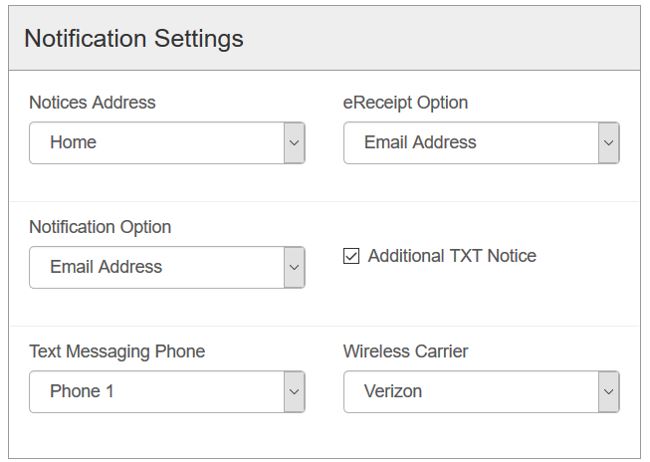
- Notices Address – select the patron address where notices should be sent. The drop-down will be populated by all address types added in section IV.
- EReceipt Option – if eReceipts are used, select the option for sending the receipts – none, email, text, or all.
- Notification Option – select how patrons should be sent notifications (mailing address, email, text, phone, etc.)
- Additional TXT Notice – click the check box if the patron should be sent a text message in addition to the notification option selected.
- Text Messaging Phone – if patron is to receive text notices, select the phone number (from section V) that should be used for the text.
- Wireless Carrier – select the wireless carrier the patron’s cell phone is associated with. This is necessary for texts to be delivered.
VII. Preferences
Miscellaneous preferences pertaining to patron.
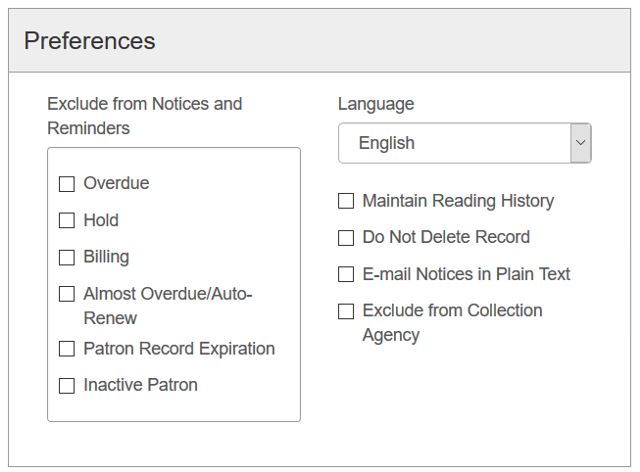
- Exclude from Notices – select any types of notices that should not be sent to the patron.
- Language – select the language to be used. The system defaults to English.
- Maintain Reading History – select if the patron’s reading history should be kept in the staff interface. Patrons have an option to opt into reading history when they log into the PAC.
- Do Not Delete Record – select to prevent the patron’s record from ever being deleted.
- Email Notices in Plain Text – select if email notifications should be sent in plain text.
- Exclude from Collection Agency – select if collection agencies are used and patron should be excluded from the process.
VIII. Password
Patron password information for logging into the PAC.
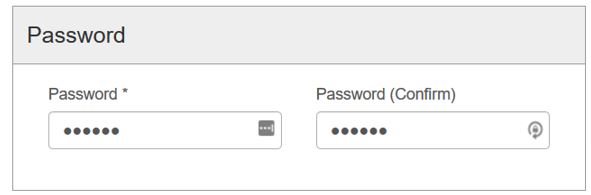
- Password – enter the password the patron will use to log into the PAC, in conjunction with their barcode. Traditionally ODIN libraries have used the patron’s last name.
- Password (confirm) – re-enter the password.
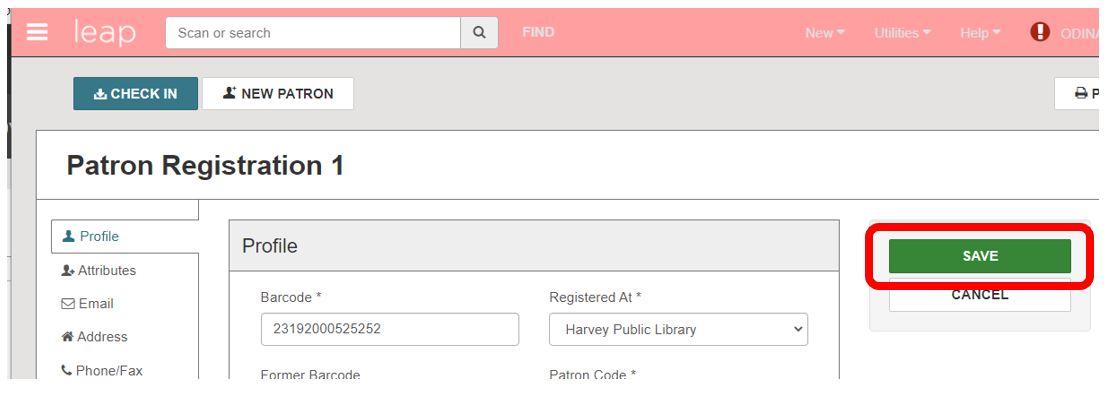
Click SAVE to add the patron’s record into the database.
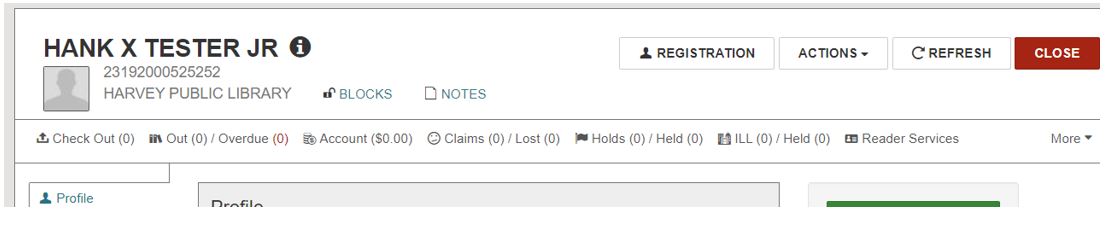
The patron’s record has been registered and is ready for use and is displayed on the screen.
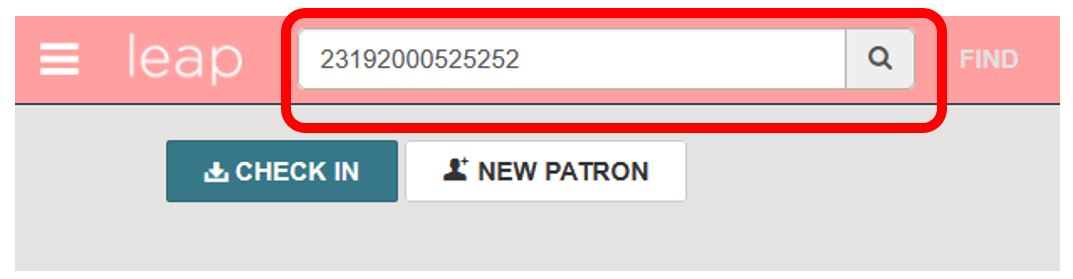
To retrieve a patron’s record, enter search criteria in the quick-search box. It is most effective to enter the barcode, but their name, email address, address or phone number can also be used.
Alternatively, click to the FIND button to invoke the Find Tool. Here additional limiters can be used to search for and locate the patron record (please see the Polaris LEAP Overview document for tips on searching).

Once you’ve located the patron, click the REGISTRATION button to open the patron’s registration form to make any alterations to their account.
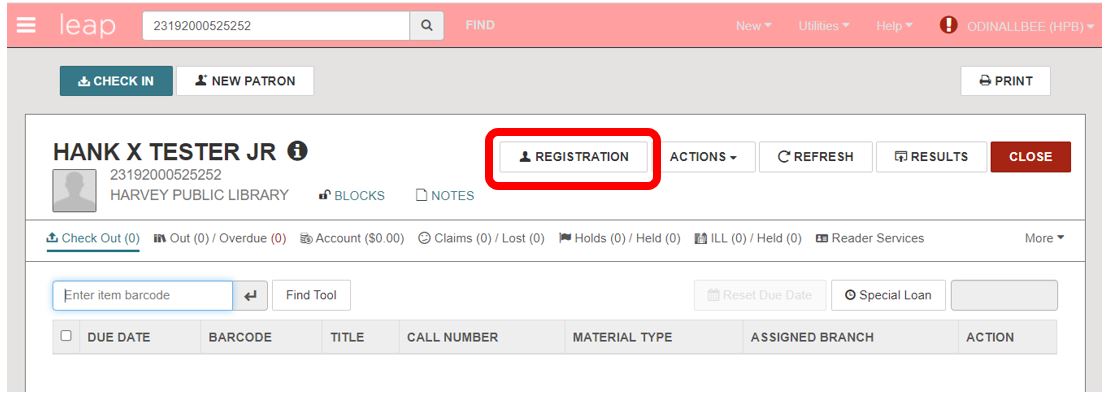
On the editable registration page, there are additional actions available on the right side of the screen.
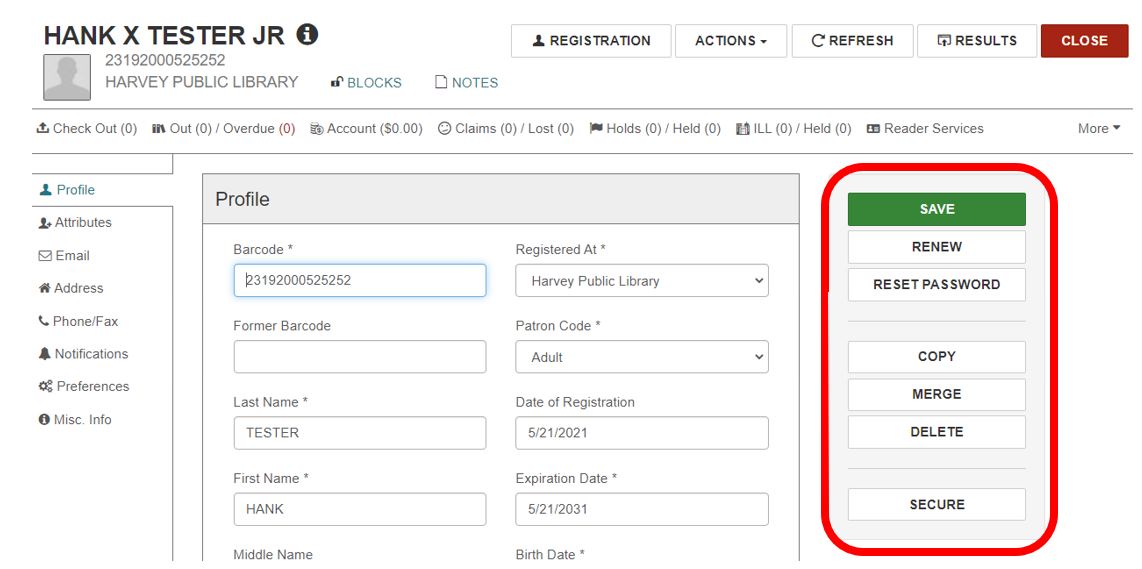
- Save – click to save any changes made to the patron record.
- Renew – click to renew the registration of an expired record.
- Reset Password – click if the patron’s password needs to be reset. You’ll be presented with a workform to enter the new password, and to confirm it.
- Copy – click to make a copy of the current patron registration. This is handy if a family is registering for cards at the same time. After clicking copy, changes can be made to the record – such as name and barcode.
- Merge – click to merge two records together. Take great care to ONLY merge records belonging to your library.
- Delete – click to delete a patron’s record. Note: the record will not be able to be deleted if there are outstanding loans or cash.
- Secure – click to freeze the patron record. No changes can be made to a record that is frozen, nor can it be used for activity such as checking out material.