Simply Reports Basics
Updated: 12/23/2025
Simply Reports is a reporting tool for your library's data in Polaris / Leap.
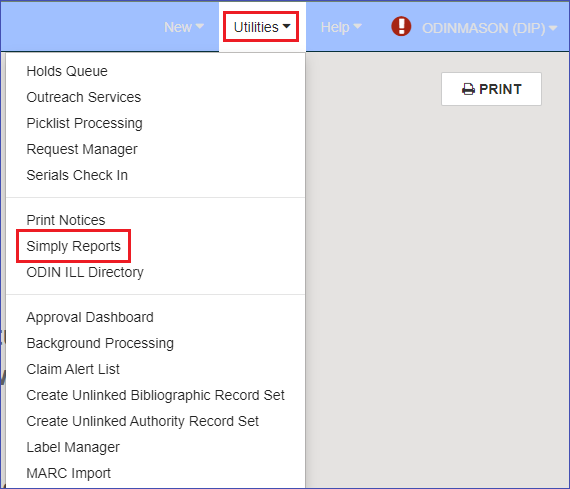
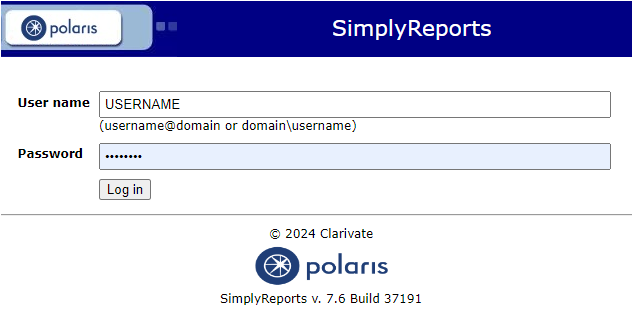
Logging in
You log in to Simply Reports with the same credentials you use to log into Polaris Client and Leap. There is a link to the Simply Reports interface in Leap under the Utilities menu.
Creating a List Report and Overview of the Simply Reports Interface
At the top of the screen, you will see two rows of tabs. The top row is where you select which functional area you want to create a report on, and the second row is the report type available for that area. Also, in the top row of tabs are two administrative tabs, My Reports, and Admin, and the last tab links out to help files for Simply Reports.
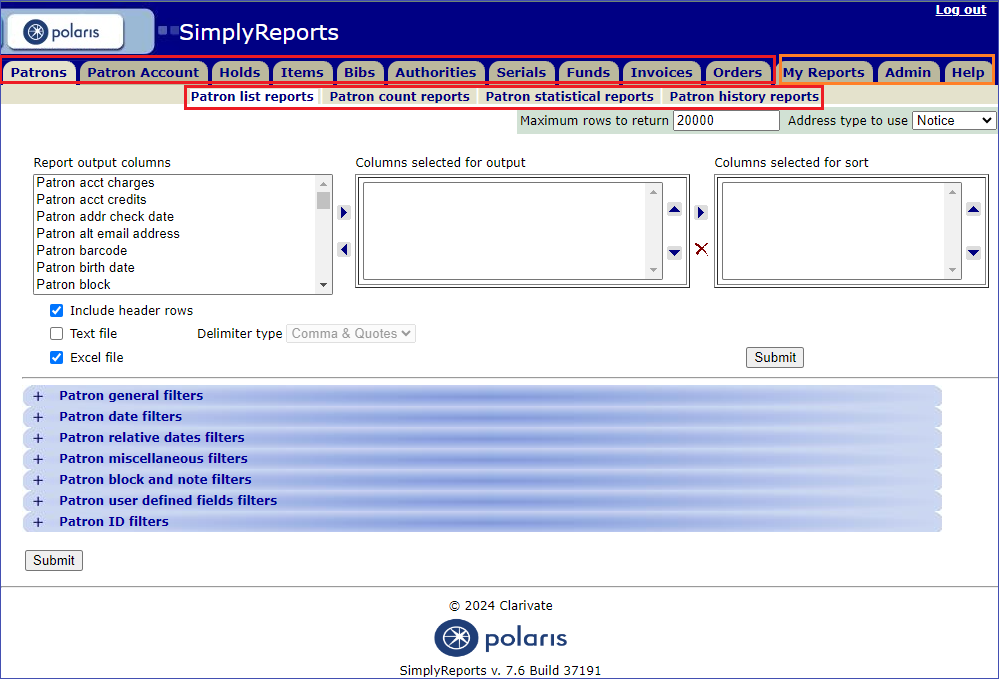
Once you have selected the functional area to run a report on, you will decide which type of report to run and choose the subtab for that report. The default report type is the “List Report” which lists all the records that match the report criteria. This is the type of report explained in this first example.
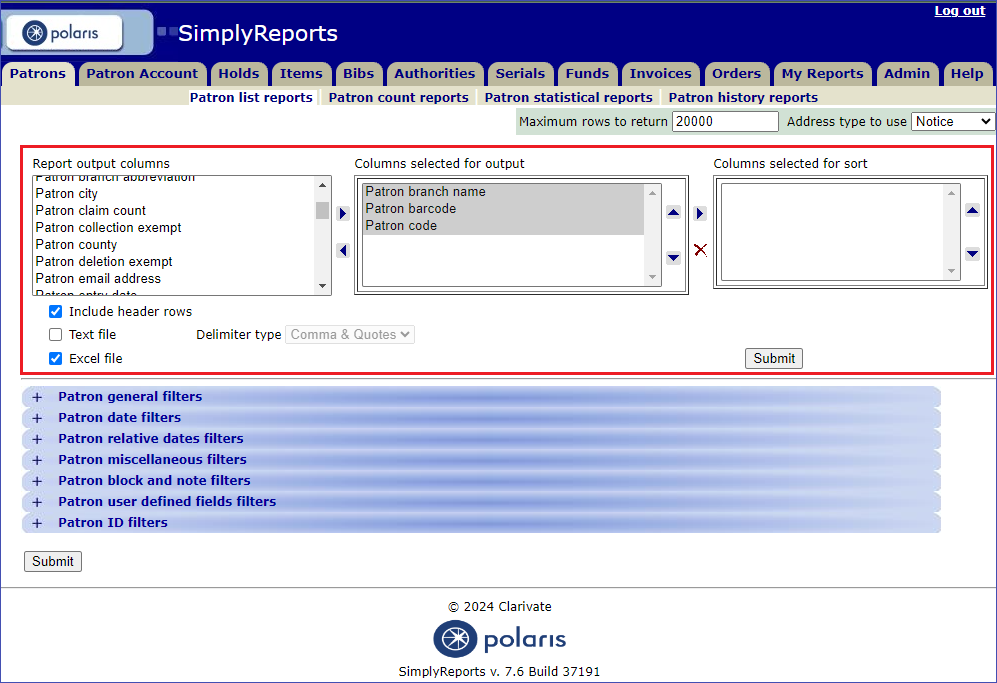
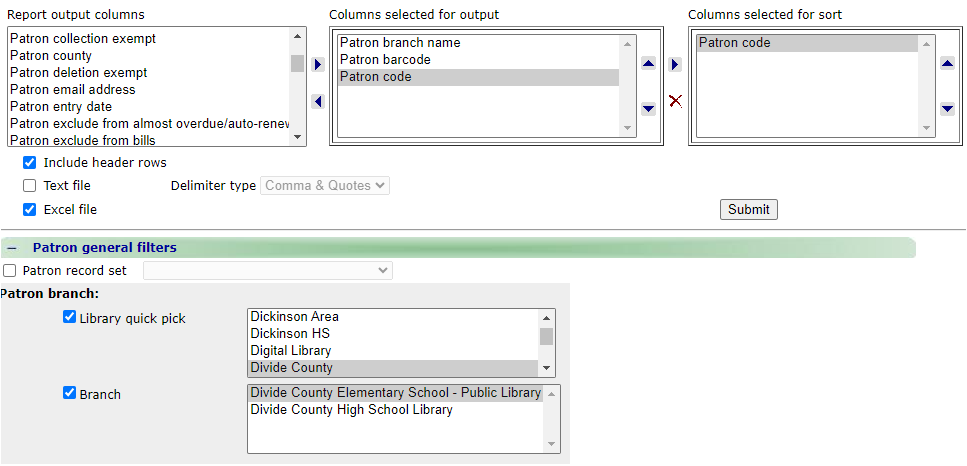
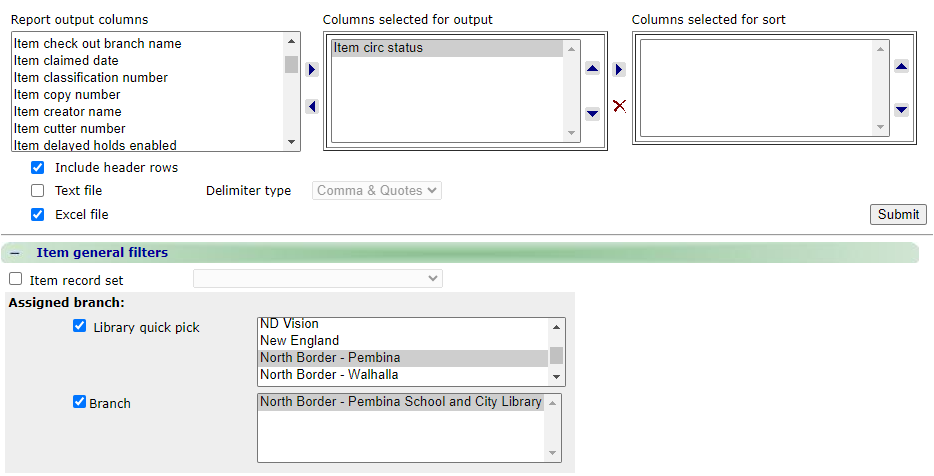
First, decide which columns of data you need to pull into your report. The left box, “Report output columns,” contains all the available columns. Click to highlight the column name and use the right and left arrows to add the column to the “Columns selected for output” box. The “Columns selected for sort” box can be left blank when exporting to an Excel file. You can use Excel’s sorting functionality. If you like, you can add a column to this box to sort.
The area under the three boxes is the parameters for exporting the file. You can leave these settings as the default values.
After selecting the columns for your report, you will select filters.
Filters depend upon the functional area you select. General filters, date filters, and relative date filters are common in most of the functional areas.
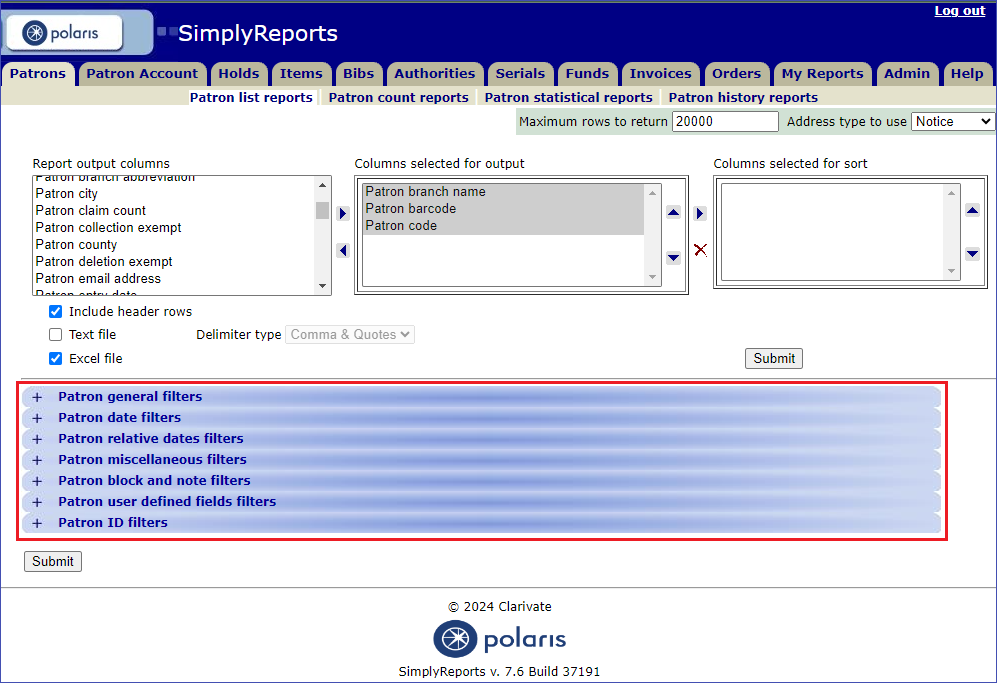
Click on the plus (+) to open each section to view the available filters.
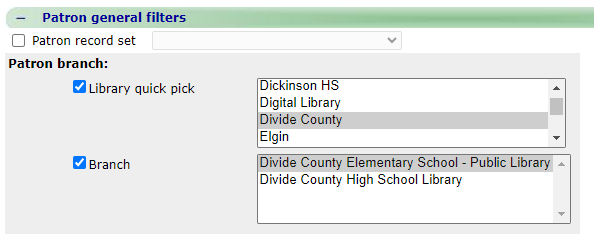
The Branch filter is a crucial tool for refining your reports. It allows you to focus on specific data related to a particular branch.
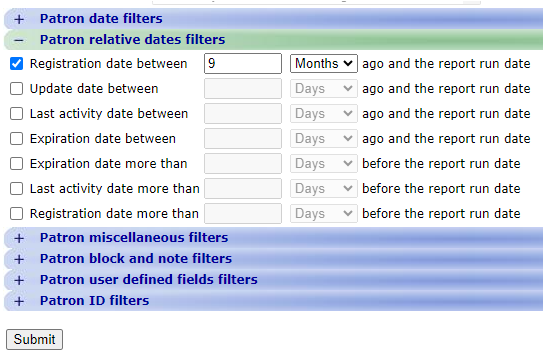
Date filters are also important in narrowing down the specific data you need. Here are the date filters that are available in the Patron functional area.
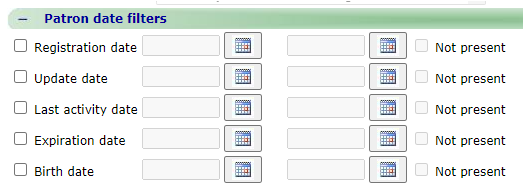
When using date filters, you have two options to find specific records containing the date information set in the filter.
One option is using a fixed date. For example, to find patrons with a registration date from January 1, 2024, to the present, select the check box next to the “Registration date,” use the calendar function to enter 1/1/2024 in the first date box, and leave the second date box empty.

On the other hand, if you want to identify records that do not contain a specific piece of information, select the “Not present” option.
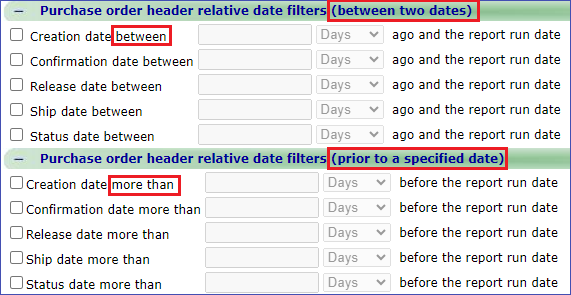
The second option is the Relative date filter. This type of date filter is important because it is the kind you need to use to save and reuse the report or publish it. There are two types of relative date filters in Simply Reports, the first is between a specified number of days, months, or years and the run date of the report, and the other is before a specified number of days, months, or years and the report run date. The “between” type relative date is available in most functional areas, and the “before” type relative date is available for Items, Invoices, and Orders.
Here are the relative date filters from the Orders functional area:
Here are the criteria for a sample Patron report:
Then click the Submit button.
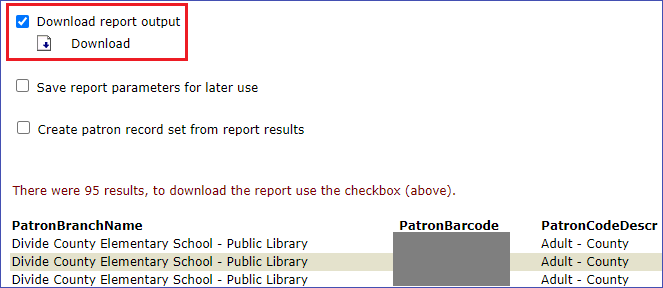
A preview of the report opens in a new tab in your browser. The first 1000 rows of the report will appear. From the results page, you can:
- Download the report to your computer
- Save the report parameters for later use
- Create a record set of the records in the report
Check the box next to “Download report output” then click the icon next to the word “Download.”
When you open the report in Excel you will receive an error message about the file type mismatch. Click Yes to open the file anyway.

Later save the report as an Excel workbook and the error will not pop up again.
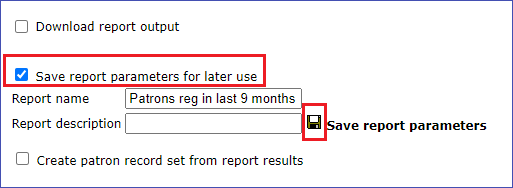
To save the report parameters to use again later, click the check box next to “Save report parameters for later use.” Fill in the name for the report and a description (optional) and click the save icon. The ODIN website has separate instructions for saving and running a saved report.
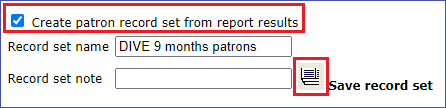
To create a record set of records from the report results, check the box next to “Create patron record set from report results.” Give the record set a name using the library branch code and click Save record set. The record set will be created, and you can work with it in Leap or the Polaris client.
Other Report Types
The type of report in the example above is a “List Report” because it lists every record that matches the criteria in the report. The List Report is the default when you click on a functional area tab in Simply Reports.

The next report type is the "Count Report." This report will tell you how many records match your criteria.
Here are some criteria for a sample count report in the Items functional area. This type of report works well when you select one or two columns.
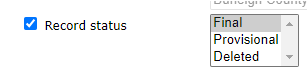
This example: A count of item records by circulation status, from the North Border – Pembina branch with record status final.
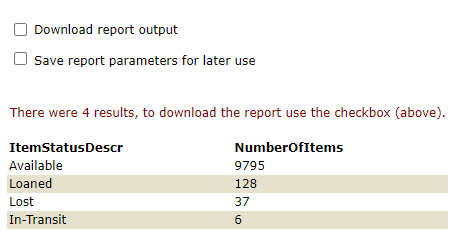
The report preview:
The third type of report is a “Statistical Report.” This report uses statistical categories and subcategories. The example below is a query to find the number of patron registrations created in the past year, broken out by month and patron code. Note that the North Border – Pembina branch has been selected. No filters were selected.
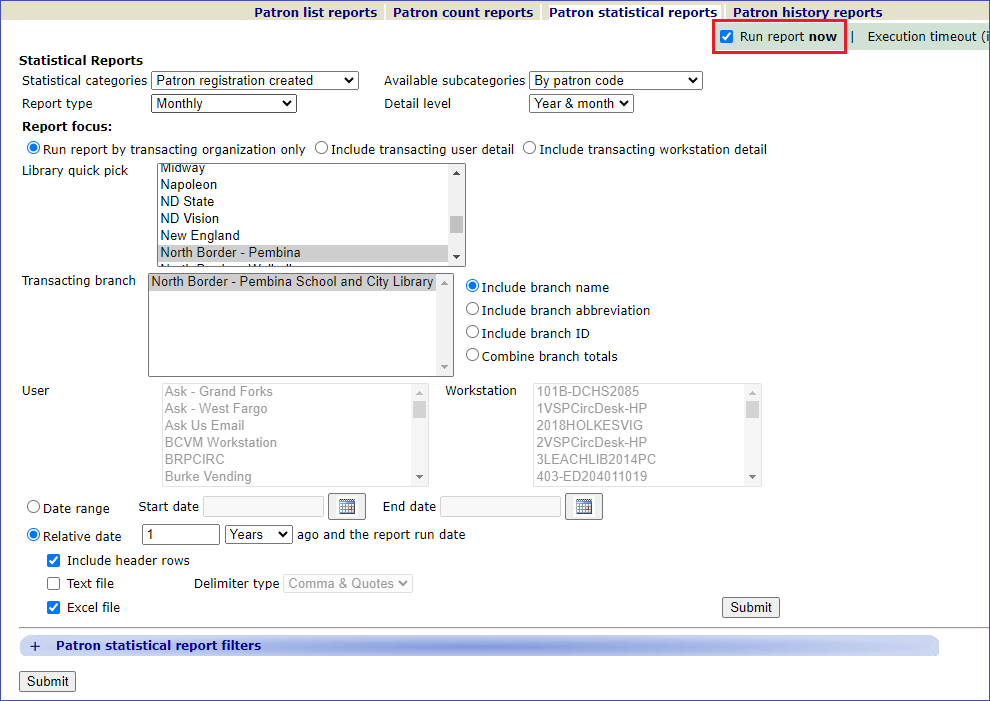
To run a statistical report, you must check “Run report now” first. You will get a warning that says, "Running large statistical reports may affect system performance. You can save the report and schedule it to run when the library is closed." It is okay for you to run statistical reports if you limit the scope of the report by selecting a branch library. If you want to run a statistical report that encompasses all of ODIN, for example, all bibliographic or item records, please get in touch with ODIN first and we can schedule it to run overnight.
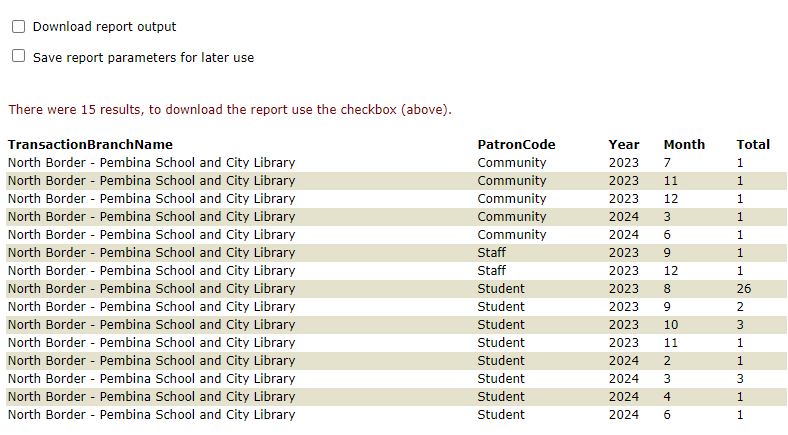
Here's the report preview for the statistical report:
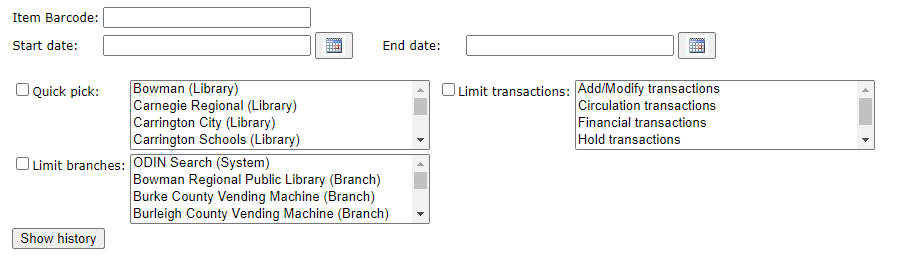
The last type of report is a “History Report.” This type of report is only available for item records.
The criteria for a History Report are simple. Enter a barcode for the item record. Then enter a date range. The date range cannot be more than 95 days from the start date to the end date. The date range does not have to be recent, so if you have a question about last year, you can still create a report. It is unlikely that you will need the branch or transaction limiters.
Here’s an example of an item history report.
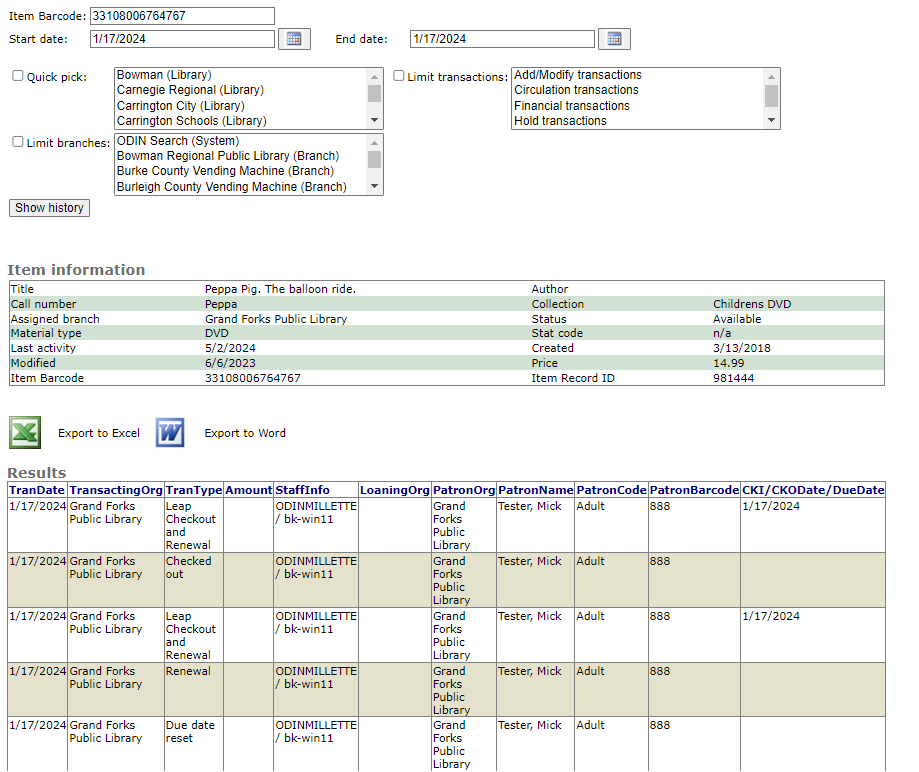
The two icons in the middle of the report allow you to export to either Excel or Word. The ODIN Office recommends Excel because the right margin cuts off columns in the Word export.
Related Training:
Simply Reports: How to Export Bibliographic Records from Polaris