Creating Orders in Polaris Acquisitions
Creating purchase orders in Polaris. Purchase orders and adding associated line items can be done manually or in bulk. This document covers both methods.
ENTERING ORDERS/LINE ITEMS MANUALLY
1. To create a purchase order to buy material, from the toolbar click on File | New, click on the new icon or use the hot-key Ctrl+N.
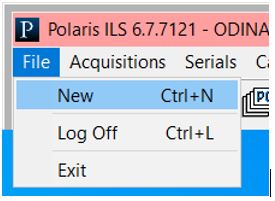
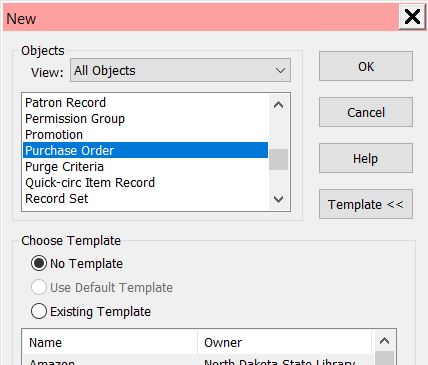
Select Purchase Order from list. You are given the option to select a template if one has been created.
2. The purchase order workform displays., Note there are four pages to this form, and each can be navigated to using the icons along the left side of the form. When completed, go to File | Save or click the save icon to save the purchase order.
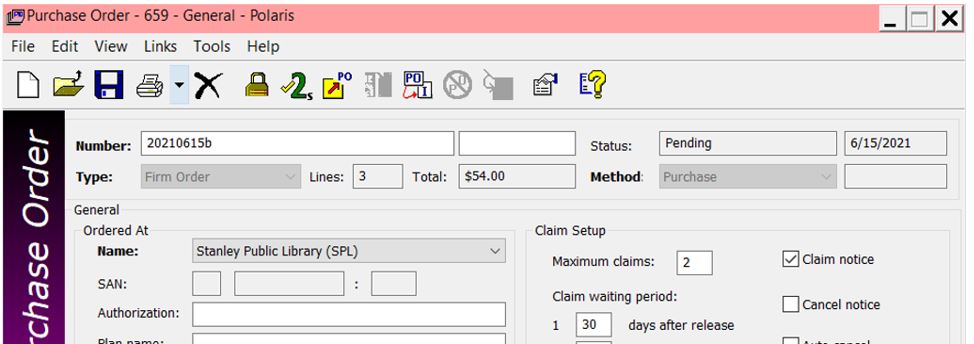
Purchase Order - general view

- Number (mandatory): Enter a number for your Purchase Order. Field has a 30 character limit.
- Suffix: enter the suffix in the box to the right of the number. A suffix is not mandatory, but you can search for purchase orders by their suffix. Field has an 8 character limit.
- Status: The status is automatically populated, and will change during various states of the PO.
- Date: The date is defaulted
- Type (mandatory): enter the type of order being created:
- Firm Order – used for specific monograph orders
- Donation – used for orders using donated funds. The fund type must be donation in the fund record.
- Gift – used for gift when the PO is being used for tracking and reporting purposes. No funds are selected with these orders, and gift orders cannot be copied to an invoice.
- Standing Order – Used exclusively for ordering parts in a monographic series. A PO line item is linked to the series as a whole. When the PO is released, the funds are encumbered for the series as a whole. Standing order parts are checked in via serials (as opposed to being received in acquisitions).
- Subscription – used for paying subscriptions with issues that can be predicted. When subscription issues arrive, they are checked in via serials and item records can be generated at check in.
- Lines/Total: automatically filled in when line items and prices are added.
- Method: select if the PO is for a purchase or a depository agreement
- Ordered at – Name: defaults to the logged in user’s library.
- Ordered at – SAN: autopopulated if SAN is in Polaris configuration
- Ordered at – Authorization: enter the name of person authorizing the purchase
- Ordered at – Plan name: enter the name of the plan
- Ordered at – Rental return: enter date when rental items need to be returned.
- Supplier Name: Use the Find tool to locate the supplier being used. Once the supplier is selected their SAN, Account number and claiming information are pulled from the supplier record and entered. This is default information and can be changed if necessary.
- External ID: enter another identifier for the PO if desired. This field is searchable.
- Header Charges: enter any charges that pertain to the PO as a whole, such as shipping charges. Select the Type of charge, Amount and fund to be used for the charge. Use the Add/Remove buttons to enter additional header charges or to remove any charges entered in error.
Purchase Order - line items view
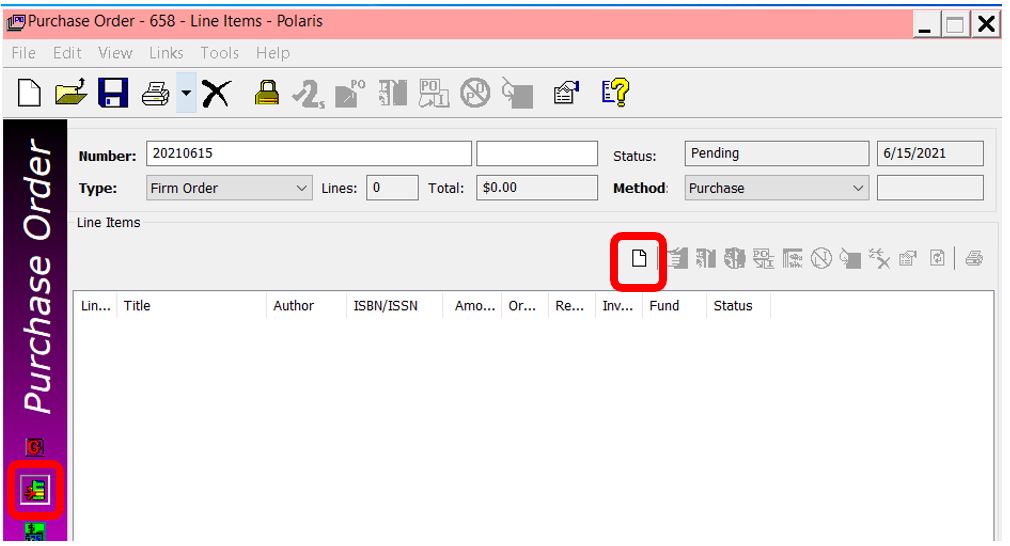
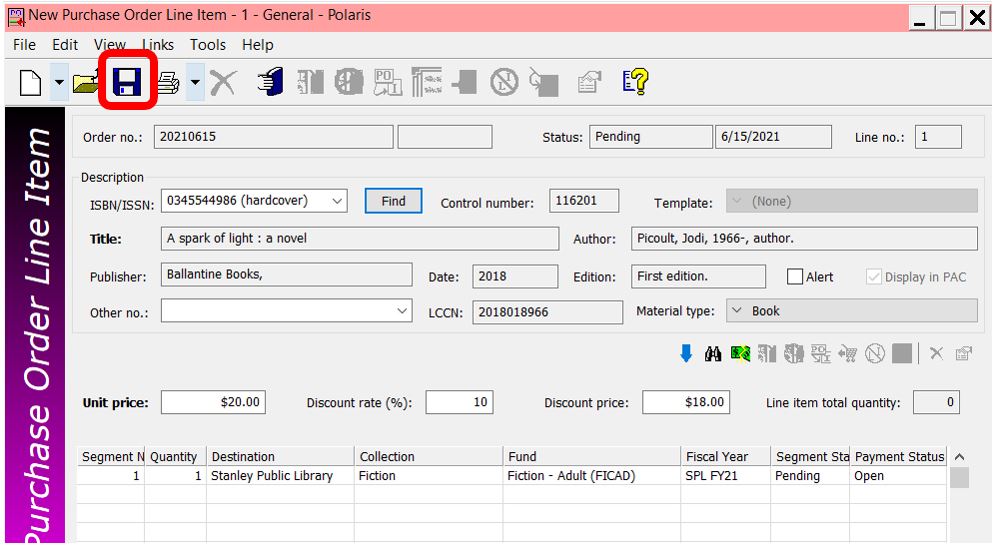
A new Line Item workform displays. A title can be added by entering the ISBN, or by using the Find button to search for a record in the database (or a record via a z39.50 search). You are also able to type in a title, and when the PO is saved, by default Polaris will create a book record, provided an on-order bib template is in place.
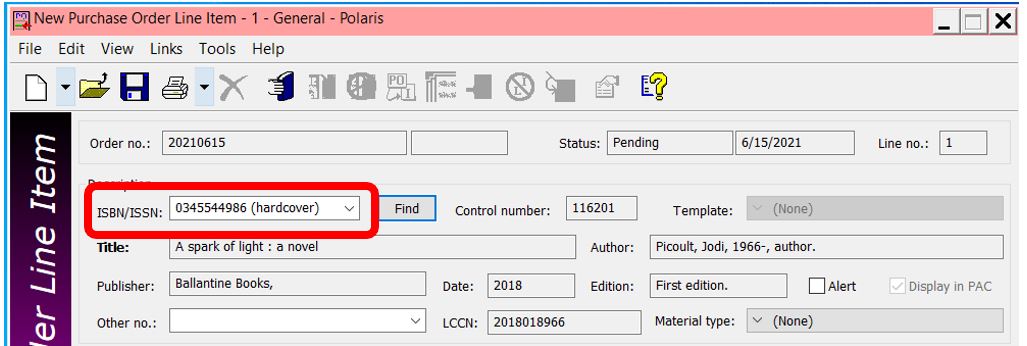
When the title is attached, fill in the rest of the form.
- Material type: select the material type from the drop down menu.
- Unit price: enter the list price of the item.
- Discount rate: the field defaults to the discount rate (if any) entered in the supplier record.
- Discount price: this field is automatically calculated based on the unit price and discount rate
- Line item total quantity: this field is automatically populated when PO is saved
- Change or add anything on the segment grid including quantity, collection or fund
- If another copy is being added from a different fund or for a different collection, click on the blue down arrow in the submenu, or click on the next segment line, both of which copy the information to the next line where it can be edited.
- Save the PO Line Item workform.
- To add another line item, click again on the new line item icon in the submenu on the PO, and follow the above steps.
Image
Purchase Order - charges view
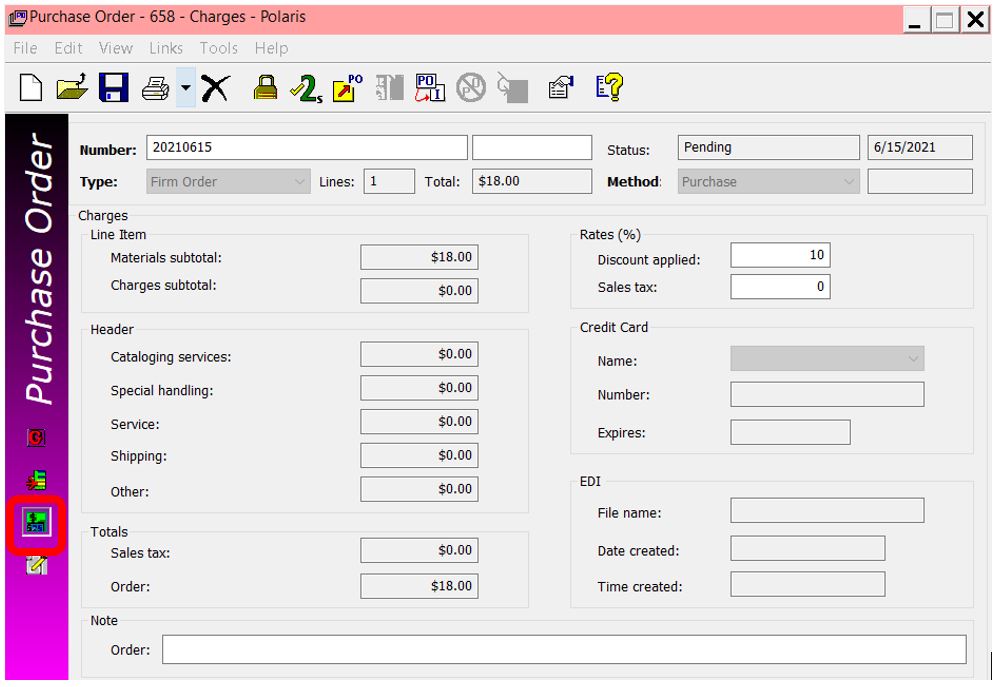
Typically nothing needs to be entered in the charges view. Most of the fields are automatically populated by other fields within the PO. You do have the option to change the discount applied, add sales tax or add a note.
Purchase Order - instructions to suppliers view

Typically, nothing needs to be entered in the instruction to suppliers view. If desired (and if the PO is being used as a mean to transmit the order to the supplier) you can enter shipping, conformation or invoicing information.
ENTERING ORDERS/LINE ITEMS IN BULK
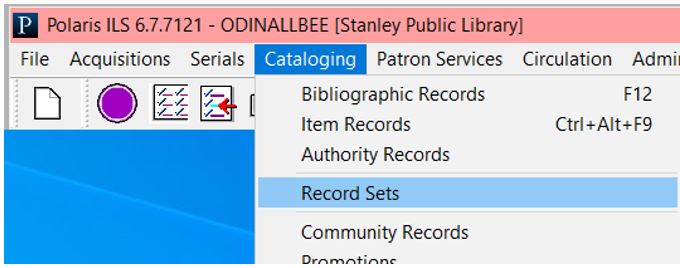
1. It is possible to enter line items to a new or existing purchase order in bulk. Order records that are imported can automatically be added to a record set, or library staff can manually create a bibliographic record set and add specific records to it. Once the record set is available, search for and open it by going the menu bar and selecting Cataloging | Record Sets.
Search for and open the record set.

2. With the record set displayed, on the menu bar select Tools and you'll see an option to add either all records or selected records to a new or existing purchase order.
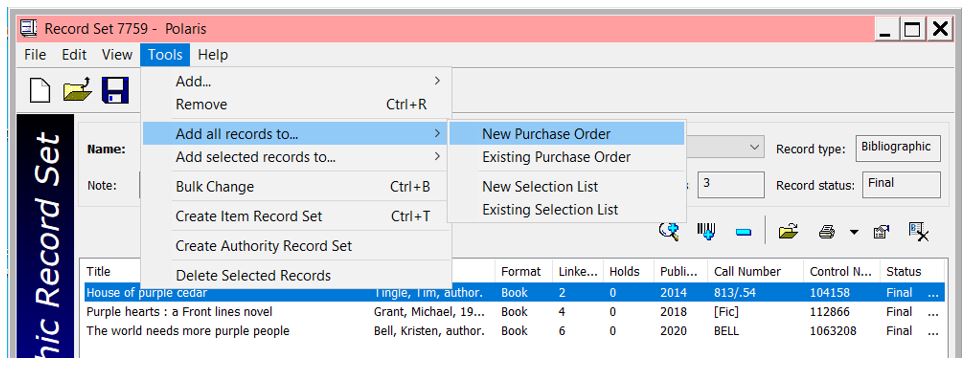
If you choose to add records to a new Purchase Order, a brief workform is presented to enter information about the PO.
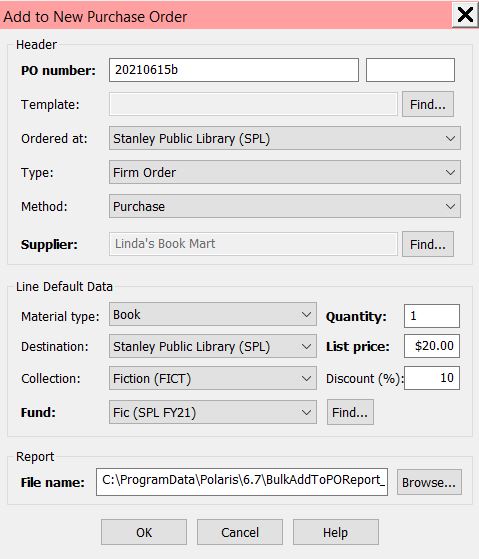
- PO Number – Enter the number of the PO
- Template – select if you wish to use a PO template
- Ordered at – Defaults to the logged in user’s library
- Type – Select the order type – Firm, Donation, Gift, Standing Order or Subscription
- Method – Select Purchase or Depository Agreement
- Supplier – Use the Find button to locate and select the supplier
- Line default data – enter default data that will populate the line item grid. This information can be altered when the PO is created.
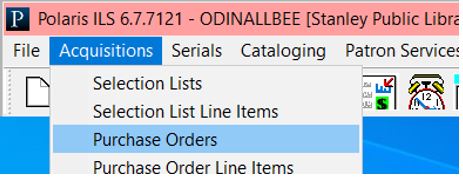
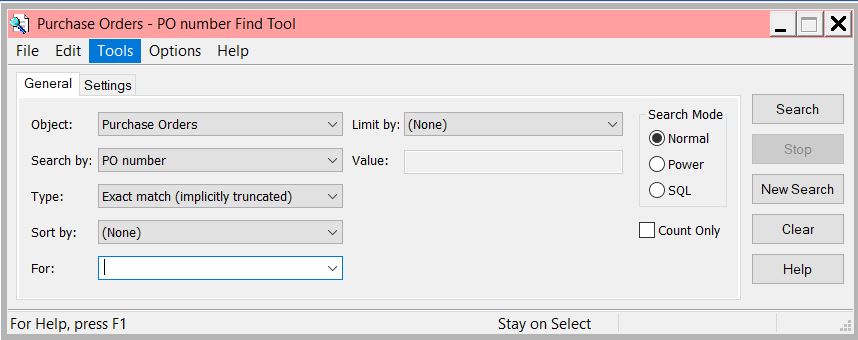
3. Once added, you need to search for the PO to edit and/or process it. On the menu bar select Acquisitions | Purchase orders or click the Purchase Orders icon.
A searchbox displays allowing you to search for existing purchase orders.
4. Once the purchase order is displayed, elements can be edited, including line items.
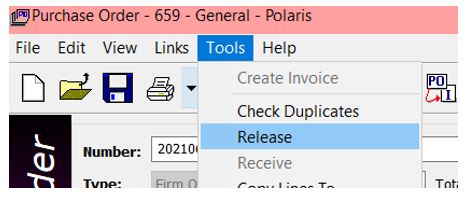
RELEASING OR SUBMITTING THE PO
Once the PO has been created, updated and saved, it can be released. The release functionality includes several events:
- The status changes from Pending to Released for firm, gift and donation PO types
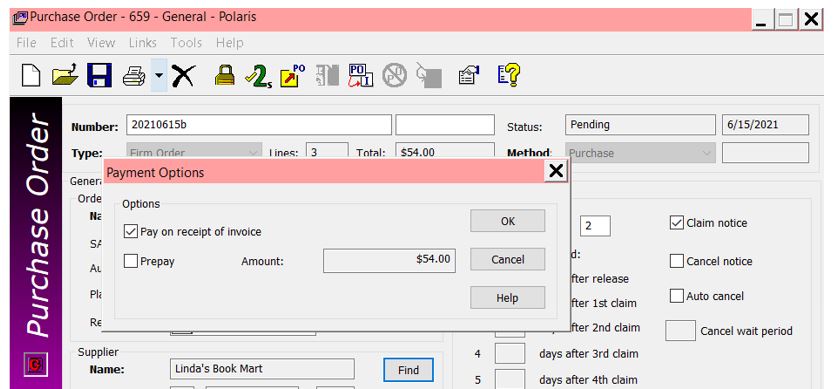
- Funds are expended if the PO is prepaid
- An invoice is created if the PO is prepaid
- Funds are encumbered if the materials will be paid for upon receipt
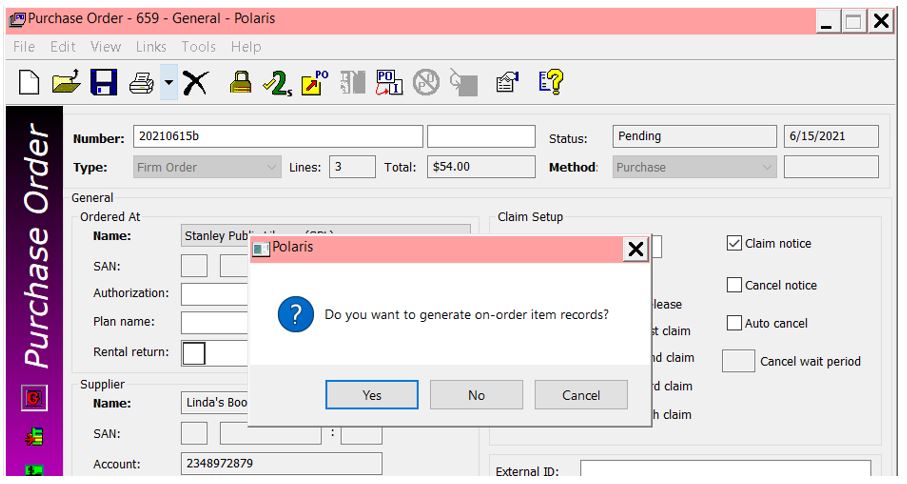
- On-order items can be generated if staff respond ‘yes’ to the prompt to create items
- A claim alert date is calculated if claiming is used
- A duplication check is performed for matching line item segments on other PO's
To release a PO, on the menu bar select Tools | Release or click the Release Order icon.
Click Yes or No indicating if you would like to generate on-order item records. If you want items generated, an on-order item template must be set-up.
You are then prompted if you wish to pay upon receipt or prepay.
The orders have been processed, and the PO can be printed to submit to the supplier.