P2E Cleanup - Electronic resources that migrated as physical materials
Create an analytics report of the electronic items that migrated as physical.
Usually, you will notice this after migration when physical items are in a location previously used for electronic resources, for example, a collection called ELEC. An analytics report is necessary because you will need URLs included in the report for clean up later.
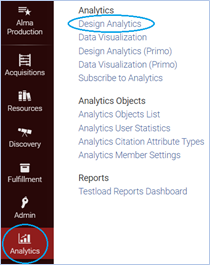
- Analytics > Design analytics.
Image
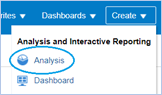
- Click on Create and Analysis.
Image
- For the Subject Area choose Physical Items.
Image
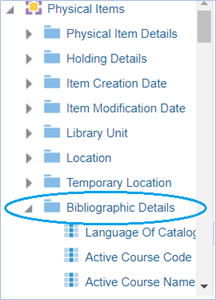
- Open the folder for Bibliographic Details.
Image
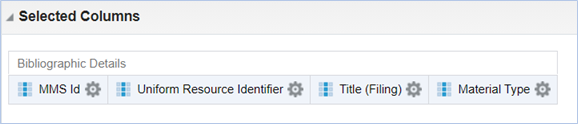
- Double click on MMSID, Uniform Resource Identifier, Title (Filling), and Material Type to add them to your criteria.
Image
- Now open the folder for Location, and double click on Location Code to add it to your criteria.
Image

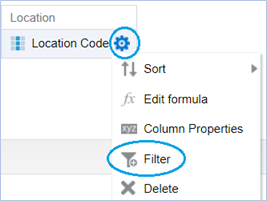
- Now click on the gear symbol under the Location Code and select Filter from the drop-down menu.
Image
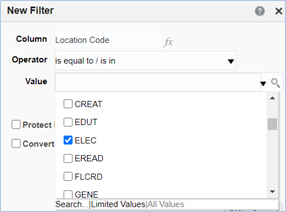
- A form appears to help you create the filter. Keep the Operator set to “is equal to / is in.” Use the drop-down box to select the location code for the electronic location. For our example, the code is ELEC. Click OK.
Image
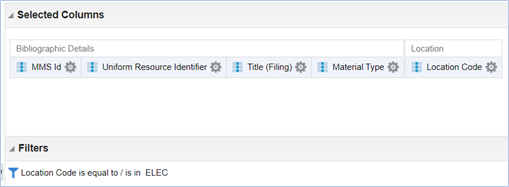
- The criteria now look like this.
Image
- Save the analysis by clicking on the symbol in the upper right of the screen. Name it something descriptive.
Image

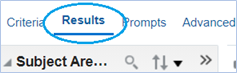
- Click on the word Results at the top of the screen to see the results of your analysis.
Image
 Image
Image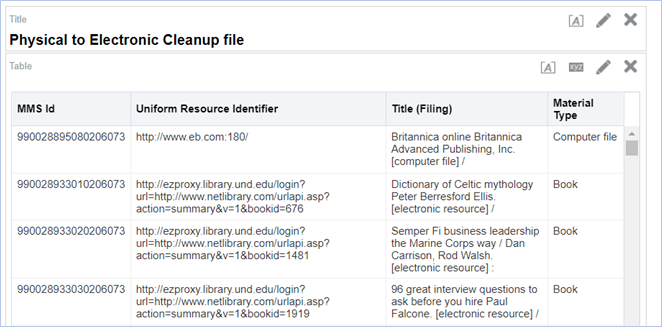
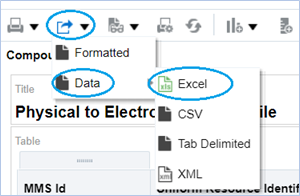
- Export the analysis in the form of an Excel spreadsheet to your computer.
Image
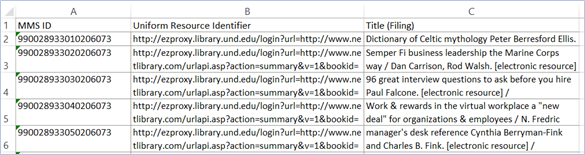
If you prefer a formatted Excel report, you can download one under the Formatted option. Review the spreadsheet.
If there are rows that have no URL, delete those rows from the spreadsheet. records without URLs will have to be cleaned up separately from this procedure.
Important: Save this report someplace you will remember. You will need to refer to this report for cleaning up your records later.
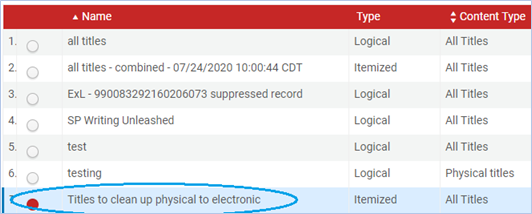
Create a set of Titles
- Create an itemized set with a spreadsheet of MMS IDs. You may want to break up your sets into multiple parts or do them all at once. Because you will be creating an import profile later that assigns material type, it is useful to break records into batches based on material type.
- If breaking your report into multiple parts, you copy and paste the parts into a new spreadsheet. Include the row headers, with the column header MMS ID in Column A. Alma will ignore the rest of the columns, but it may be nice for you to refer to the titles, so you can include them.
Image
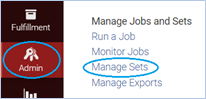
- Admin > Manage Sets.
Image
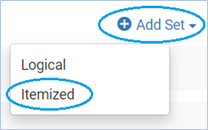
- Click Add set and select Itemized.
Image
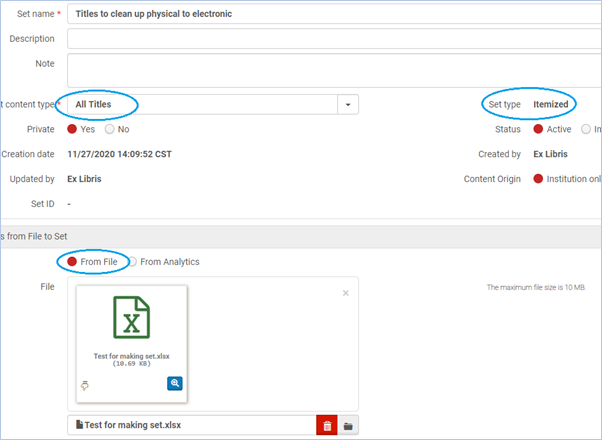
- Give the set a set name, make sure the content type is Titles, and upload your Excel file from your computer. Click Save.
Image
Run a job to export bibliographic records (Exporting records does not delete them from Alma)
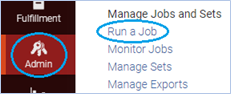
- Admin > Run a Job
Image
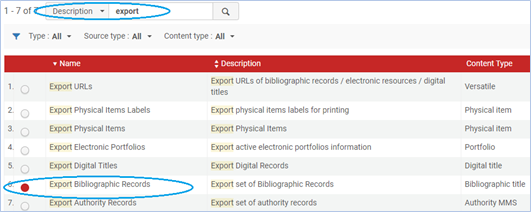
- Find the Export Bibliographic Records job. Select it. Click Next.
Image
- Select the set of titles to export. Click Next.
Image
- Select the following parameters: Binary, MARC21 Bibliographic, if you are exporting a large batch of records have them break into batches of 1000 or 5000, select the expand routine to include holdings information, export to the Institution folder so ODIN staff can access it if necessary. Click Next. Click Submit.
Image

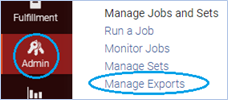
- To download the files(s) to your computer. Go to Admin > Manage Exports.
Image
- Select the institution tab, select View Files from the row action menu.
Image

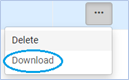
- The export files appear, select Download.
Image
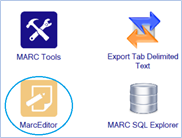
- Optional: Review the Downloaded records with MARC Edit (https://marcedit.reeset.net/)
- Open MARC Edit. Click on MarcEditor.
Image
- Open your downloaded file. Review the files to make sure they look right, and to remind yourself how 856 fields constructed- for example notes are in $3 or in $z.
Delete the downloaded records from your Alma
- Click Admin > Run a Job
- Find the Delete Bibliographic records job. Click Next.
Image

- Select the same file of titles that you exported in the previous step. Click Next. Click Submit.
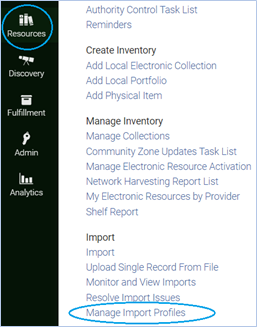
Create an import profile
- Resources > Manage Import Profiles
Image
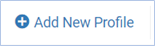
- Click on Add New Profile.
Image
- Select Profile Type: Repository and click Next.
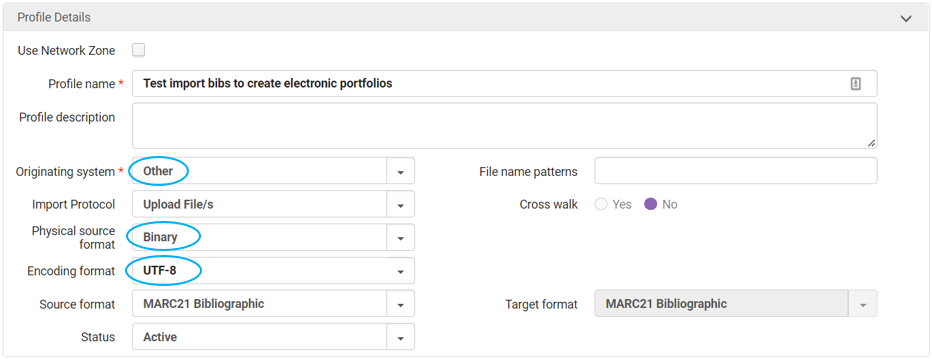
- Fill in the form- unclick check for network zone, name the import profile, originating system is Other, physical source format is Binary. Click Next to go to the 3rd screen.
Image
- On screens 3, 4, and 5 use the defaults. Click Next.
- On screen 6, select Electronic, and a form for electronic resources appears.
Image

- The import will create standalone portfolios. We will add them to a collection in a later step. Use these settings:
Image
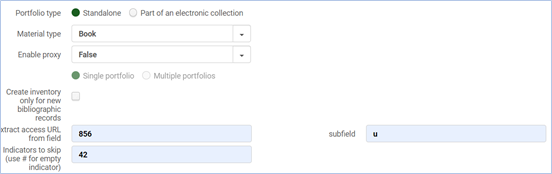
Material type is Book for this example. Refer to your spreadsheet, and export by material type so you can import and create the correct material type.
856 42 indicates that the link is not to the resource itself, so do not create portfolios for those links.
If you want to include the public note from $z or $3 you would put it further down on the form:Image
At the bottom of the form make sure you check Activate Resource. Click Save to save the Import Profile.Image
Load your records into Alma using the new import profile
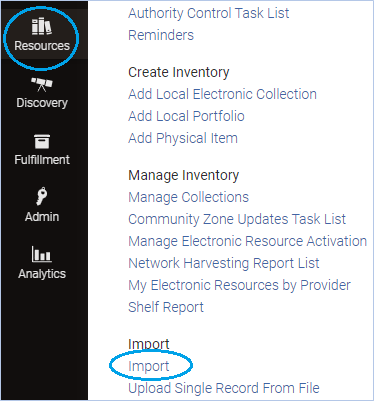
- Resources > Import
Image
- Select the import profile you are going to use and select Run from the row action menu.
Image

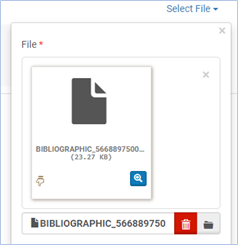
- Select the file of bibliographic records that you downloaded to your computer in step 4. Click Add.
Image
- On the next screen click Submit to start the import.
Image

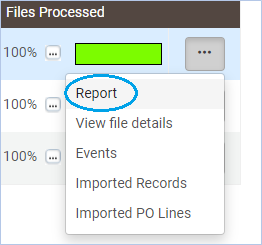
- Once the file is finished importing, view the Report.
Image
- Note that you can have more portfolios than records processed because a bibliographic record may have a url for more than one portfolio on it.
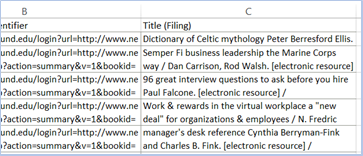
- You may also want to spot check your records by looking up titles in Alma from your spreadsheet in step 1.
Image
 Image
Image
Create a Local Electronic Collection
- Use your spreadsheet to identify collections to group your electronic resources- for example, Netlibrary or JSTOR.
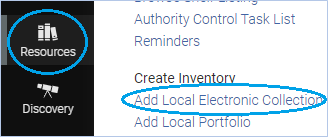
- Create a local electronic collection. Resources > Add Local Electronic Collection.
Image
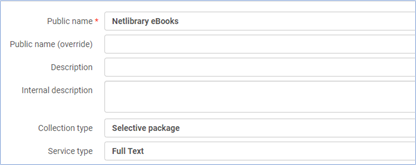
- Give the local electronic collection a name and set the collection type and service type. Click Save and continue.
Image
- Change service activation to Available.
Image

- Click the next tab Service Description. It should say Full Text.
- Click the Linking tab. Fill this tab in according to your collection. If the links must be proxied as for Netlibrary you would put that information here: Proxy enabled: Yes, and Select your proxy from the drop-down box.
Image

- Click Save and Save again.
Create a set of portfolios to add to the local electronic collection
- Search your institution for Electronic portfolios | Is Standalone | Equals | Yes then add a line AND Electronic Portfolio: URL |Contains keywords | part of the url you are searching for.
*It is very important to include the line “Is Standalone Equals Yes” because you do not want to take actions on portfolios that are already set up in another collection.Image
- Save your query as a set.
Image

- Give your set of portfolios a name and save it.
Image
Add the set of portfolios to the local electronic collection
- Search for your electronic collection. For example, Electronic collection | Electronic collection name| Netlibrary
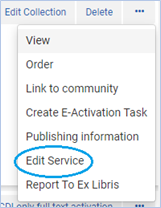
- Click the row action menu for the electronic collection and click Edit Service.
Image
- Click on the Portfolios tab. Then click +Add and Add from Set.
Image

- Select the set of portfolios from the list and click Submit.
- You will receive a message asking you to confirm this process, click Confirm.
Editing portfolio URLs to remove proxy information
Review your spreadsheet and note whether you have bibs that matched with records from another library during migration. The URLs will have that library’s proxy information:

- Create a set of portfolios to update. Conduct a search for all the portfolios in a collection and save the query. For example:
Image

- Admin > Run a Job.
- We have set up our library’s proxy information in the Service of the electronic collection. So, we will delete the proxy information from the URLs. Select the job “Change electronic portfolio information.” Click Next.
Image

- Select the set of portfolios:
Image

- Click Next. For the line “Delete or replace url’s prefix” type in the proxy prefix in the box and leave the “with” box blank. Click Next.
Image

- You will see a confirmation page showing what will be done. Click Submit. You will see a confirmation message. Click Confirm. The job runs.
- Search for some of the portfolios from the spreadsheet and see that the URLs are correct. Check the service of the collection to make sure the proxy is there (not in the portfolio record). View the portfolios in Discovery and check that they work.
Clean up
Once you have all your new electronic collections set up, there may be some portfolios left over.
- You may want to look over your spreadsheet from step 1 and sort it by URL. Are there any portfolios in there from collections your library does not have access to? This could have happened because your library’s bibliographic records matched against another library’s bibliographic records during migration and the other library had the portfolio in multiple collections.
- As an example, a library might see these urls that look unfamiliar from Cornell that they don't have access to.
Image

- Search your institution for Electronic portfolios | Is Standalone | Equals | Yes then add a line AND Electronic Portfolio: URL |Contains keywords | part of the url you are searching for, in this case, encompass.library.cornell.edu.
- Save the query as a set.
Image

- Give the set a name and Save.
Image

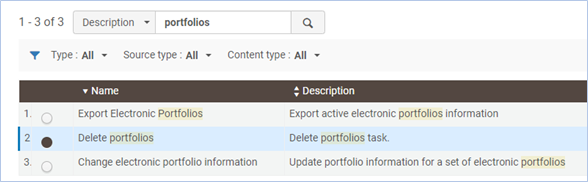
- Run a job to delete these portfolios. Admin > Run a Job. Type “portfolios” in the description box, click the magnifying glass to filter the jobs to those applying to portfolios. Select the job, “Delete portfolios.” Click Next.
Image
- Select the set of portfolios to delete. Click Next.
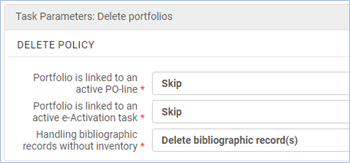
- Set your delete policy. It is best to choose to delete bibliographic records without inventory. Click Next.
Image
- Review the job information click Submit. A confirmation message appears, click Confirm.
- After the job has been completed, review the job report to make sure there were no errors.
- Repeat this step until all unwanted portfolios are removed from your Alma.