Create a vendor
How to Create a Vendor
A vendor in Alma is an aggregator or publisher that sells library materials to your institution.
Start on the Acquisitions menu, find the Acquisitions Infrastructure section, and select Vendors.
You will need to have the Vendor Manager role in Alma to be able to create and configure vendors.
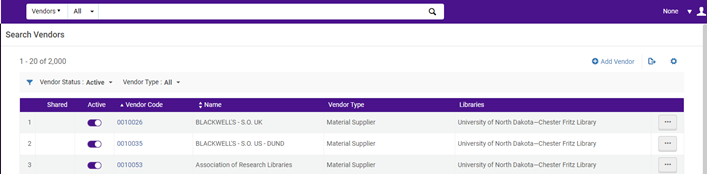
This brings you to the Search Vendors page with a list of the existing vendors. Note that you can search the vendor list using the search bar at the top of the page, and filter by vendor status (All, Active and Inactive), and filter by vendor type as well. Click Add Vendor to start creating a new vendor.
On the Vendor Details page fill in the following information
- Name – please enter name of the publisher
- Code – please enter unique code for the vendor
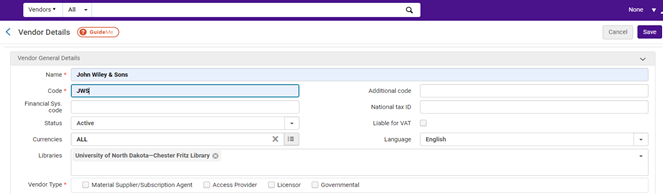
- Libraries - Select the library/branches that will be working with this vendor. You can keep the selection for your whole institution or delete that selection and choose specific libraries.
- Vendor Type – Vendors that are a material supplier or a subscription agent are organizations that you pay to provide your institutions with resources. Access providers are vendors that provide access to electronic resources. Sometimes the access provider is the same vendor as the material supplier or subscription agent; and other times they are two different vendors. Licensors provide licenses to other vendors electronic resources. Governmental vendors provide materials or access, and they receive a use-tax for an invoice payment from non-governmental vendors.
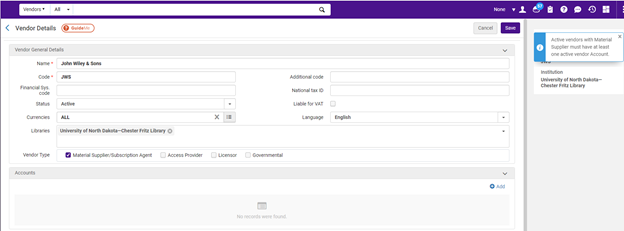
Select your vendor type and material supplier and as soon as I check the checked box my screen will refresh, and I will get two additional areas on the top screen it says Active vendors with Material Supplier must have at least one active vendor Account and the bottom.
For this example, the vendor is a Material Supplier. The page refreshes and a notice appear, reminding you the “Active vendors with Material Supplier must have at least one active vendor account.” And at the bottom, the Account section has appeared. Click on the Add to start configuring an account for this vendor.
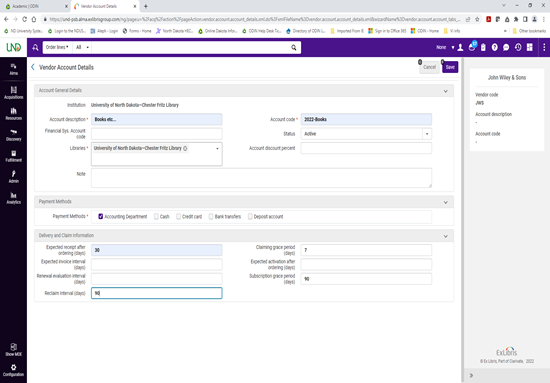
A vendor account contains the information that describes how to perform business activities with this vendor, including details like payment method, delivery, and claim information.
Now we get the Vendor Account Details Screen
- Enter the Account description (required).
- Enter the Account code (required)
- In the Payment Methods click on the Accounting Department or select more if needed.
- In the Delivery and Claims information you can add the expect receipt time and the claiming grace period before filing a claim. Then click on Save.
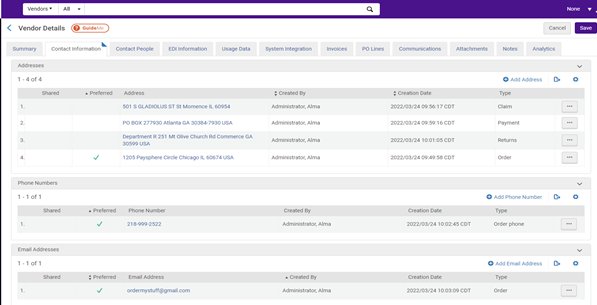
Back at the Vendors Detail page, there are now a series of tabs that can contain additional information about the vendor. You want to add the contact information this is where you enter a vendor’s physical address, phone numbers, general emails, and web addresses. By the way, some acquisitions transactions require a vendor email address so be sure to add one here.
Use the Contact People tab to add specific individuals at the vendor that your institution may need to communicate with. Please note by adding your contact here they will also appear on your Alma User list as a Contact Type.
EDI Information tab is used by vendors that allow automated, electronic ordering from Alma, using Electronic Data Interchange protocols.
Usage Data tab can be added here manually in files you get from the vendor. Please note if this vendor allows Alma to automatically retrieve usage date using the SUSHI protocol, you can set up that account information here.
And after you start ordering from this vendor, the tabs with invoices and PO Lines will be available to see the items associated with this vendor.
There is even a tab to give you direct access to some analytics information, after you start placing orders with the vendor.
Once you have completed the tabs you have entered information, please make sure you click SAVE.
Back on the Search Vendors page, whenever you need to make changes to the vendor, use the row-action Edit to open the Vendor Details page again.