Polaris Leap: Managing Hold & Transfer Requests
Updated: 1/18/24
Overview:
Holds Queue
Picklist Processing
Fulfilling Requests
Request Manager
Hold Status Reference
Print Settings for Transfer Slips
The Holds process in Polaris can apply to items owned by your library OR items owned by other ODIN Polaris libraries. If the item must be requested from outside the ODIN system, it is considered an ILL (interlibrary loan).
When a Hold is placed by a patron in the PAC or by a staff member on behalf of a patron in Leap, the following will occur:
If the item is owned by the patron's registered library:
Circ status indicates Available = the request is placed on the local library's picklist for retrieval as a local Hold.
Circ status indicates unavailable (Loaned, In-process, In-transit, etc.) = the request stays in the local library's queue for a pre-determined number of days (this is configurable and can be different library to library). This allows for the local library to fill the Hold request for their local patrons first, before sending the item to other libraries. If the local library is unable to fill the patron's Hold in this time period, the request is distributed at random to other ODIN Polaris libraries who own the item.
If the item is not owned by the patron's registered library:
The Hold request is distributed at random to other ODIN Polaris libraries who own the item. If the first library denies the request, it will be automatically sent to the next library in the queue. This continues until the request is filled, denied by all libraries in the queue, or expires.
- If a certain title is on Hold for multiple patrons throughout ODIN Polaris libraries, local copies will prioritize local Holds first. This ensures each library is fulfilling their patrons’ requests before the item is sent outside their library.
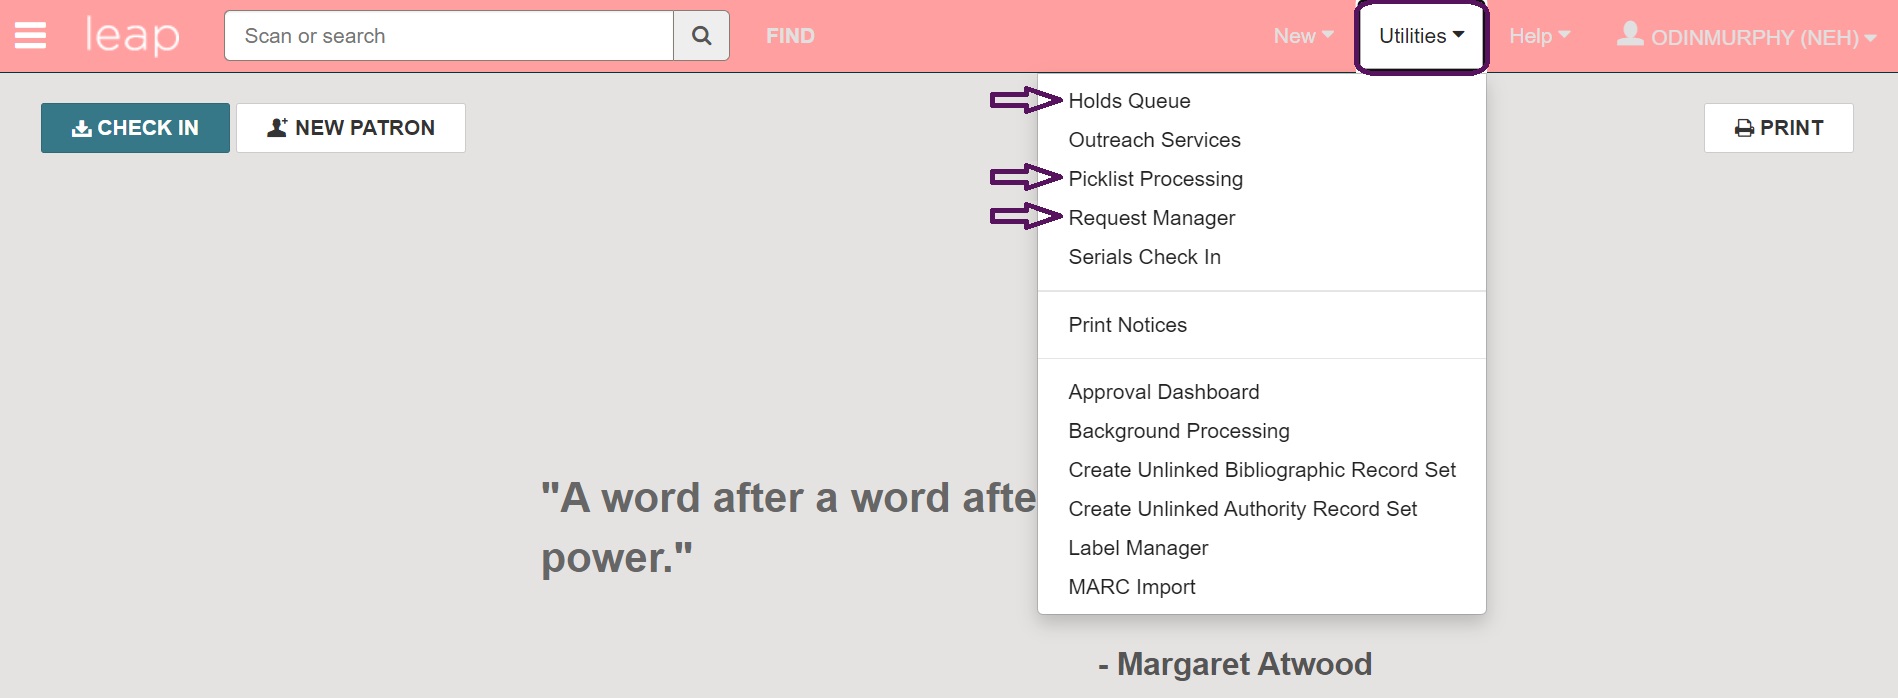
Hold requests are processed via the Utilities menu in Leap:
- Holds Queue = Search for outstanding Holds on a particular bib or item record. You can view Hold requests for a specific title or item, cancel/transfer Holds, and place new requests.
- Picklist Processing = List of Holds for items that are being requested from your library. Their circ status shows as Available in Polaris.
- Request Manager = View & manage all Hold/ILL requests that designate your library for pickup.
Additional print settings for Hold Transfer Slips will be covered at the end of this module.
Holds Queue
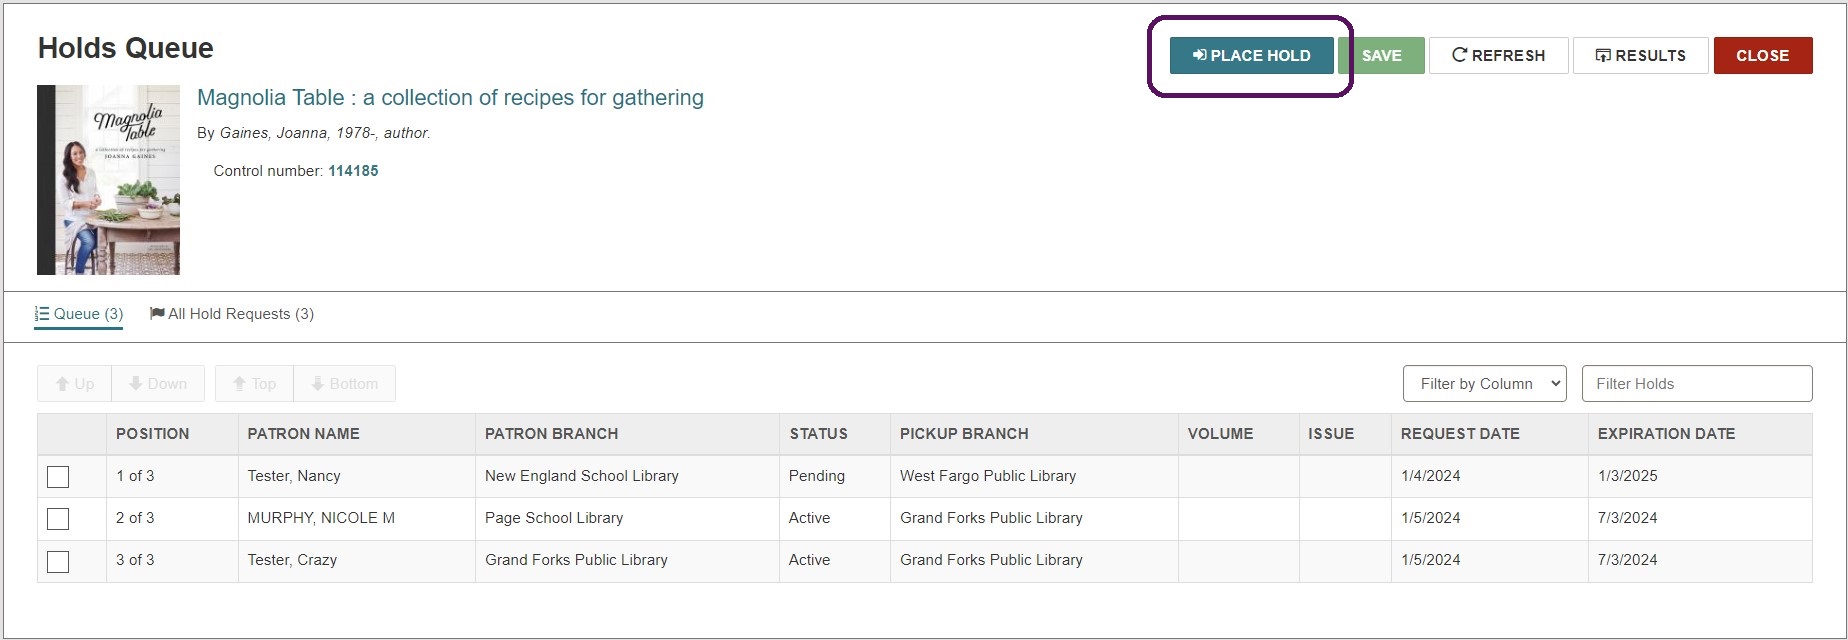
- Clicking on Holds Queue opens the Find Tool. Search for bibliographic or item records (bibliographic is the default) and the Holds Queue for that record will appear.
- Image
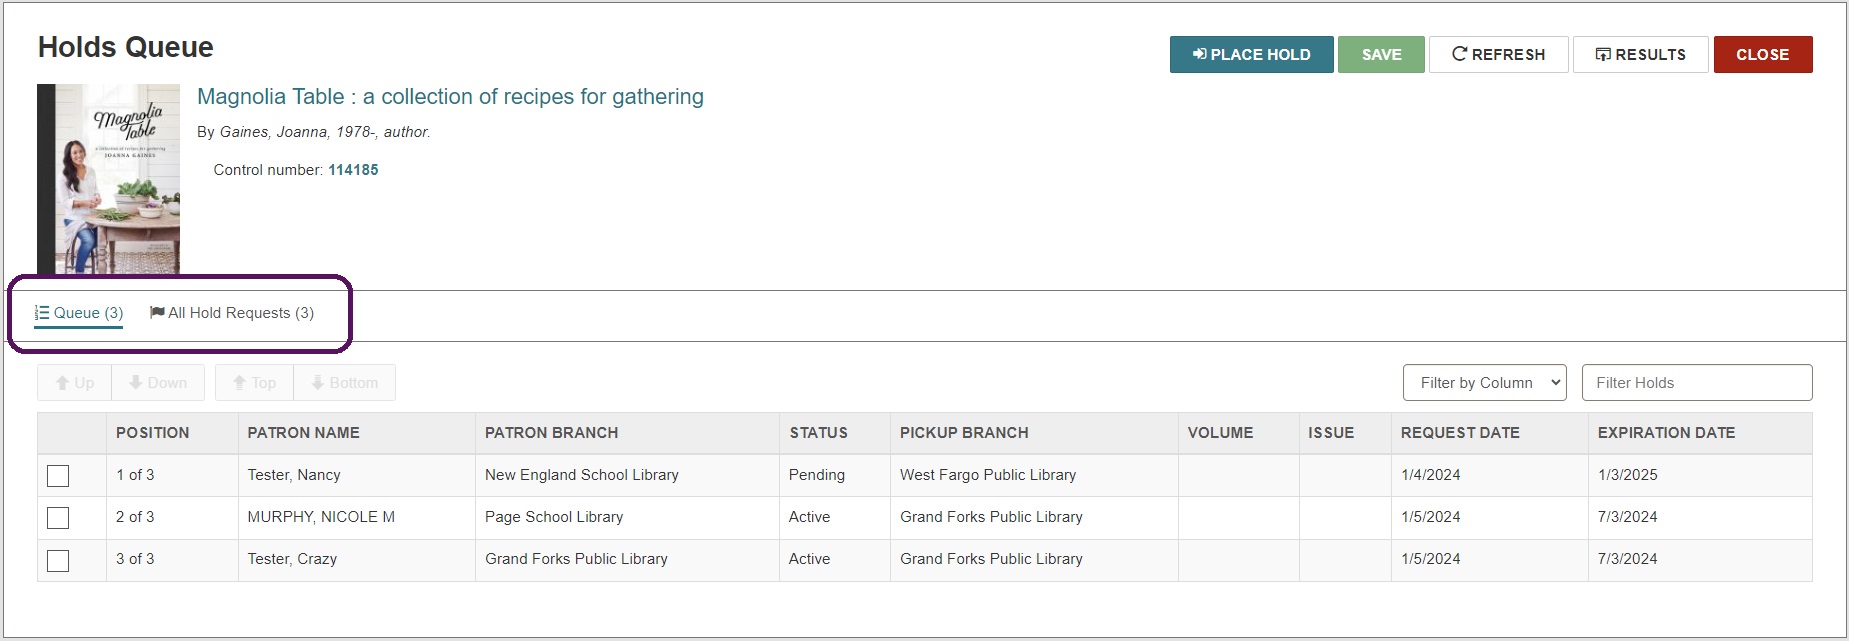
- Queue tab: displays the Active and Pending holds associated with the selected record
- It is possible to change the order of the Holds Queue from this tab, but this is not recommended.
- Holds may be filtered using the drop-down menu to the right of the screen. Simply choose your filter option from the menu and enter your criteria in the selection box.
- It is possible to change the order of the Holds Queue from this tab, but this is not recommended.
- All Hold Requests tab: displays all linked hold requests, including those with a status of Inactive, Cancelled, Expired, Held, Unclaimed, or Out to Patron.
- Use this tab to Cancel Hold Requests or Transfer them from one bib or item record to another. Click the check box next to the Hold request(s) you want selected for either action.
- Image
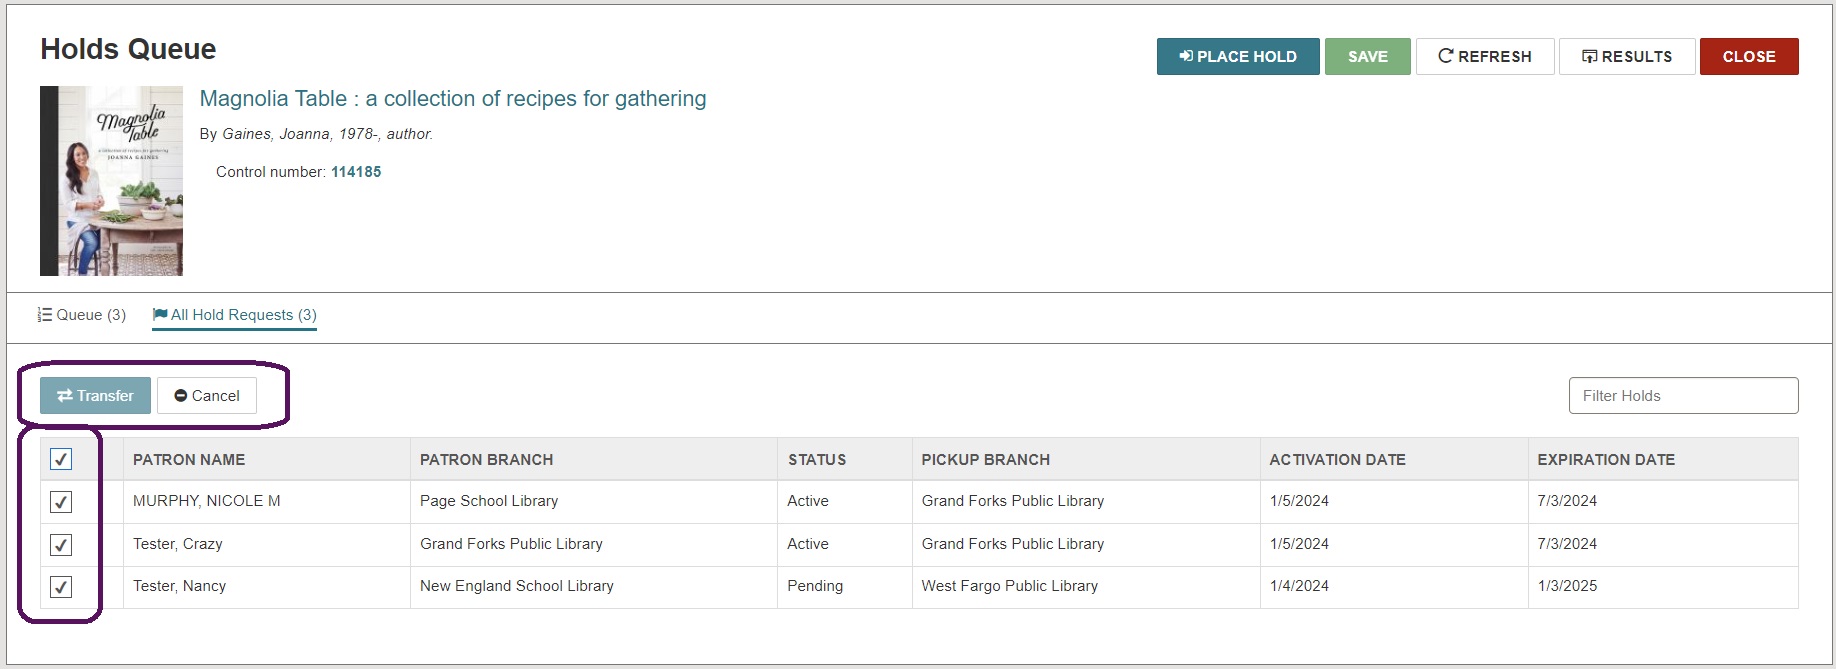
- Choosing Cancel will cancel the selected request(s).
- Choosing Transfer will open the Find Tool and allow you to search for and select the bibliographic or item record to which you want to transfer the selected request(s). Once selected, a message will pop up asking you to confirm the transfer.
- Use this tab to Cancel Hold Requests or Transfer them from one bib or item record to another. Click the check box next to the Hold request(s) you want selected for either action.
- Queue tab: displays the Active and Pending holds associated with the selected record
- From the Holds Queue, you can create additional holds by clicking PLACE HOLD.
- Image
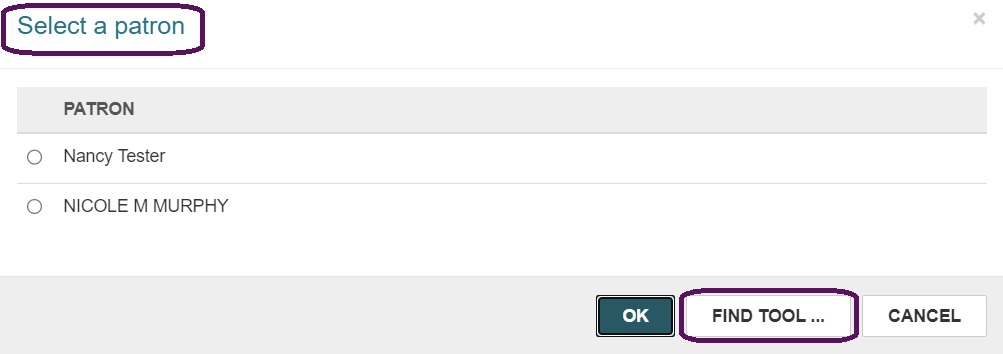
- Enter the patron account info by selecting any open accounts or using the Find Tool.
- Image
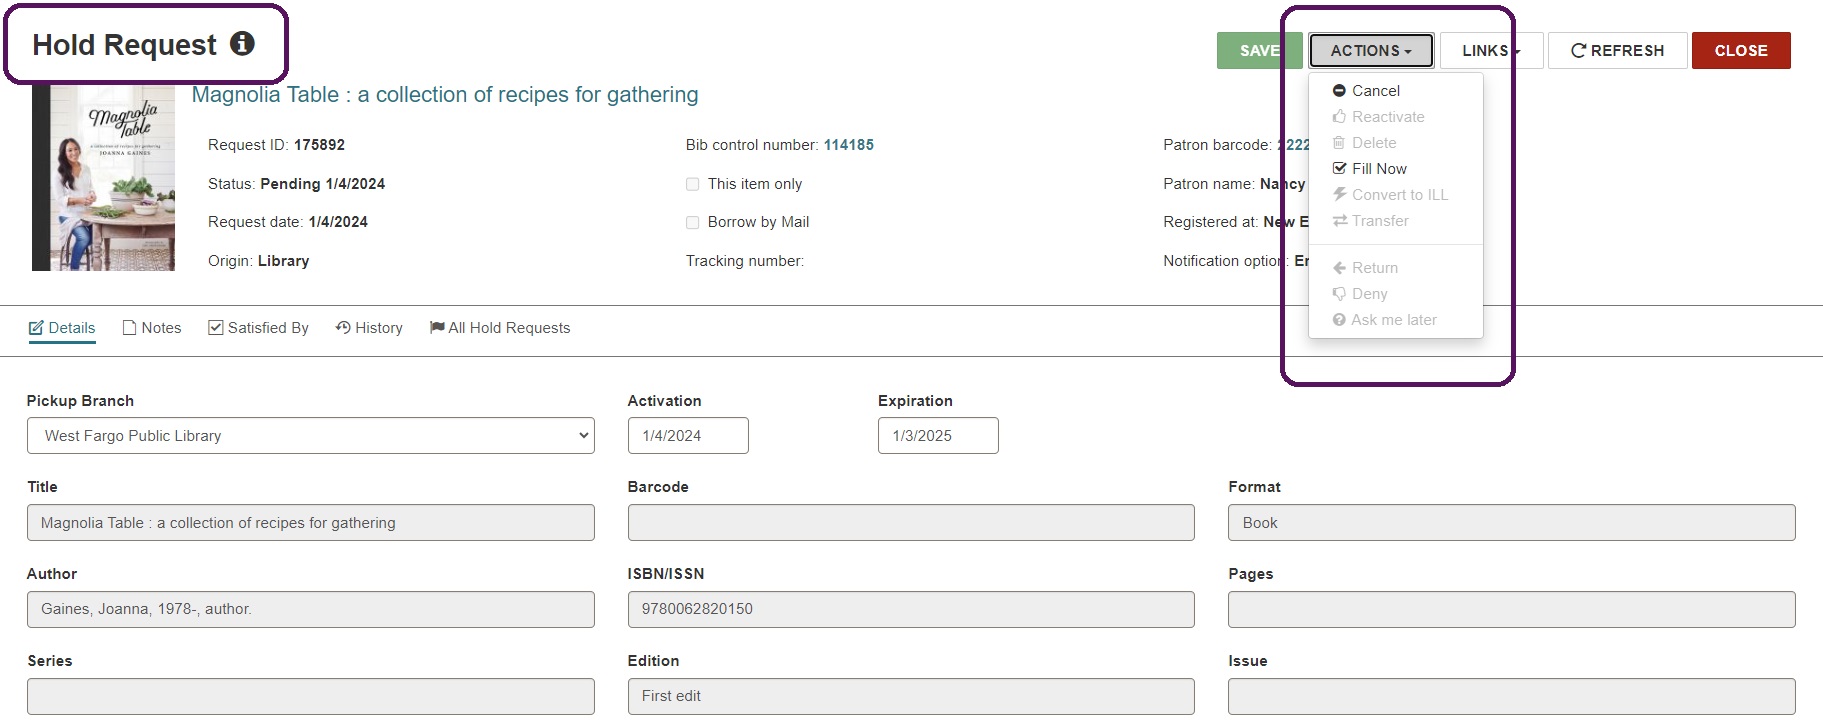
- To view more information on a specific Hold request, select a row from the list in either tab. This will take you to the Hold Request workform where you can view Details, Notes, the History of the request and more.
- To perform an action from the Hold Request workform, click the Actions drop-down menu. The list of available actions will depend on the status of the request. Options include: Cancel, Reactivate, Delete, Fill Now, Convert to ILL, Transfer, Return, Deny, and Ask Me Later.
Picklist Processing
- Your picklist is a list of material in your library that can fulfill a Hold request (i.e. the catalog shows the item to be Available).
- Image
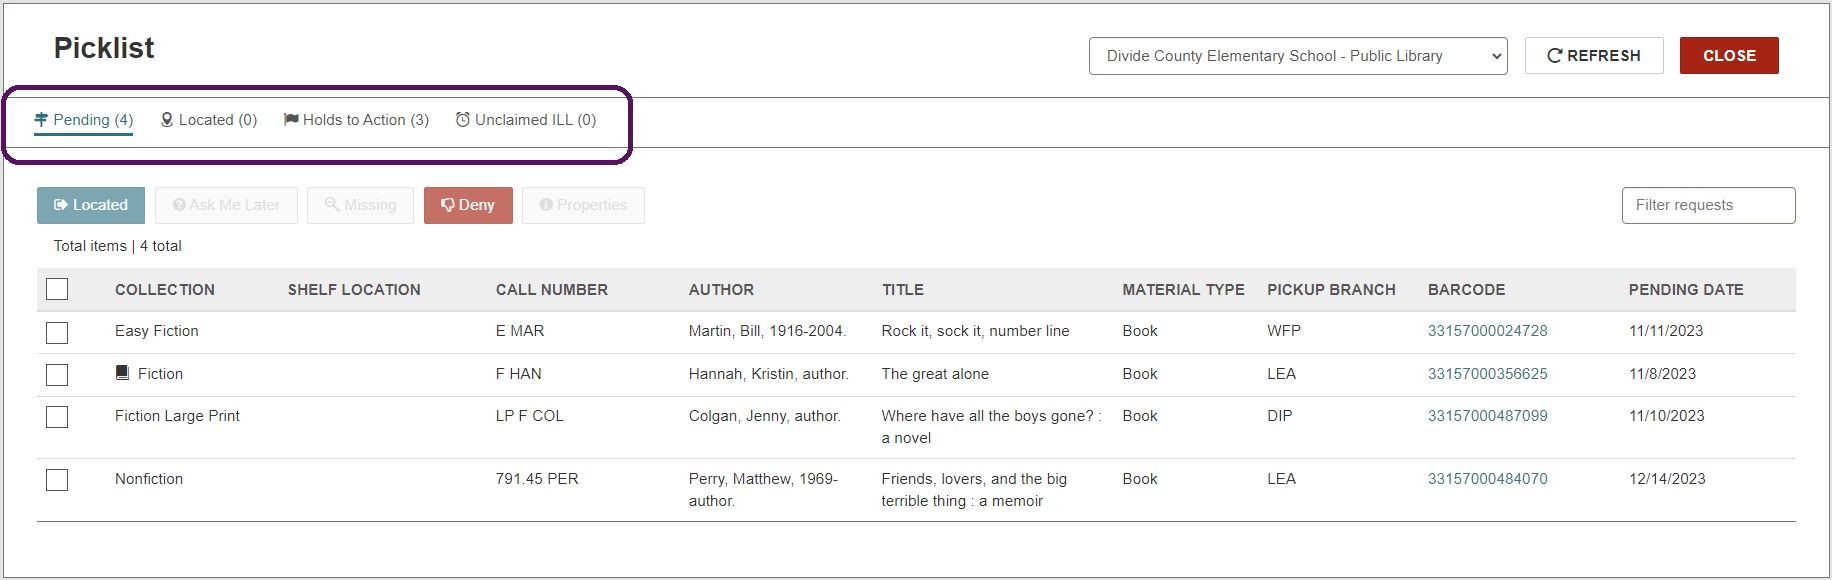
- Pending tab = lists the hold requests with a Pending status for the selected branch.
- Located tab = lists the holds that have been set to Located for the selected branch. Indicates the item has been pulled from the shelves and is on the way to a processing location where it will become held for the patron or go in-transit. Only applicable in larger library settings. Make selections and click Return to move requests back to the Pending tab if needed. This is an optional step, and generally, only applicable in larger library settings.
- Holds to Action tab = lists hold requests in Unclaimed or Canceled status that may require further action. For example, listed items may need to be pulled from your library's Hold Shelf.
- Unclaimed ILL tab = lists the ILL requests for the selected pickup branch that have a status of Received or Held and an unclaimed date earlier than the current date. You can select a row in this view to open the ILL Request workform.
- Pending tab = lists the hold requests with a Pending status for the selected branch.
- Notes:
- A hold request will only show up on one picklist at a time. If the first library in the queue cannot fulfill the request, Polaris will automatically send it to the picklist of the next library that has an available item. This will continue until the hold is fulfilled or expires.
- A request can remain on a library’s picklist for up to 3 ‘open’ days. If the request is ignored during that period of time, it will automatically move on to the next library in the queue. However, if it is not fulfilled by the other libraries in the queue, the request could continue coming back until it is fulfilled or specifically denied.
- A hold request will only show up on one picklist at a time. If the first library in the queue cannot fulfill the request, Polaris will automatically send it to the picklist of the next library that has an available item. This will continue until the hold is fulfilled or expires.
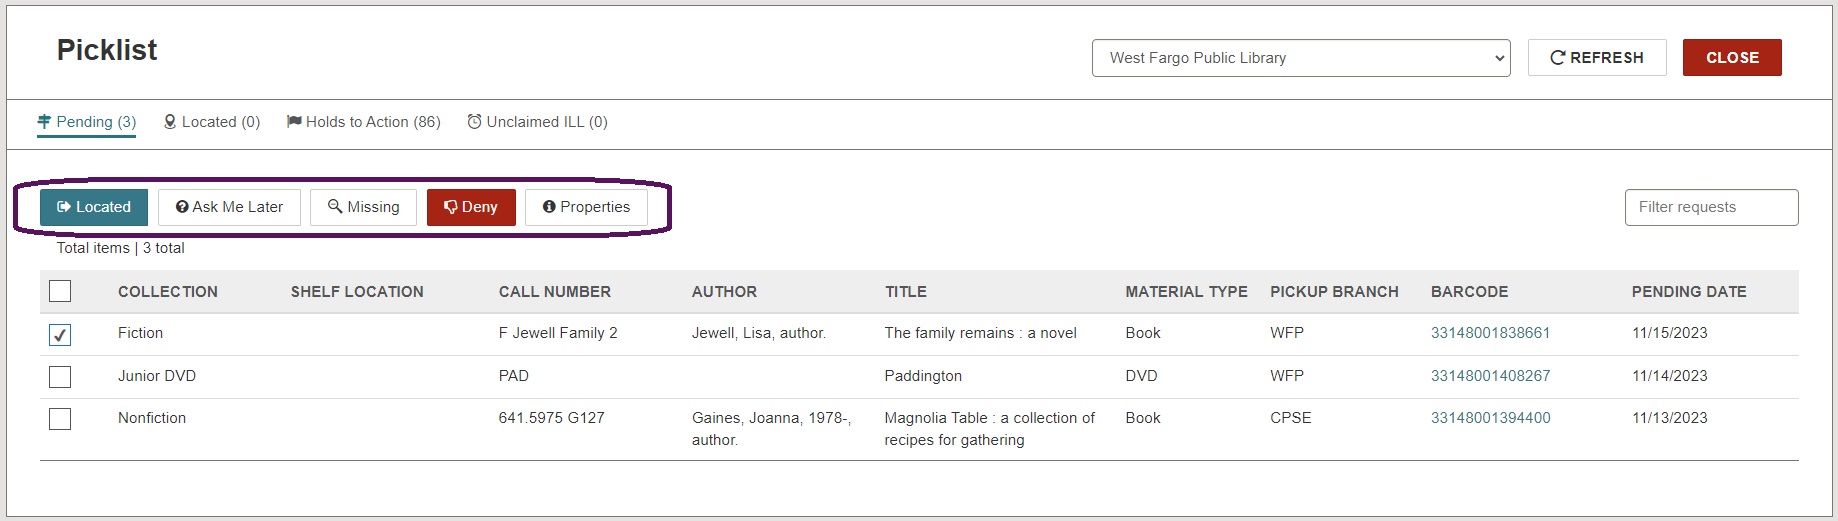
- To process your picklist, navigate to the Pending tab. Click the check box on the left of each request to select it. With one or multiple requests selected, you can choose:
- Located: indicates you found the item and intend on fulfilling the request. This step is optional and is only needed is there is a large gap of time between the item being located on the shelves and being sent. It prevents the request from being automatically moved along to the next picklist due to inaction and moves it to the Located tab of your picklist.
- Ask Me Later: indicates you are unable to fulfill the request at this time but may be able to at a later date. This option removes the request from your picklist and sends it to the next library in the queue. If all locations are exhausted without the request being fulfilled, it will get routed back to your library.
- Missing: indicates the item is missing from your shelves, moves the request along to the next library, and places the item in 'Missing' status.
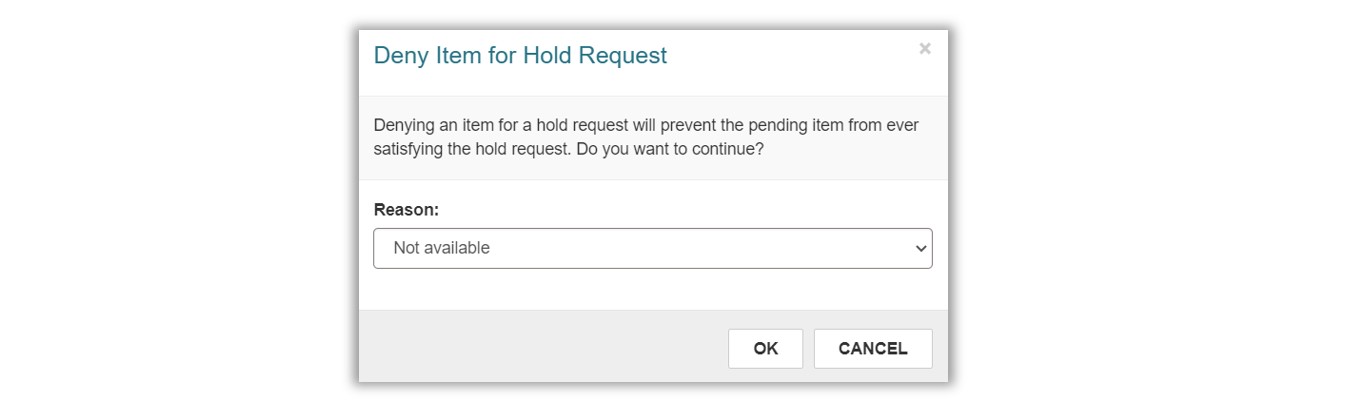
- Deny: indicates your library is unable to fulfill the request. This option removes the request from your picklist, sends it along to the next library, and prevents it from being routed back. You will be presented with a dialog box asking for confirmation and given the opportunity to choose a reason for denial from the drop down menu.
- Image
- Properties: displays request details
- Located: indicates you found the item and intend on fulfilling the request. This step is optional and is only needed is there is a large gap of time between the item being located on the shelves and being sent. It prevents the request from being automatically moved along to the next picklist due to inaction and moves it to the Located tab of your picklist.
- Note: all above actions can be done in bulk. For example, to deny several requests at once, select the check box next to multiple requests before clicking Deny.
- Fulfilling Requests:
- Retrieve picklist items from your shelves. You may choose to print your picklist to take with you.
- Optional step: From the Pending tab of your picklist, select the request(s) you intend to fulfill and choose Located. This updates the status from Pending to Located and moves the request(s) to the Located tab.
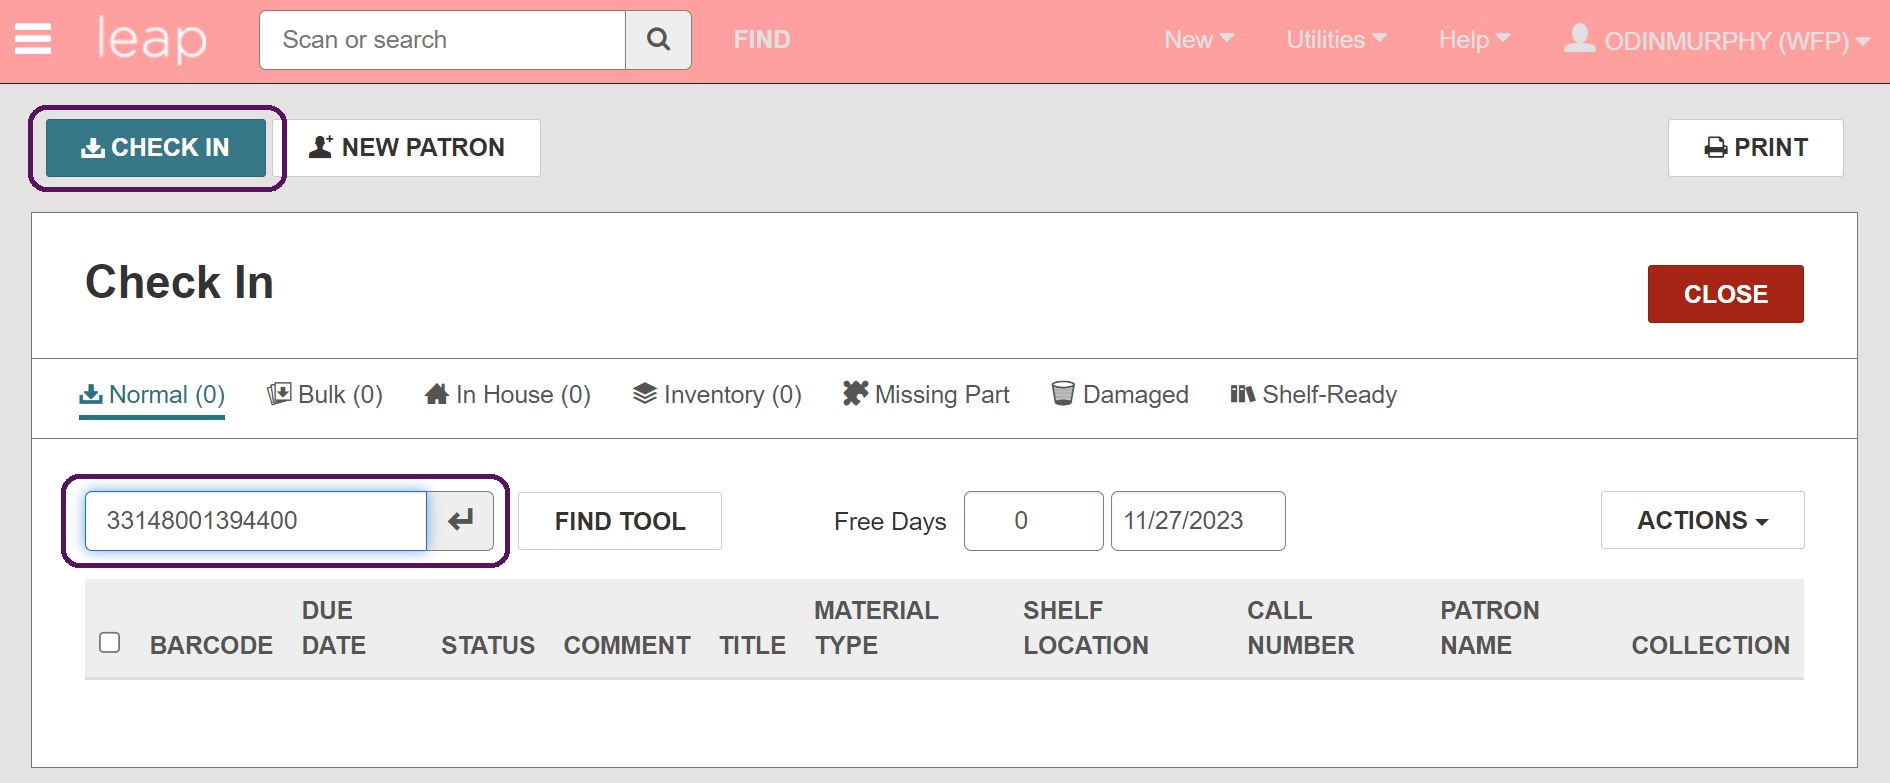
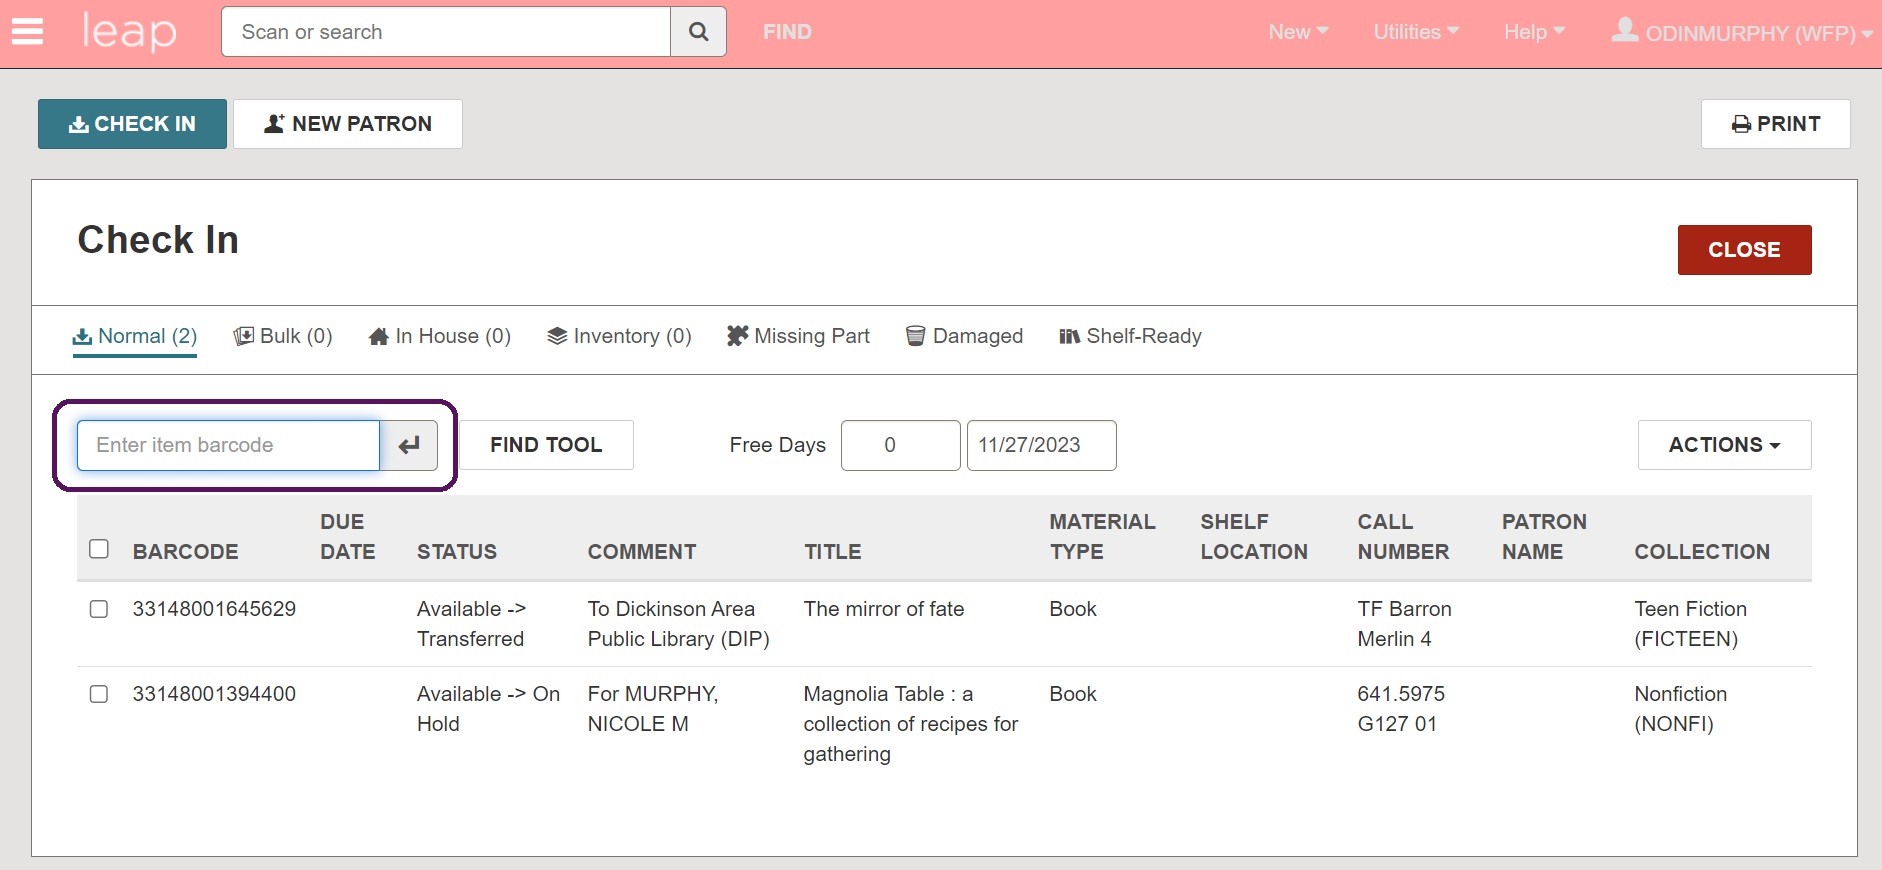
- Go to the Check In screen and scan the barcode of each item you retrieved.
- Retrieve picklist items from your shelves. You may choose to print your picklist to take with you.
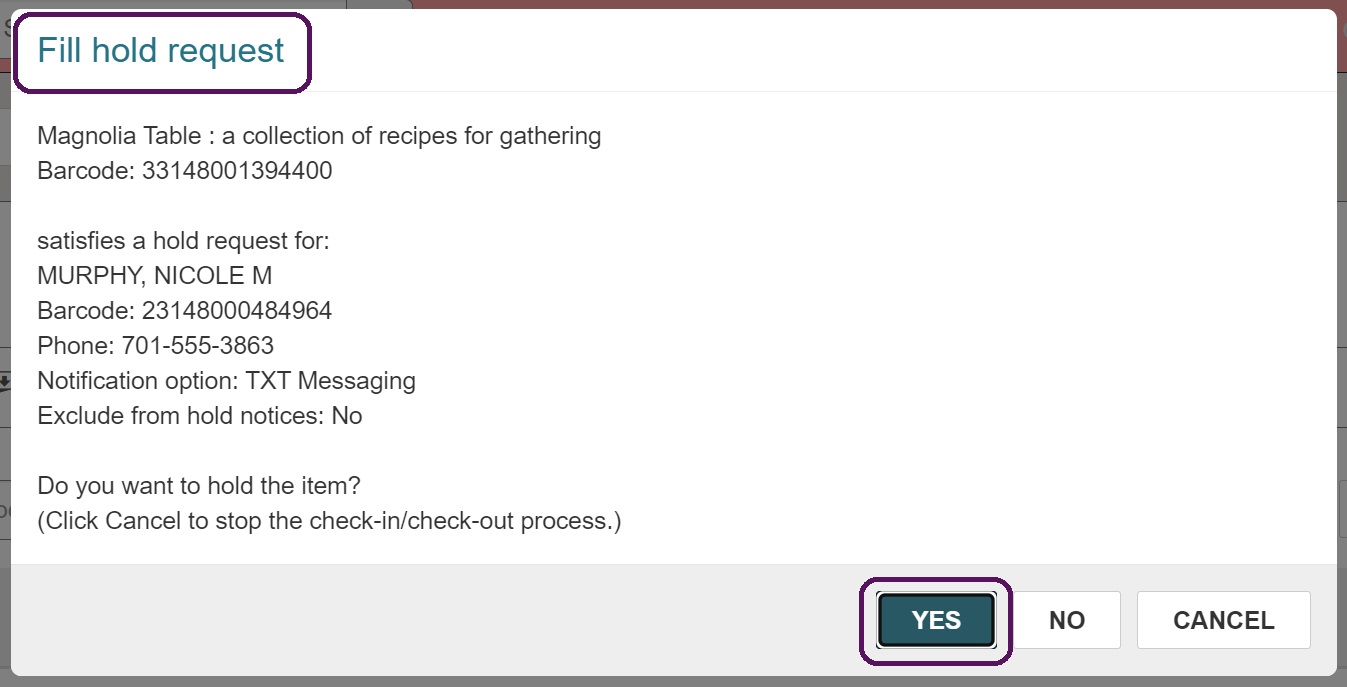
- If the item fills a Hold for your library, a Hold slip will pop up indicating the item can fill a request. Choose Yes to satisfy the Hold and print the Hold slip if desired. If your Hold notifications are enabled, your patron will be notified via their preferred notification method.
- If the item fills a Hold for another ODIN library, a transfer message will pop up indicating the item can fulfill the Hold and needs to be transferred to the requesting library. Choose Yes to satisfy the Hold.
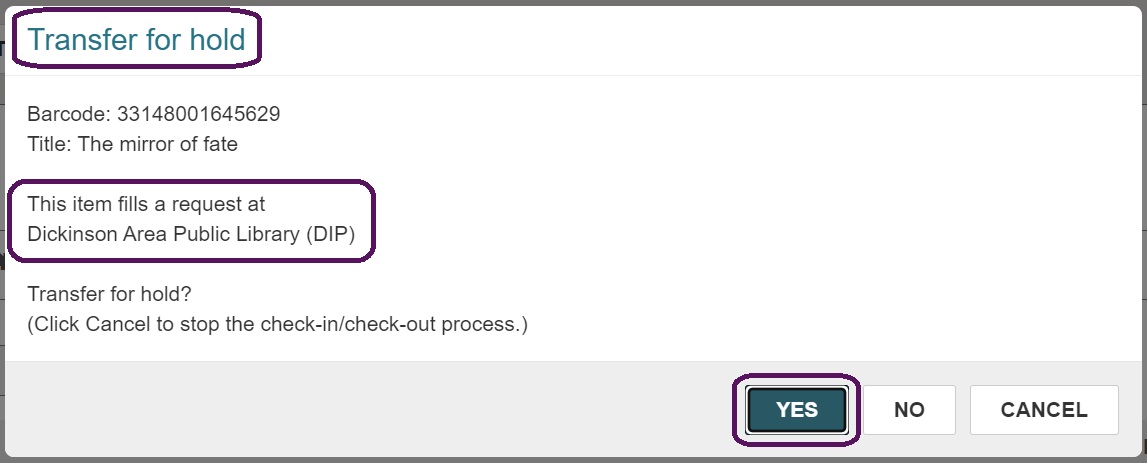
- The In-Transit Slip will appear. Print slip and place it with the item.
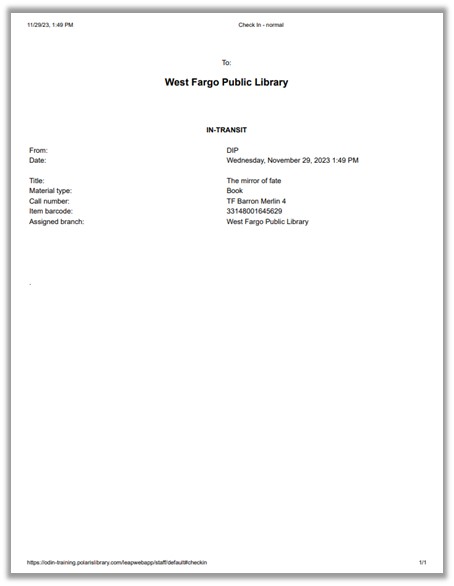
- Send the item(s) to the requesting library. Item will be in Transferred status until it is checked in at its destination.
- Note: An ILL Directory with all ODIN library mailing addresses and contact information can be found at https://www.odin.nodak.edu/libraries/ill
- Note: An ILL Directory with all ODIN library mailing addresses and contact information can be found at https://www.odin.nodak.edu/libraries/ill
- Continue scanning in your remaining items until your picklist is complete.
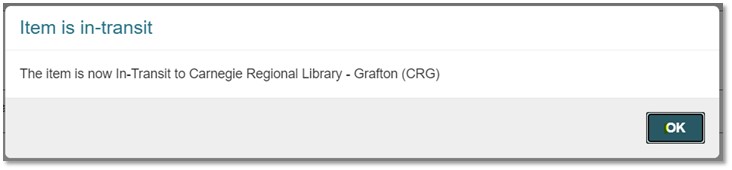
- When an item is ready to be returned from a borrowing library to its home library, a transit message will appear upon check-in. This will tell the borrowing library where to return the item and place it in In-transit status.
- The In-Transit Slip will appear. Print slip and place it with the item.
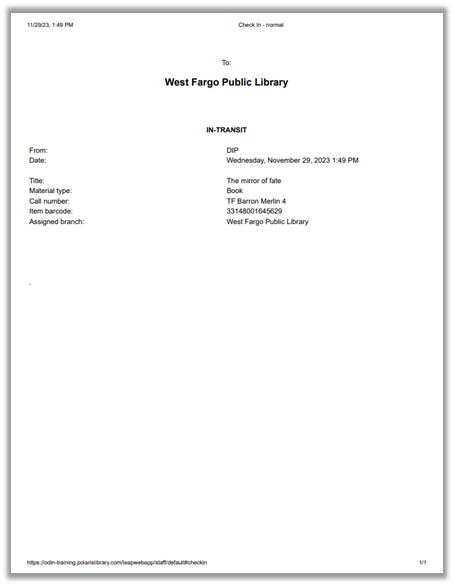
- The item will remain in In-Transit status until it is checked in at its home library.
- Handling Lost & Damaged Items: If your library has requested an item from another library and that item has become lost or damaged, contact the owning library to arrange for payment or replacement. You may choose to attempt to recoup the cost of the item from your patron.
Request Manager
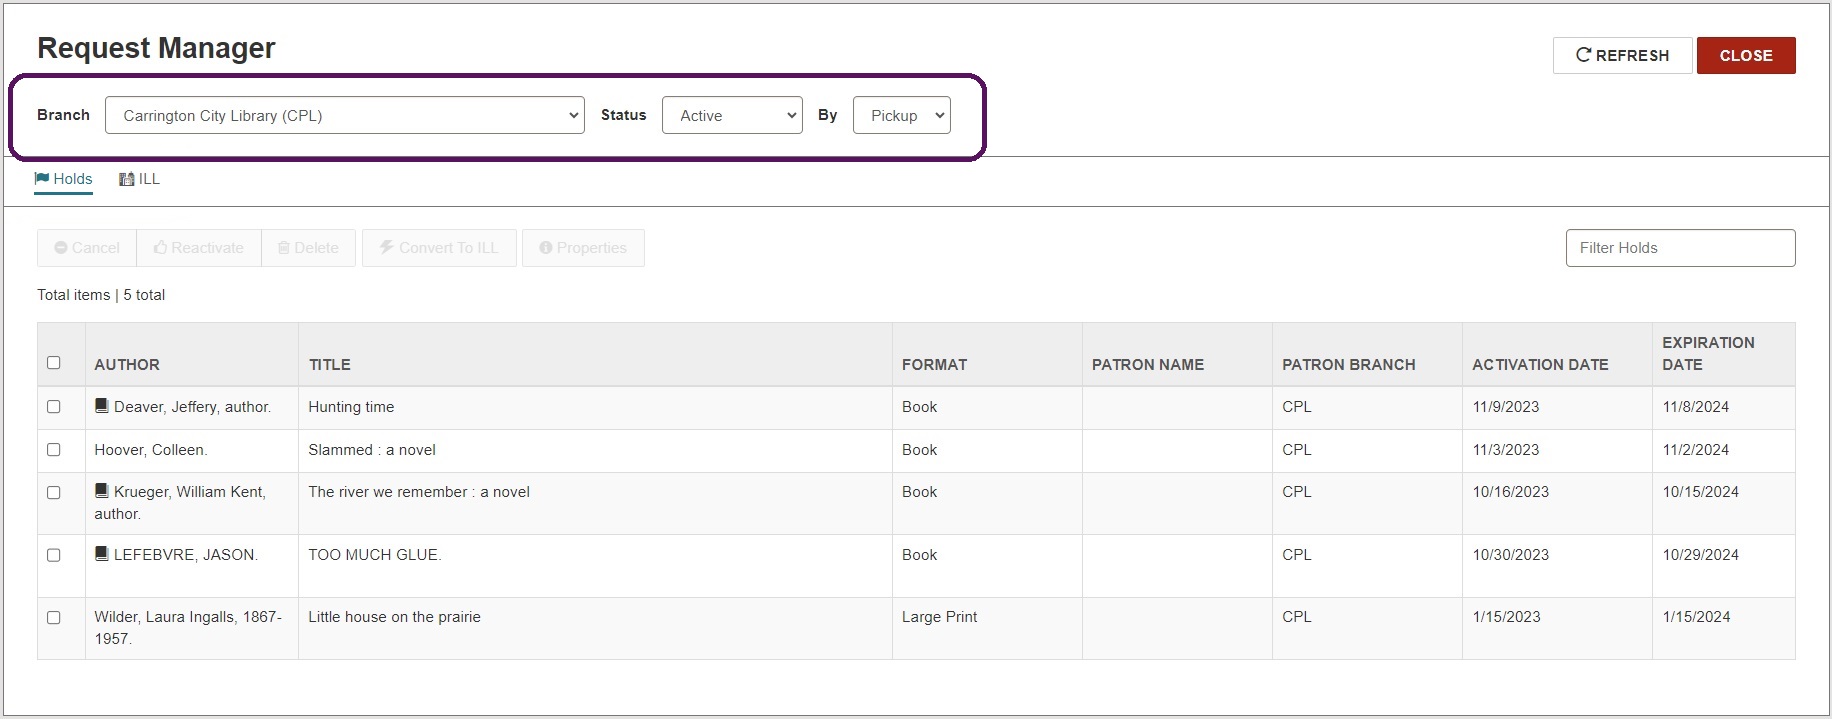
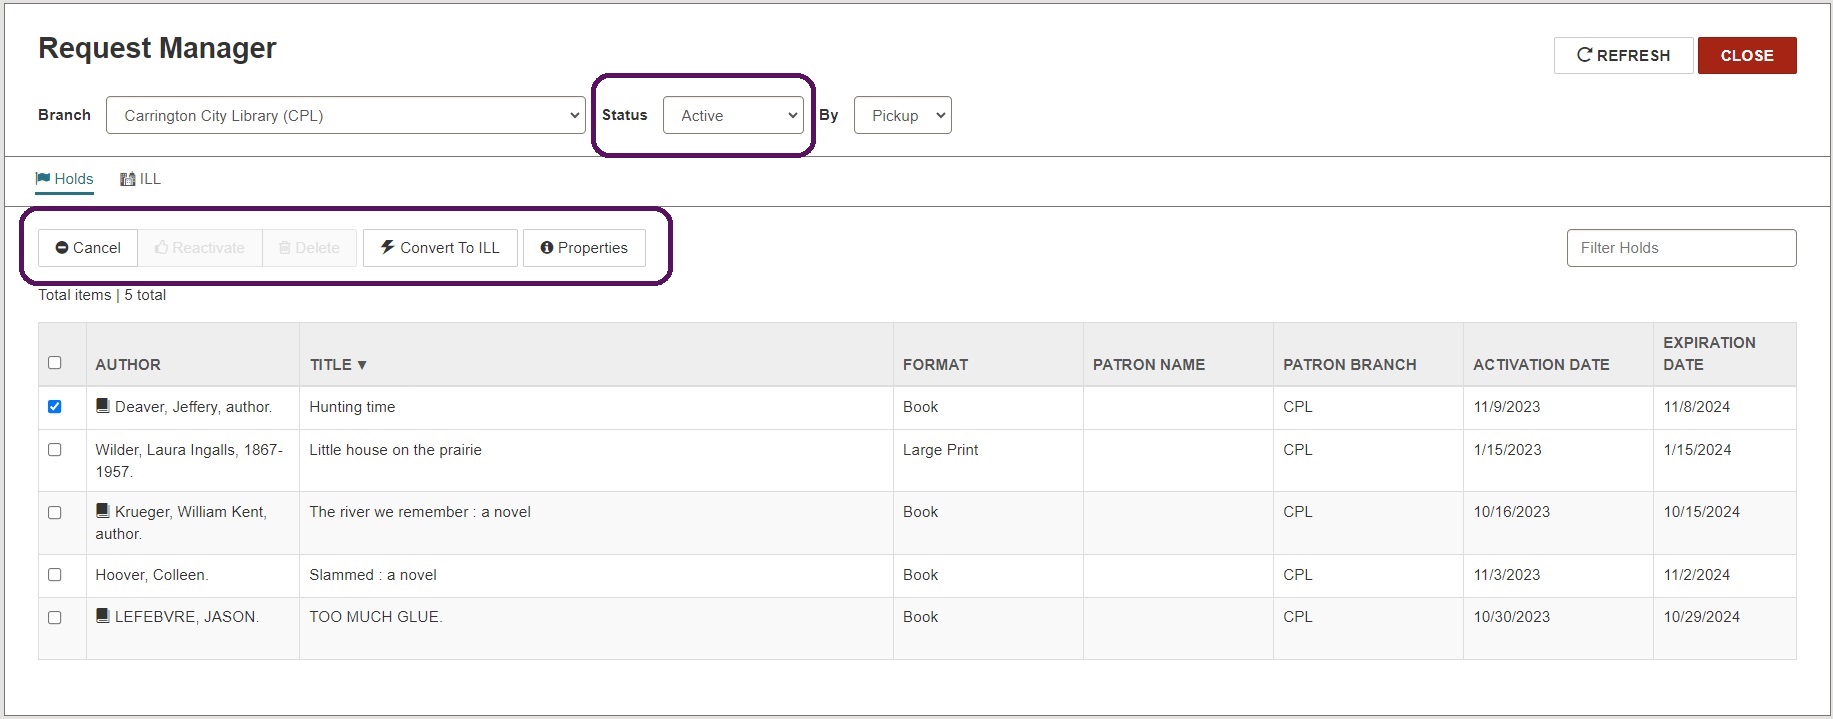
- The Request Manager lists all Hold/ILL requests that designate your library for pickup and allows you to manage them from the list. Upon opening, the filters across the top of the screen will default to Active requests found in your library. The Status and By fields can be adjusted to further filter and sort the requests. We do not recommend changing the Branch field as this will affect the requests of other ODIN libraries.
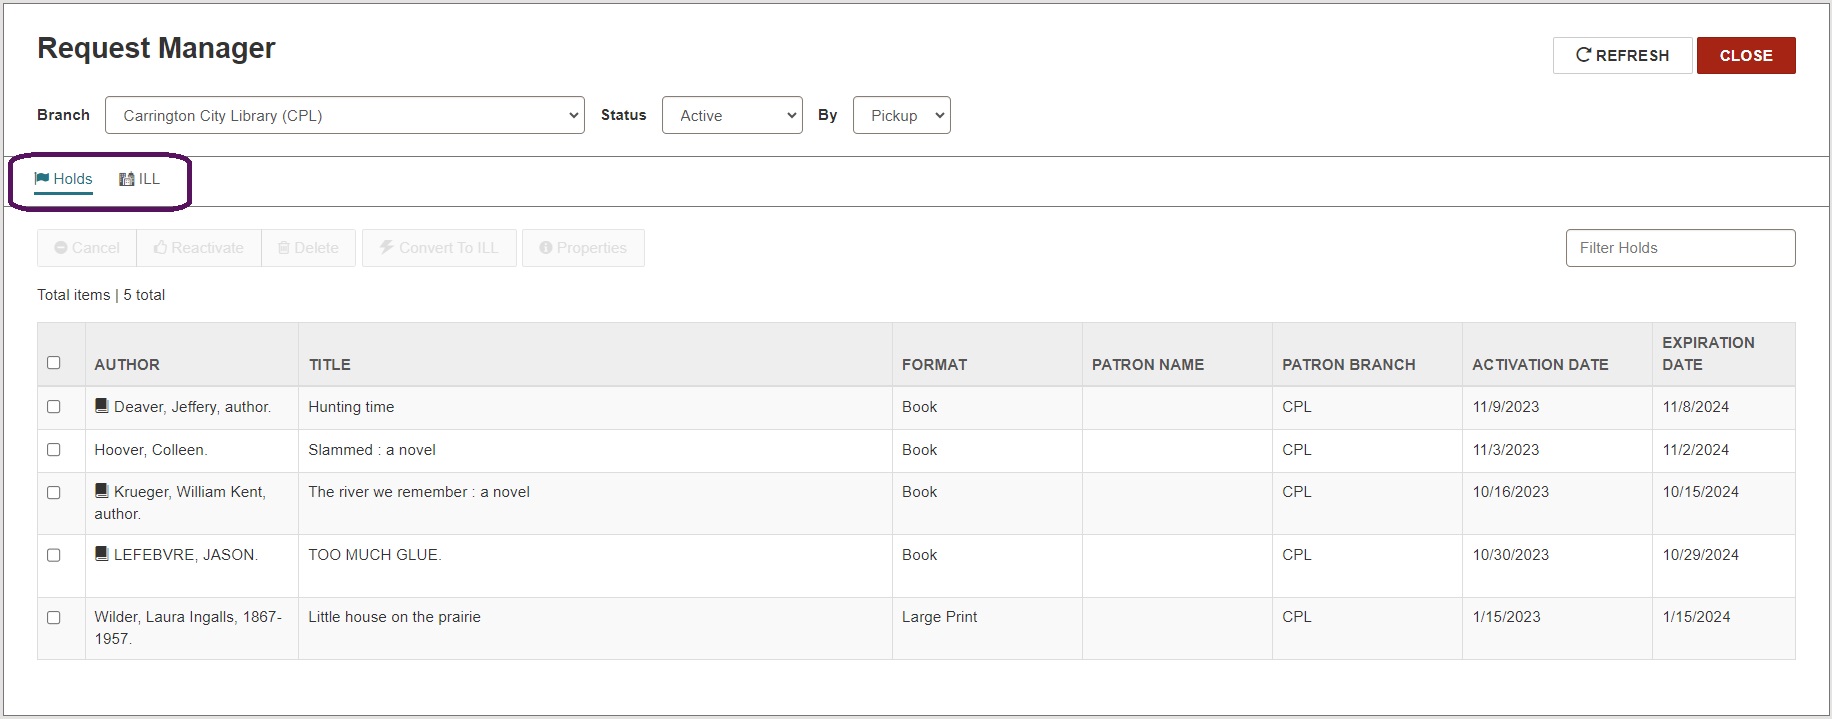
- Holds tab: lists materials being requested from other ODIN libraries.
- ILL tab: lists materials being requested from outside the ODIN system.
- You may sort each column by clicking the heading. One click will automatically sort the column in Ascending order (arrow pointing up will appear). Two clicks will automatically sort the column in Descending order (arrow pointing down will appear). This applies to every column in the list.
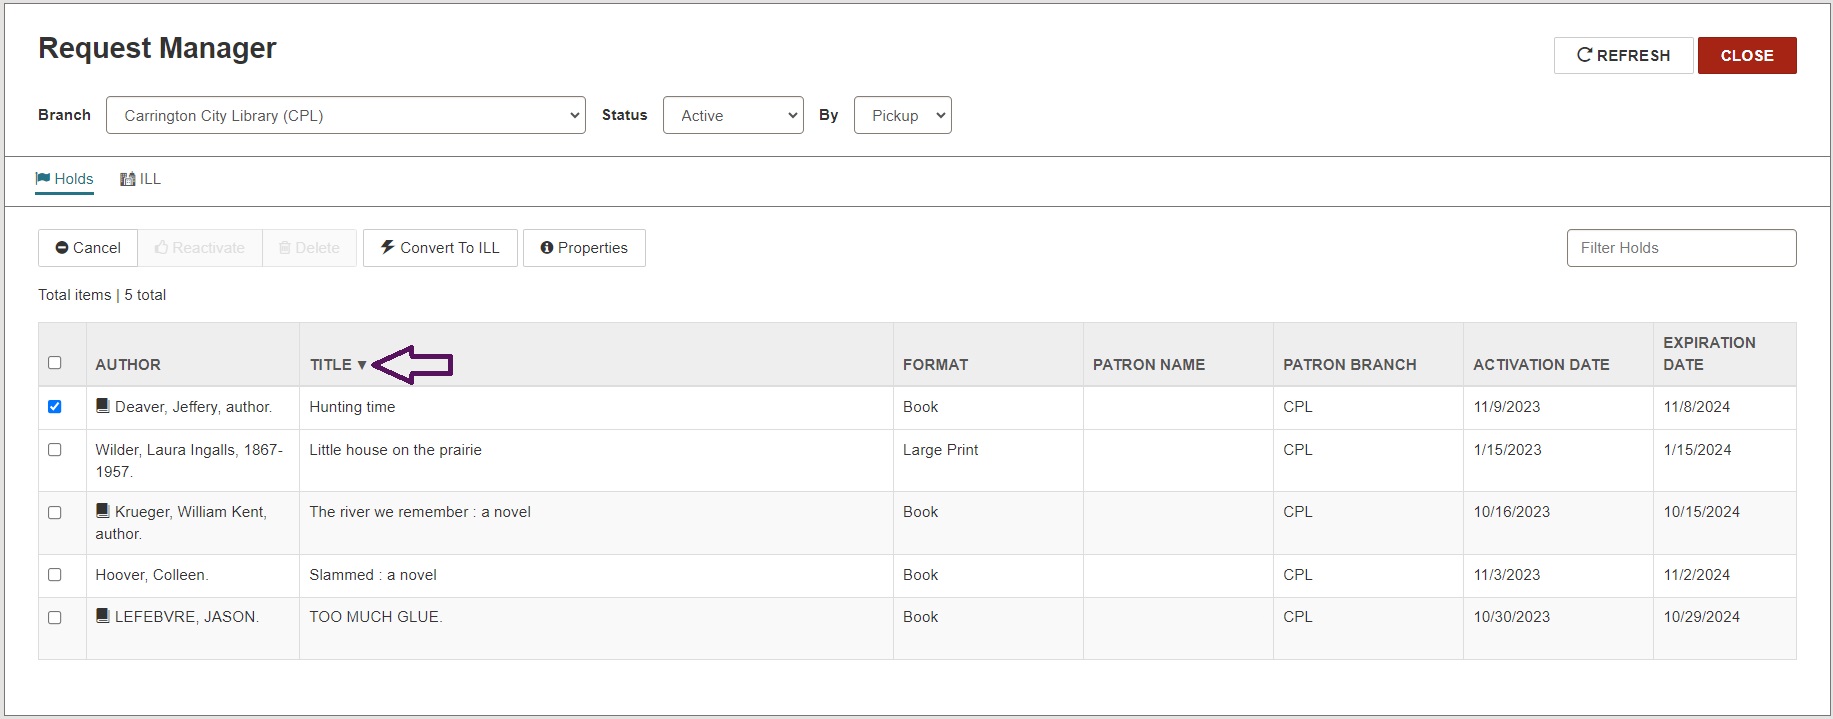
- If the list is filtered to show Active requests, clicking the check box next to one or more requests will enable the option to Cancel the request(s) or Convert to ILL.
- If the list is filtered to show Canceled requests, clicking the check box next to one or more requests will enable the options to Reactivate or Delete the request(s).
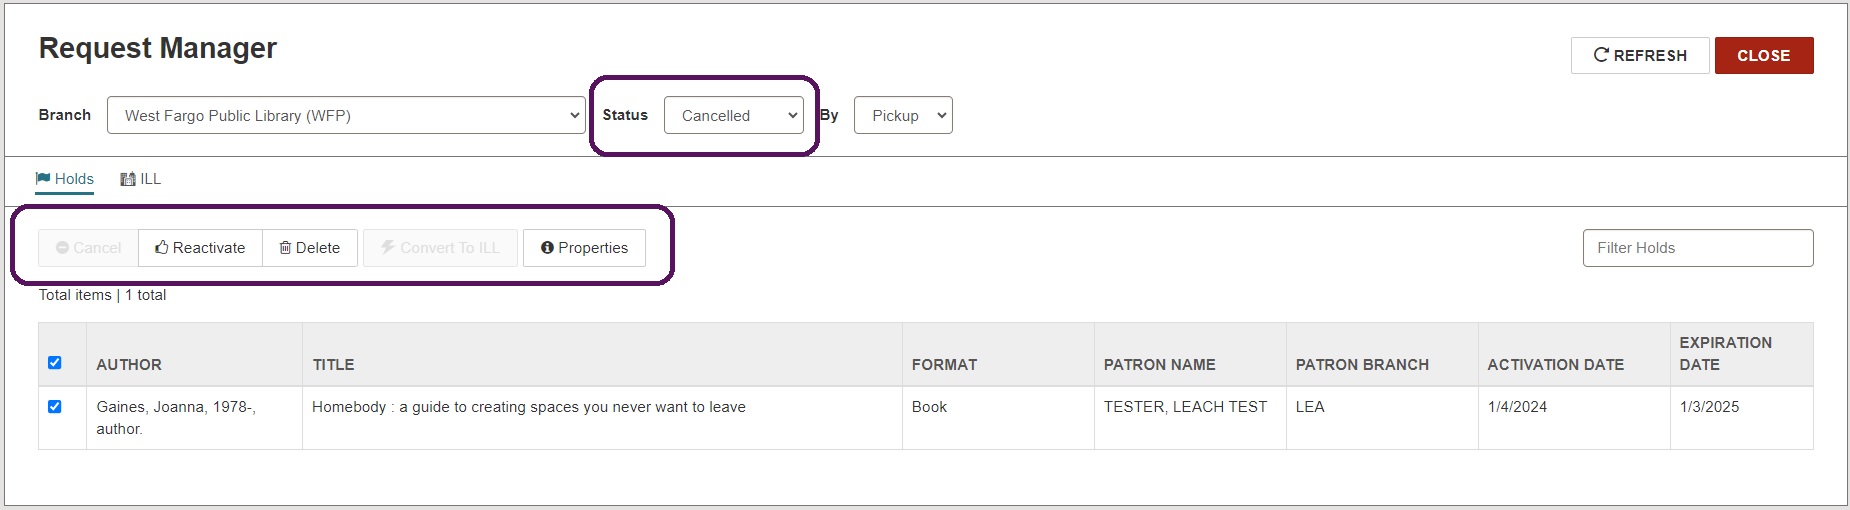
- As you continue to filter by status, your options for managing the requests will change accordingly.
Hold Status Reference:
- Active = When a hold request is placed in the queue, its status is automatically set to Active. This indicates Polaris is actively looking for items to fill the request and items can be trapped to fill it. You can cancel an active request or convert it to an ILL.
- Cancelled = Cancelled hold requests remain in the database and are visible on Polaris workforms. A Cancelled request cannot be filled; however, you can reactivate or delete it.
- Expired = If a hold request is not filled within the specified period of time, the request status automatically changes to Expired. (The current date is later than the Expiration date on the Hold Request workform.) An Expired request cannot be filled; however, it can be reactivated, deleted, or converted to an ILL.
- Held = Indicates an item has been trapped to fill the request and is ready for the patron to pick up.
- Inactive = Indicates the request has an activation date in the future. The request does not appear in the queue and cannot be trapped until activated. You can cancel or delete an Inactive request or convert it to an ILL.
- Located = Optional step used during picklist processing. The Located status allows staff to indicate an item has been found to fill a request. Staff can select the entry from the Pending tab and choose Located to indicate the item has been located on the shelf.
- Not Supplied = If no items can fill the request (i.e. if no items are attached to the bibliographic record), the status becomes Not Supplied. You can delete the request or convert it to an ILL. You can reactivate a Not Supplied request, but if the reason it was not supplied has not changed, the request becomes Not Supplied again.
- Out = Indicates an item has been linked to the hold request and has been checked out. This status is useful in keeping track of items requested and circulated using Borrow by Mail.
- Pending = When an Active request can be filled by an Available item at your library, or the request has been routed to another library that has an Available item, the status changes to Pending. If there are no readily Available items, the request keeps its Active status and items can still be trapped to fill the request.
- Shipped = Indicates an item was trapped at a branch other than the pickup branch and is being shipped to its destination.
Unclaimed = If the requesting patron does not pick up the held item within a specified period of time, the hold request status automatically changes from Held to Unclaimed.
Print Settings for Transfer Slips:
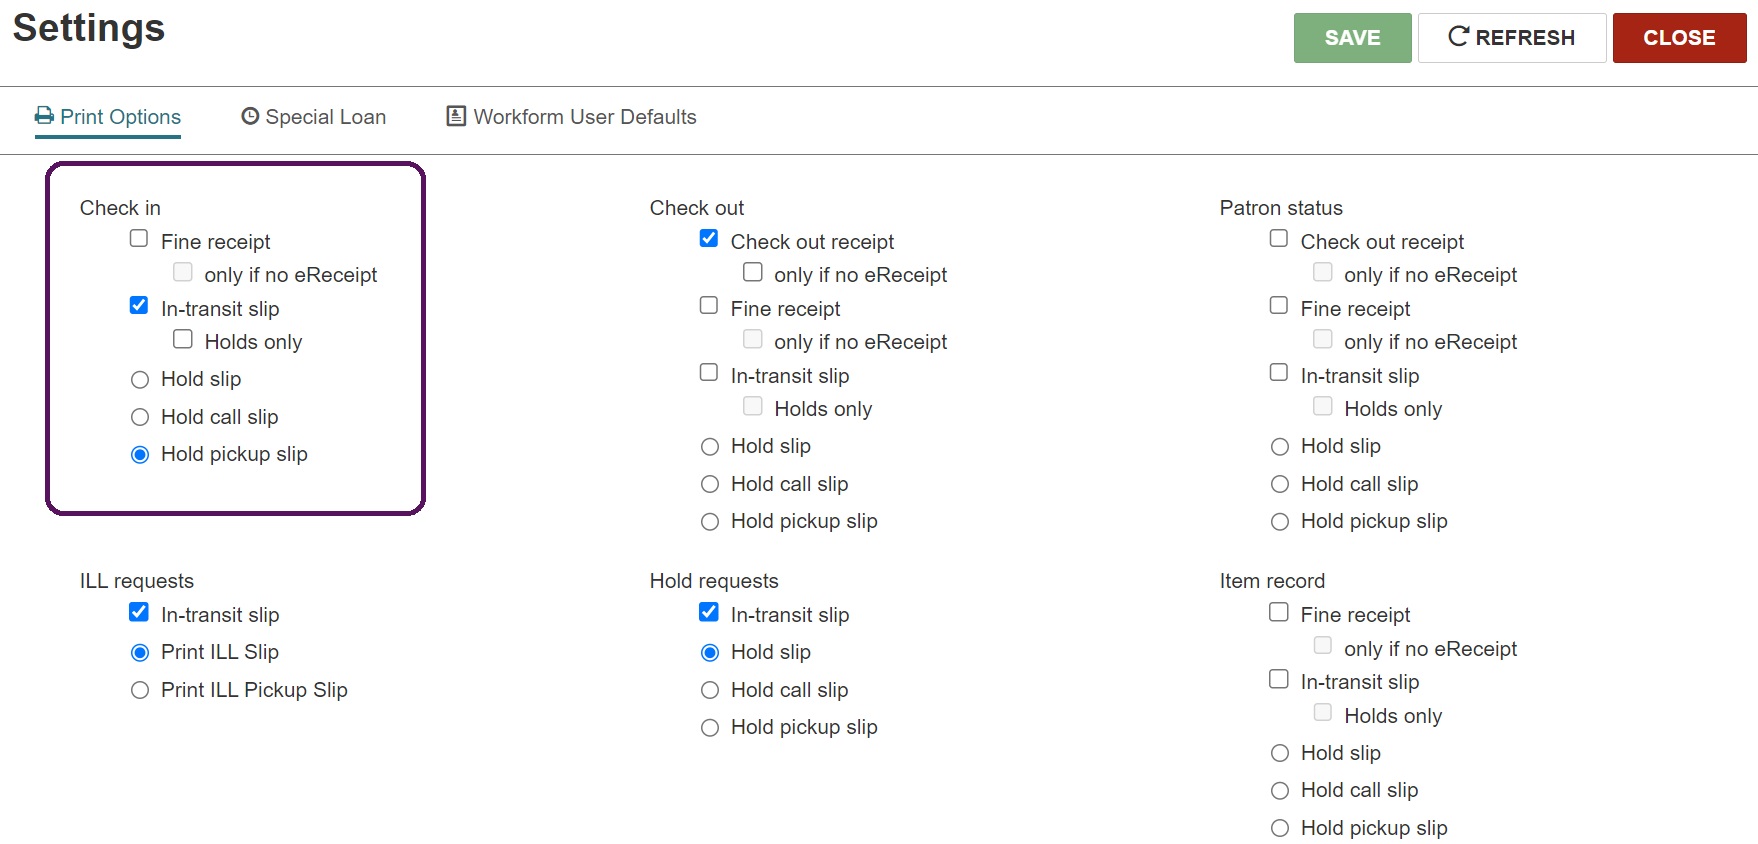
To ensure Hold Transfer Slips print, your workstation options must be configured.
- In the upper right corner of the screen, click on your username and choose Settings in the drop-down menu.
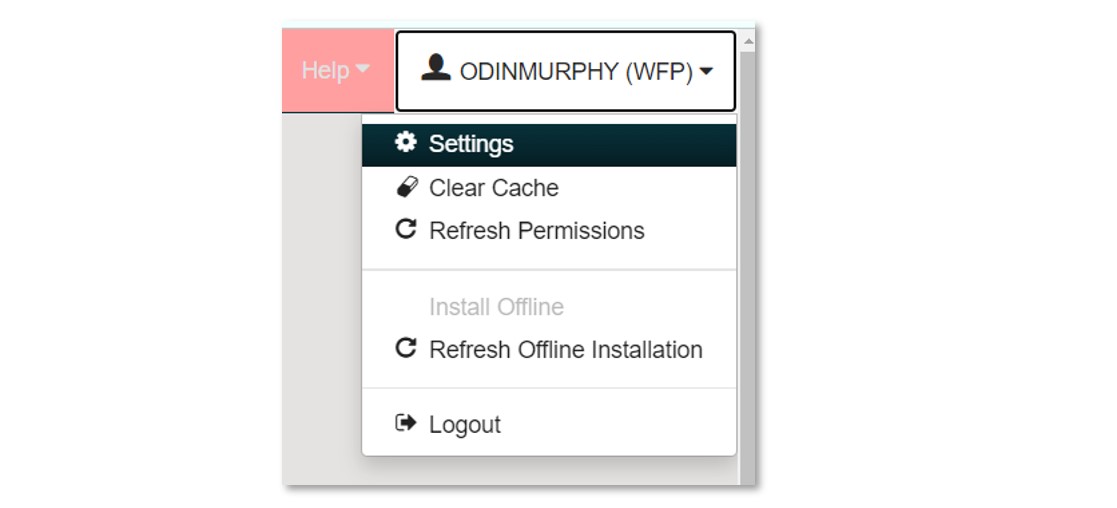
- On the settings page under Check In, make sure the box next to In-Transit slip is checked.